
Every thriving garden starts beneath the surface. At Konzept Garden, we've designed and built enough outdoor spaces across Malaysia to know that soil quality determines everything, from how well your plants establish to how vibrant they look years down the road. That's exactly why learning how to compost at home for gardening is one of the most practical skills any homeowner can pick up.
Composting turns your kitchen scraps and yard waste into nutrient-rich organic matter that feeds your soil naturally. No expensive fertilizers, no synthetic chemicals, just a straightforward process that works with nature. For Malaysian gardens especially, where heat and humidity can deplete soil fast, homemade compost acts as a steady source of nourishment that keeps your plants healthy through every season.
This guide walks you through the full process, step by step. You'll learn what materials to use, how to layer them correctly, how to maintain your compost pile, and when and how to apply the finished product to your garden beds. Whether you're working with a small patio planter or a full backyard landscape, composting fits right in.
What composting is and what you need
Composting is the process where organic materials break down into a dark, crumbly substance called humus. Microorganisms, worms, and fungi do most of the work, consuming your scraps and yard waste and converting them into stable, nutrient-dense matter your soil can absorb directly. Think of it as recycling, but the end product feeds your garden instead of a landfill.
How composting works
At its core, composting relies on a balance of four things: carbon-rich materials (called browns), nitrogen-rich materials (called greens), moisture, and airflow. Browns provide energy for microbes, greens supply protein to help them multiply, water keeps the pile active, and air prevents it from turning into a slow, anaerobic mess. When these four elements are in the right ratio, your pile heats up internally, sometimes reaching 60 to 70 degrees Celsius, which speeds decomposition and kills weed seeds and pathogens.
Getting this balance right from the start saves you weeks of troubleshooting later.
In Malaysia's climate, the heat and humidity actually work in your favor. Decomposition happens faster here than in cooler countries, which means you can produce finished compost in as little as six to eight weeks with an active pile. The challenge is managing moisture during heavy rain, which Step 3 covers in detail.
What goes in and what stays out
Not every material belongs in your compost bin. Using the wrong inputs either slows decomposition or introduces harmful bacteria and pests into your garden. Here's a clear breakdown:
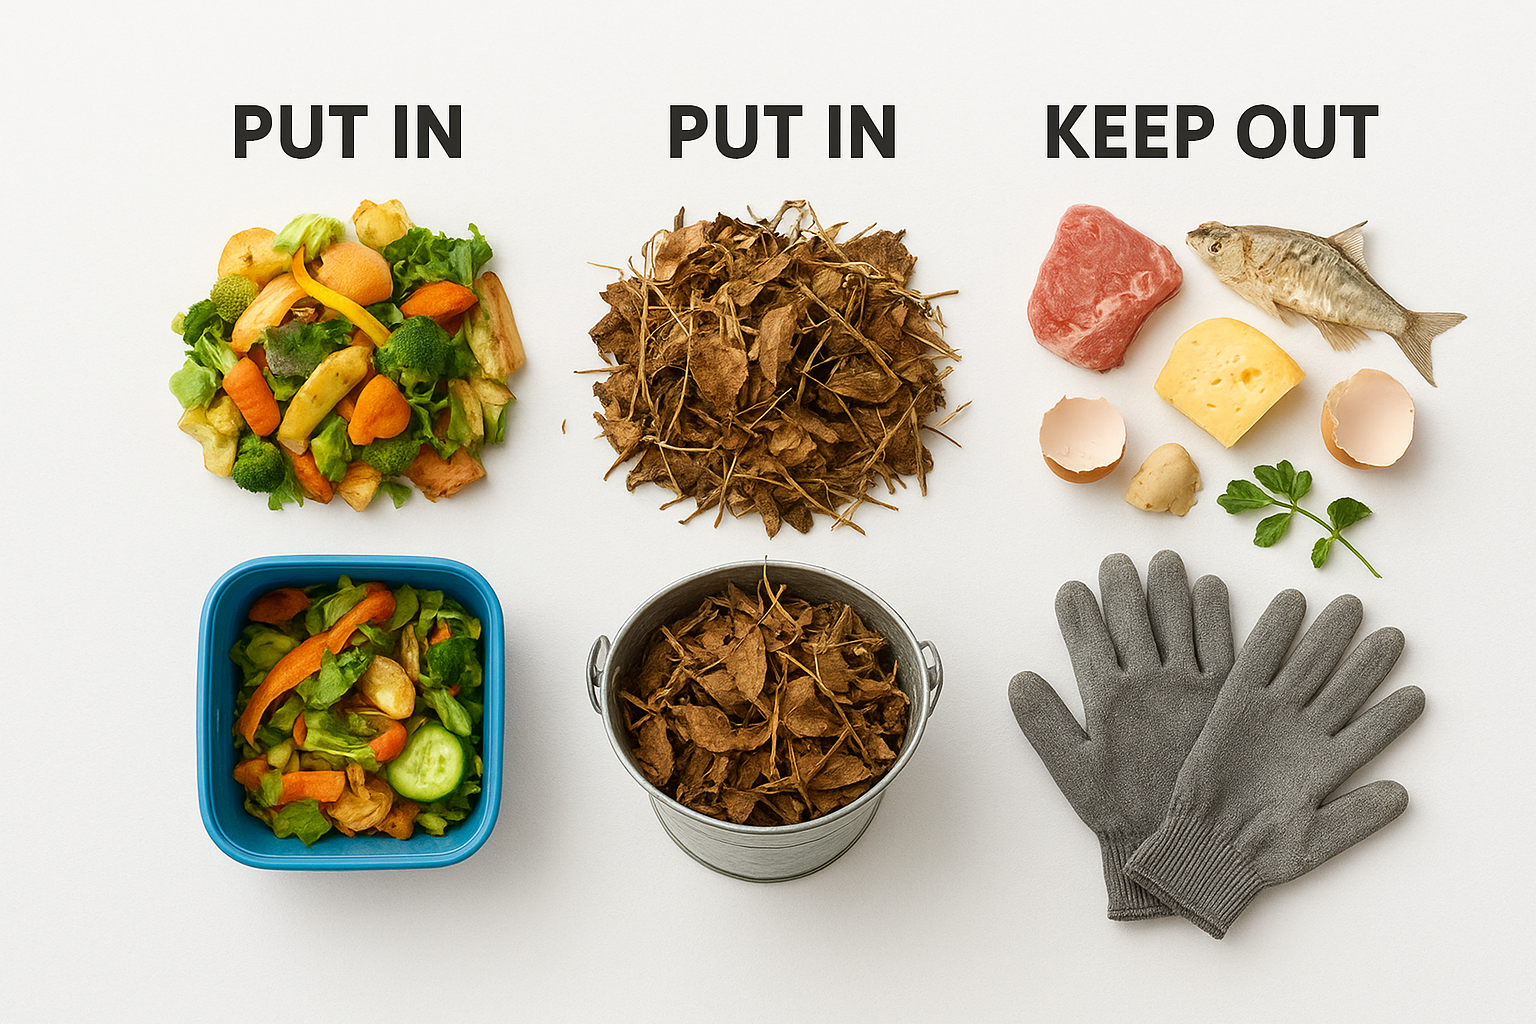
| Put In (Greens) | Put In (Browns) | Keep Out |
|---|---|---|
| Fruit and vegetable scraps | Dried leaves | Meat and fish |
| Coffee grounds and filters | Cardboard (torn up) | Dairy products |
| Fresh grass clippings | Paper bags | Cooked food with oil |
| Plant trimmings | Newspaper (non-glossy) | Pet waste |
| Plain rice or cooked grains (small amounts) | Dry straw | Diseased plants |
Aim for a ratio of roughly 3 parts browns to 1 part greens by volume. In practice, every time you add a bucket of kitchen scraps, layer three buckets of dried leaves or torn cardboard on top.
What equipment you actually need
Learning how to compost at home for gardening doesn't require expensive gear. A functional setup needs just a few basics:
- A compost bin or designated pile area (minimum 1 cubic meter to retain heat effectively)
- A garden fork or compost aerator tool for turning the pile
- A watering can or hose with a gentle spray setting
- A kitchen scrap container with a lid for collecting daily waste
- A pair of gloves for handling raw materials safely
You can buy a purpose-built bin or construct one from wooden pallets or wire mesh. Both work equally well in Malaysian conditions. What matters more is placement and how consistently you manage the pile, which the steps below cover in full.
Step 1. Choose a composting method and spot
Before you add a single scrap to a pile, you need to decide which composting method fits your space and how much time you can realistically commit each week. This decision shapes everything, from how fast you get finished compost to how well you manage moisture during Malaysia's wet season. Picking the wrong method for your situation leads to a neglected pile, unpleasant smells, and wasted effort, so take five minutes to work through the options below.
Pick the right composting method
Three methods work well for home gardeners learning how to compost at home for gardening. Each suits a different yard size, weekly time input, and material volume. Review the table below and match the method to your actual setup:
| Method | Best For | Time to Finish |
|---|---|---|
| Open pile | Large yards with plenty of browns and greens | 3 to 6 months |
| Enclosed bin | Small gardens or patio setups | 6 to 8 weeks |
| Worm bin (vermicomposting) | Apartments, balconies, or indoor use | 4 to 6 weeks |
An enclosed bin is the most practical choice for most Malaysian homeowners because it keeps pests out, retains moisture better during dry spells, and stays manageable in smaller outdoor spaces. A worm bin suits anyone who lives in a condo or apartment with no yard access but still wants to turn daily kitchen scraps into something useful for potted plants and garden beds.
If you're just starting out, an enclosed bin gives you the most control with the least guesswork.
Find the best spot in your garden
Placement directly affects how fast your pile breaks down and how much hands-on attention it needs each week. You want a spot with partial shade, since full sun in Malaysia will dry out your pile too quickly between turnings, and full shade slows the microbial activity you need for fast decomposition.
Set your bin or pile on bare soil rather than concrete or tile so worms and beneficial microbes can travel up into the pile from the ground below. Keep it within comfortable walking distance of your kitchen door so you actually use it daily, but position it at least two meters away from seating areas or windows. A flat, well-drained location prevents waterlogging during heavy downpours, which happen frequently from April through October across most parts of Malaysia.
Step 2. Build your pile or bin the right way
Once your bin is in position, how you build the initial pile determines how quickly you get usable compost. A randomly dumped heap of scraps breaks down eventually, but a properly layered pile gives microbes the conditions they need to work fast and efficiently. This step is where most beginners learning how to compost at home for gardening see the biggest difference in results.
Layer your materials correctly
Think of your pile as a lasagna of alternating materials, where each layer serves a specific function. Browns create air pockets that let oxygen circulate, greens supply the nitrogen microbes consume to reproduce, and thin soil layers introduce the microorganisms that kick off decomposition. Follow this layering template every time you add new material:
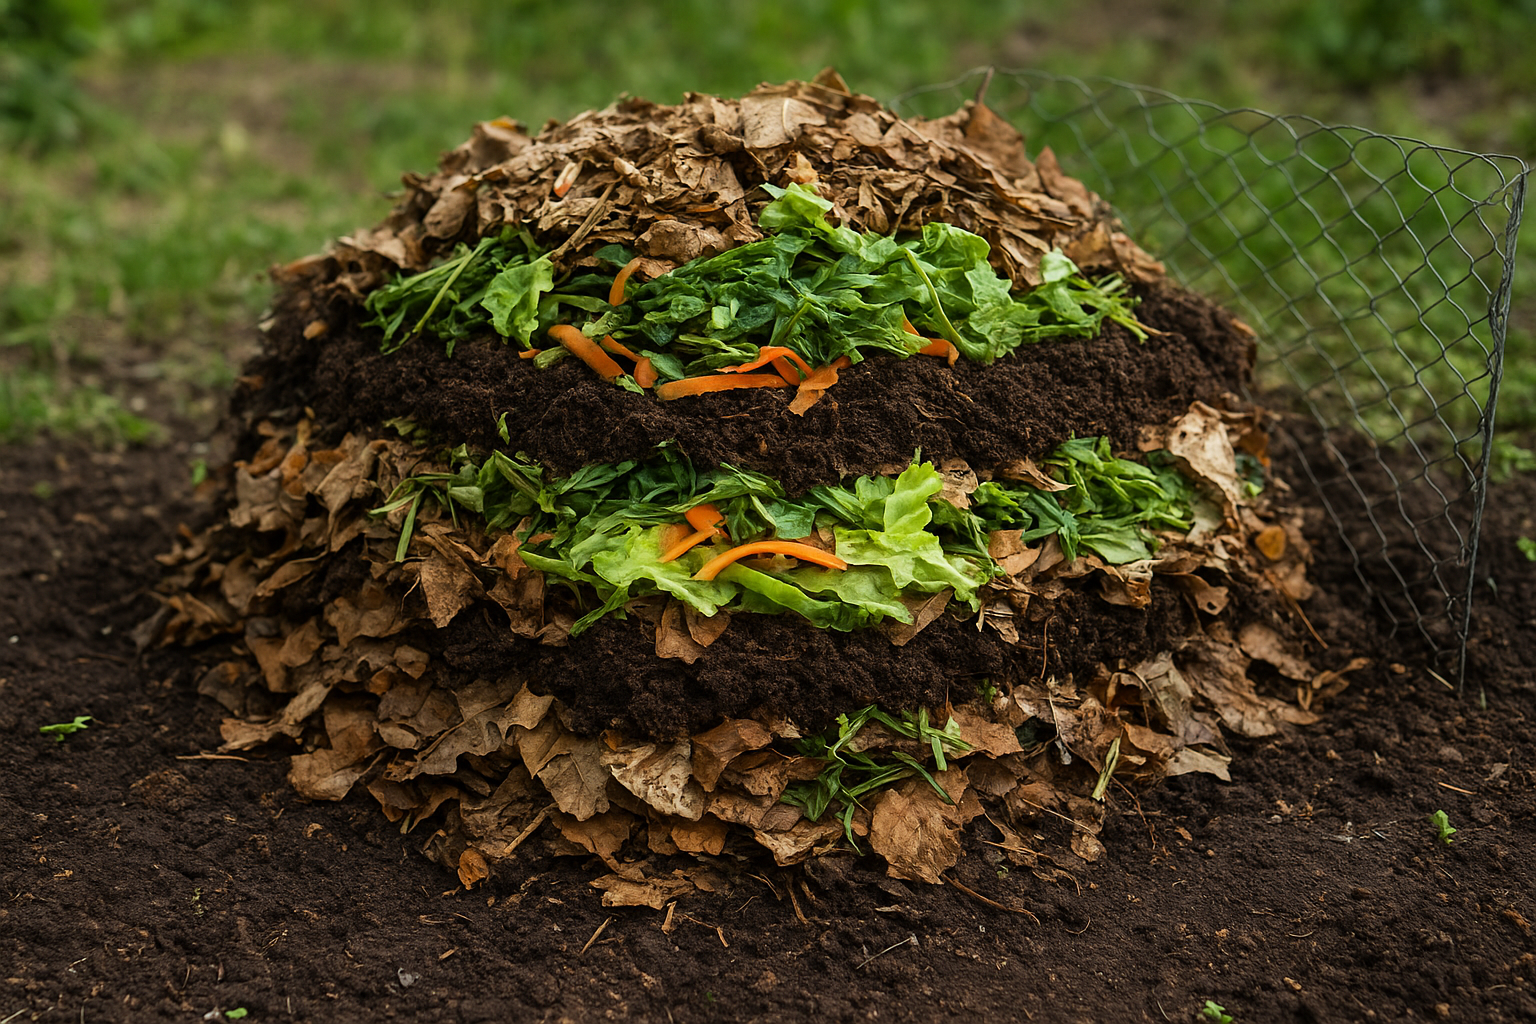
Compost pile layering template:
- Start with a 10 cm base layer of coarse browns (dry leaves, small twigs, torn cardboard) directly on bare soil
- Add a 5 cm layer of greens (vegetable scraps, fresh clippings, coffee grounds)
- Sprinkle a thin 1 to 2 cm layer of finished compost or garden soil over the greens
- Repeat the sequence until your bin is three-quarters full
- Finish with a top layer of browns to reduce odor and discourage flies
Keeping browns on top acts as a natural lid that controls both smell and moisture loss between additions.
Get the moisture level right
Your pile needs consistent moisture to stay active, but too much water kills the aerobic microbes you depend on. Squeeze a handful of material from the middle of your pile. It should feel like a wrung-out sponge: damp but not dripping. If it feels dry and dusty, add water with a gentle spray and turn the pile immediately. If it feels soggy, layer in dry cardboard or dried leaves and leave the bin open on a dry day to let excess moisture escape. In Malaysia, check moisture levels after every heavy downpour since rain can waterlog an uncovered pile within hours.
Step 3. Maintain it, fix problems, and stop pests
Once your pile is built, consistent maintenance is what separates a productive compost bin from a neglected heap that smells and attracts pests. The good news is that once you understand how to compost at home for gardening, the weekly effort stays under 15 minutes for most home setups.
Turn your pile on a schedule
Turning introduces fresh oxygen into the pile, which aerobic microbes need to keep working at full speed. Use a garden fork to lift material from the outer edges toward the center, and push the cooler outer material inward where temperatures are highest. Turn your pile every five to seven days for the fastest results, or every two weeks if you prefer a more passive approach. After each turning, check moisture and adjust with water or dry browns as needed.
Fix common problems fast
Even a well-built pile runs into issues. The table below covers the most common problems you'll encounter and the fix for each:
| Problem | Likely Cause | Fix |
|---|---|---|
| Bad smell (rotten eggs) | Too wet or too little air | Turn the pile and add dry browns |
| No heat or activity | Too dry or too many browns | Add greens and water, then turn |
| Pile is slimy | Too many greens | Layer in cardboard or dried leaves |
| Very slow breakdown | Materials too large | Chop scraps smaller before adding |
Catching these problems early keeps your pile on track and prevents the kind of buildup that becomes very difficult to recover from.
Keep pests away
Rats, cockroaches, and fruit flies are the most common pest issues in Malaysian gardens, and all three are attracted to exposed food scraps. Bury fresh kitchen scraps at least 15 cm deep inside the pile rather than leaving them on top. Always finish each addition with a thick layer of browns to seal the surface. If rats are persistent, switch to a fully enclosed bin with a solid base and a latched lid. Avoid adding cooked food, meat, or oily scraps entirely, since these draw the most unwanted attention from animals looking for an easy meal.
Step 4. Finish the compost and use it in your garden
After weeks of turning, layering, and managing moisture, your pile will eventually stop heating up and start looking completely different from what you put in. Knowing when compost is truly finished is the final critical step in understanding how to compost at home for gardening, because applying unfinished compost to plant roots can cause more harm than good.
How to tell when compost is ready
Finished compost has three clear characteristics: it looks dark brown and crumbly, it smells like fresh earth rather than decomposing food, and you can no longer identify any of the original materials you added. If you still see recognizable vegetable scraps or leaf fragments, give the pile another two to three weeks before testing again. For Malaysian conditions, most active bins reach this stage within six to eight weeks from the last major material addition.
If your compost still smells sour or looks stringy, it needs more time regardless of how long it has been sitting in the bin.
How to apply compost to your garden
Once your compost is ready, application method depends on what you're growing and where you're growing it. Use the guide below to match the right technique to your specific garden situation:
| Garden Type | Application Method | Amount |
|---|---|---|
| Garden beds | Spread 5 to 8 cm layer on surface, then dig in | Once per season |
| Potted plants | Mix 20 to 30% compost into potting mix | At planting or repotting |
| Lawn or turf areas | Apply a thin 1 cm top dressing and water in | Every 3 to 4 months |
| New planting holes | Add one handful to the hole before placing the plant | Per plant |
Work compost into the top 10 to 15 cm of soil rather than burying it deeper, since most plant roots and beneficial soil microbes concentrate in this upper zone. Water your garden bed thoroughly after applying so the nutrients begin moving into the soil right away.

Next steps for a healthier garden
Now that you know how to compost at home for gardening, you have a practical system that improves your soil structure, plant health, and long-term garden resilience. The results build on themselves: better soil grows stronger plants, stronger plants need less intervention, and less intervention means a garden that practically manages itself once established.
Start small. Pick one composting method from Step 1, set up your bin this week, and commit to adding kitchen scraps consistently for the first 30 days. That single habit creates the momentum that carries through every step that follows.
Your outdoor space deserves more than healthy soil. If you want expert help designing and transforming your garden into something you're genuinely proud of, our team at Konzept Garden is ready to help. Get in touch with our landscape design team and let's talk about what your outdoor space could become.