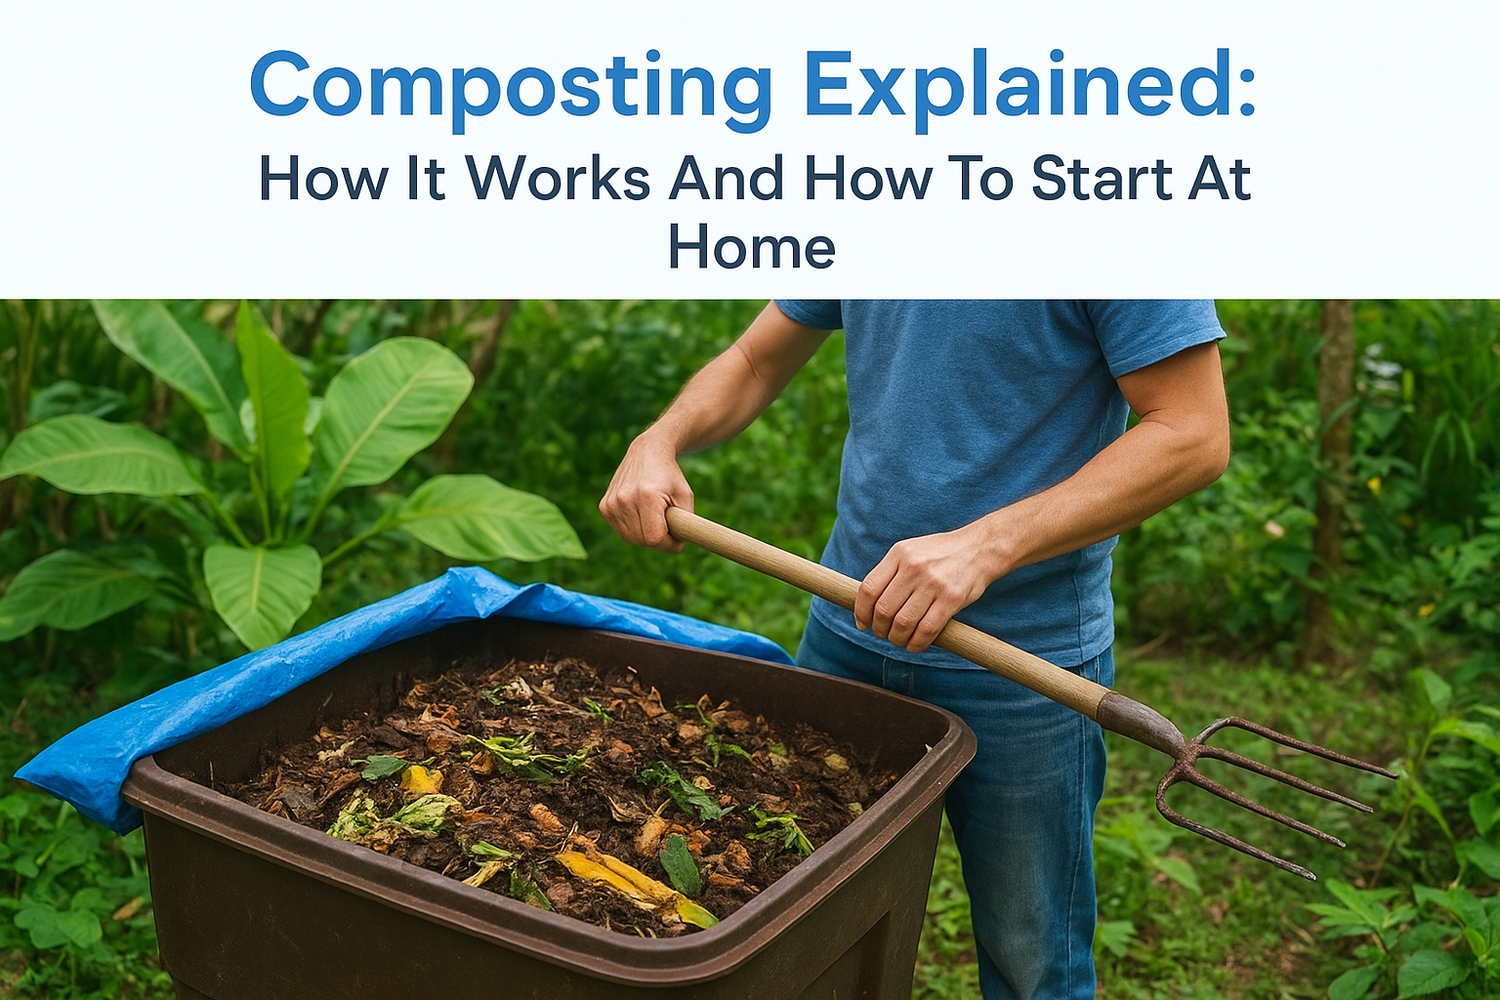
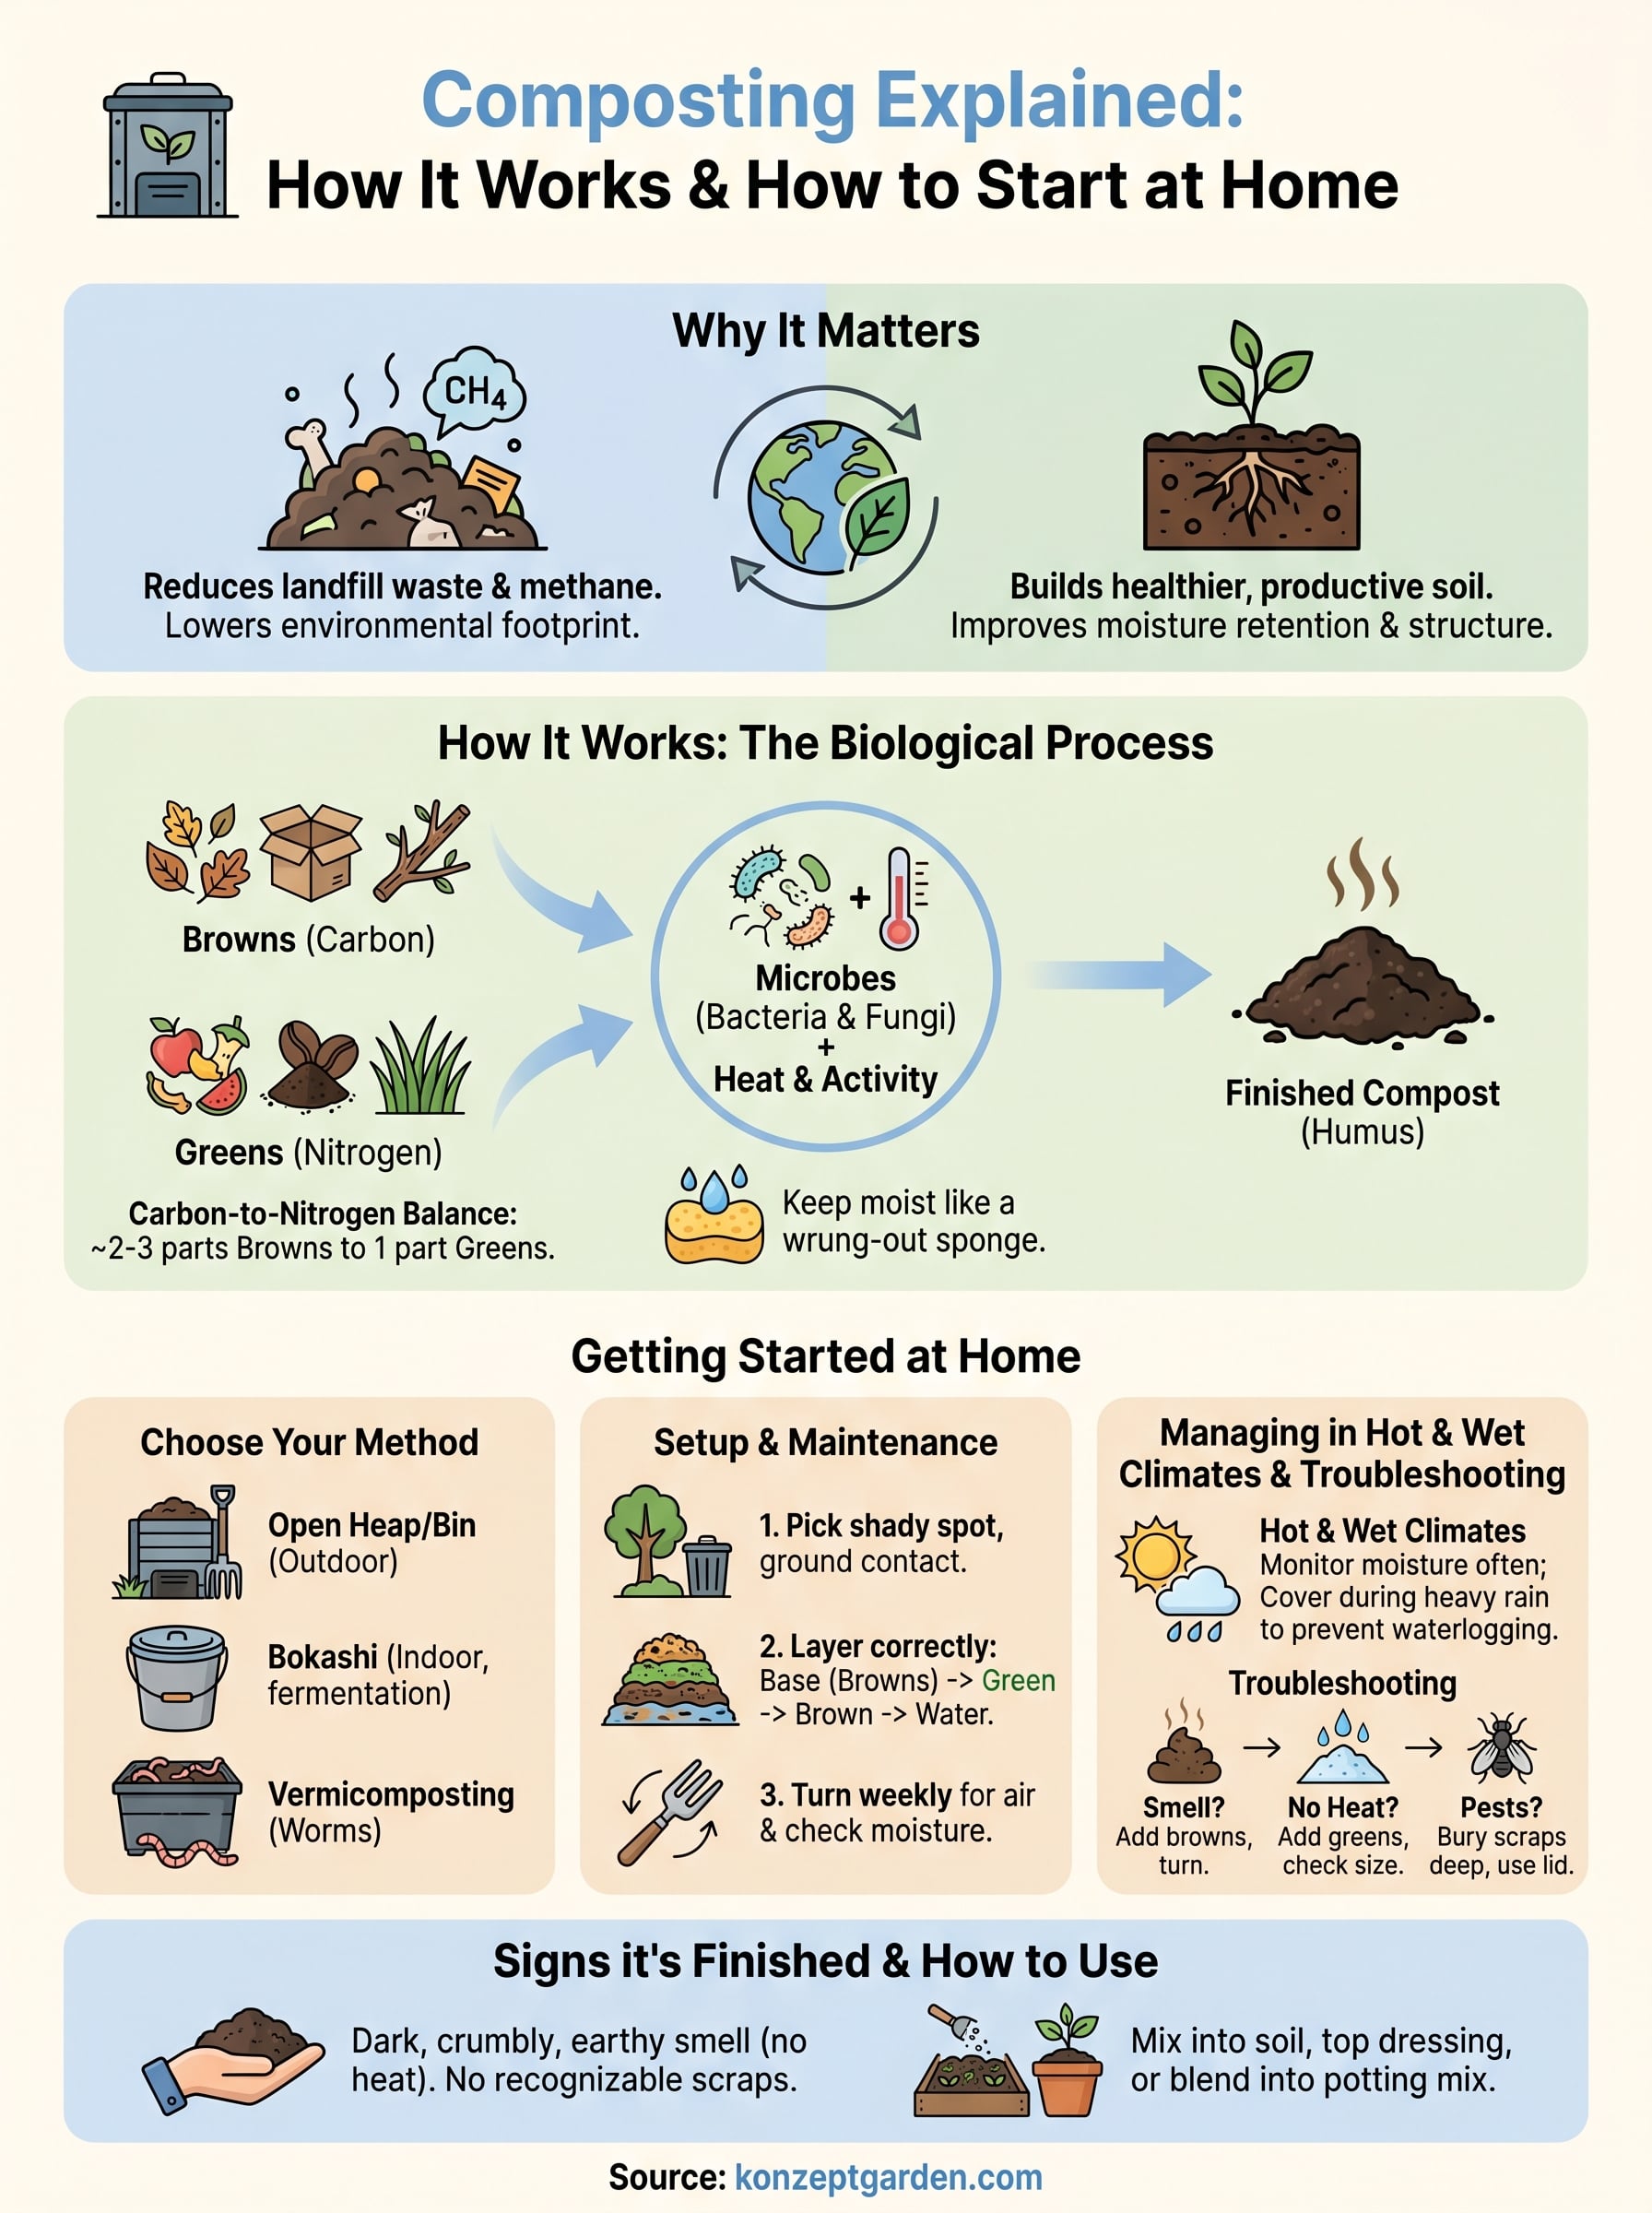
Every thriving garden starts below the surface. Healthy soil feeds the roots, supports the microorganisms, and holds the moisture that keeps plants alive through Malaysia's intense heat and heavy monsoon rains. That's exactly why we put together this guide on composting explained, because at Konzept Garden, we've seen firsthand how soil quality determines whether a landscape design succeeds or struggles in the long run.
Composting is the natural process of recycling organic waste, food scraps, yard trimmings, fallen leaves, into a dark, nutrient-rich material that improves virtually any soil it touches. It reduces what goes to landfill, cuts the need for chemical fertilizers, and gives your garden a biological advantage that store-bought alternatives simply can't replicate. Whether you're maintaining a small home garden or caring for a professionally designed landscape, composting is one of the most practical skills you can pick up.
In this article, you'll learn what composting actually is at a biological level, why it matters for the environment, and, most importantly, how to start doing it at home with materials you probably already have. No prior experience needed. Just a bit of space, some patience, and the willingness to let nature do its thing.
Why composting matters
Organic waste makes up a significant share of household trash. In Malaysia, food waste alone accounts for roughly 45% of total municipal solid waste, according to data from the Solid Waste Management and Public Cleansing Corporation. When that waste goes to a landfill rather than a compost bin, it doesn't simply decompose quietly. It gets buried under layers of other trash, starved of oxygen, and breaks down anaerobically, releasing methane, a greenhouse gas far more potent than carbon dioxide over a short time frame.
Composting cuts your environmental footprint
When you compost at home, you intercept that waste before it reaches a landfill. The material decomposes aerobically instead, which means beneficial microbes break it down using oxygen and produce carbon dioxide, water, and stable organic matter rather than methane. That's a meaningful difference for the atmosphere. Beyond gas emissions, keeping organic material out of landfills also reduces the volume of leachate, the liquid that seeps through waste piles and can contaminate groundwater if containment systems fail.
Composting at home is one of the most direct actions you can take to reduce your household's contribution to methane emissions from organic waste.
Malaysia's climate adds another layer to this issue. Heavy monsoon rains accelerate organic decomposition in open landfills, which intensifies both gas and leachate production. By composting your kitchen scraps and garden trimmings at home, you reduce the pressure on those waste systems and take real responsibility for what your household generates. The scale of one household may seem small, but the cumulative effect across communities is substantial.
It builds healthier soil without synthetic inputs
Beyond the environmental case, composting explained in practical terms comes down to one straightforward result: it makes your soil dramatically more productive. Finished compost improves soil structure by binding particles together into aggregates, which creates the loose, well-aerated texture that plant roots need to grow deep and access water efficiently. Sandy soils, common across parts of Malaysia, drain too fast and fail to hold nutrients. Clay-heavy soils compact easily and suffocate roots. Compost addresses both problems by introducing organic matter that acts as a natural buffer between extremes.
Healthy compost is also teeming with beneficial microorganisms, including bacteria, fungi, and protozoa, that work continuously in the soil to process nutrients and make them available to plant roots. Applying compost regularly means you're not just delivering a one-time nutrient boost. You're building a living biological system that suppresses certain soil-borne pathogens, improves moisture retention during dry spells, and strengthens your garden's long-term resilience. Chemical fertilizers deliver a quick hit of specific nutrients but leave the underlying soil biology untouched and unchanged.
The financial case for home composting
Starting a compost system requires very little upfront investment, and the savings accumulate steadily over time. Bags of commercial potting mix and soil amendments carry real costs, especially when you're maintaining a large garden or replenishing raised beds after each growing season. Finished compost can replace or supplement those purchases entirely, reducing how often you need to buy in external inputs. You can also lower your reliance on synthetic fertilizers by switching to compost as your primary soil amendment, since it releases nutrients slowly and steadily rather than demanding frequent reapplication.
For homeowners who have invested in a professional garden or landscape design, protecting that investment over time is just as important as the initial work. Consistent compost application keeps the soil in good working condition, reduces plant stress during Malaysia's dry periods, and helps your garden continue performing at the level it was designed to achieve.
How composting works
At its core, composting is a biological process driven by millions of microorganisms, primarily bacteria and fungi, that consume organic matter and convert it into simpler, stable compounds. These organisms need four things to thrive: carbon, nitrogen, moisture, and oxygen. When you supply all four in the right proportions, decomposition moves quickly and produces a finished product your soil absorbs readily. When one element is out of balance, the process slows, smells, or stops entirely.
The organisms doing the work
The microorganisms inside your compost pile operate in stages that follow temperature changes as decomposition progresses. Early on, mesophilic bacteria handle the initial breakdown at moderate temperatures, digesting the most accessible organic materials first. As their metabolic activity increases, the pile heats up and thermophilic bacteria take over, thriving at temperatures between 50°C and 70°C. This heat phase destroys most weed seeds and certain pathogens, making your finished compost safe to use around edible plants and ornamental beds. Once the pile cools, fungi and slower-acting bacteria complete the final breakdown into stable humus.
The composting process moves through three recognizable phases:
- Early phase (below 40°C): Mesophilic bacteria begin breaking down soft, accessible material.
- Active phase (50°C to 70°C): Thermophilic bacteria dominate and generate the heat that sanitizes the pile.
- Maturation phase (cooling): Fungi and actinomycetes finish converting raw material into finished, crumbly compost.
Turning your pile every one to two weeks introduces fresh oxygen, which keeps aerobic microbes active and speeds up decomposition significantly.
Browns, greens, and the carbon-to-nitrogen balance
Composting explained at a biological level comes down to two categories of input: browns and greens. Browns are carbon-rich materials such as dry leaves, cardboard, torn paper, and woody stems. They provide the energy that microorganisms consume to function. Greens are nitrogen-rich materials including fruit peels, vegetable scraps, grass clippings, and fresh garden trimmings. Nitrogen supplies the protein that microbes use to build cellular structures and reproduce at the rate needed to sustain active decomposition.
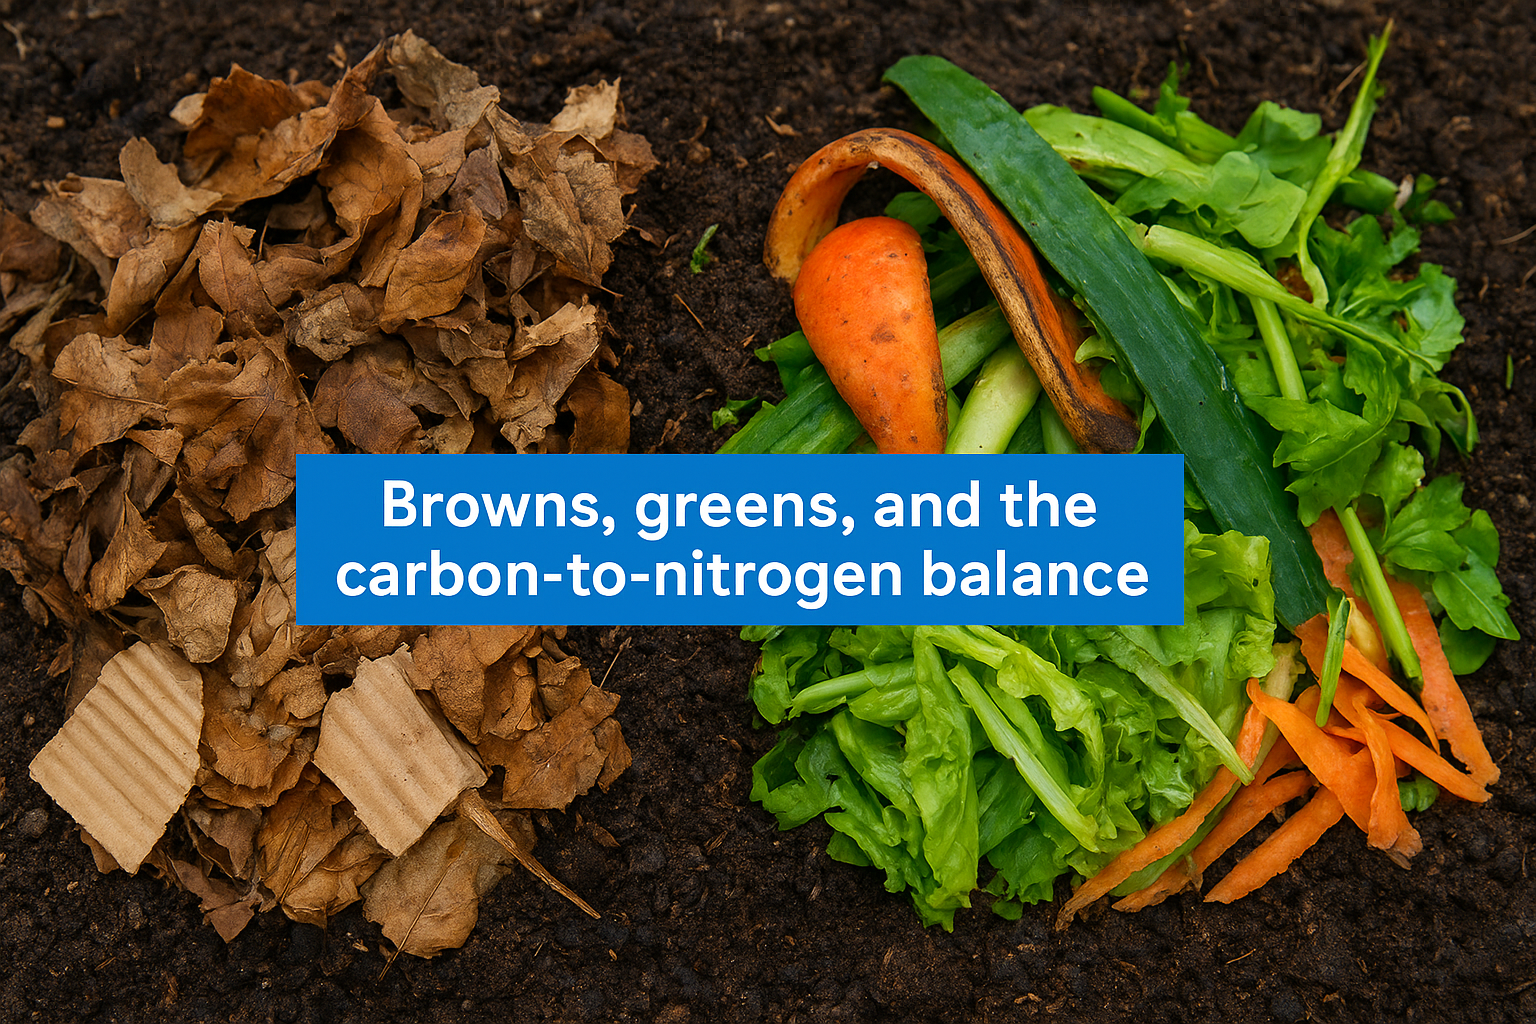
A practical working ratio is two to three parts browns for every one part greens by volume. Getting this roughly right prevents the two most common problems: a pile that smells like ammonia from excess greens, or one that sits completely inactive because there is too little nitrogen. Your pile should also feel consistently damp, similar to a wrung-out sponge, not waterlogged and not dry, so microbes stay hydrated without losing the oxygen flow they depend on.
What you can and cannot compost
Knowing what goes into your bin matters as much as understanding the biology behind the process. The wrong materials can attract pests and create foul odors that make composting feel like more trouble than it's worth. Getting familiar with the accepted and rejected inputs before you start saves you from the most common beginner mistakes and keeps your system running cleanly.
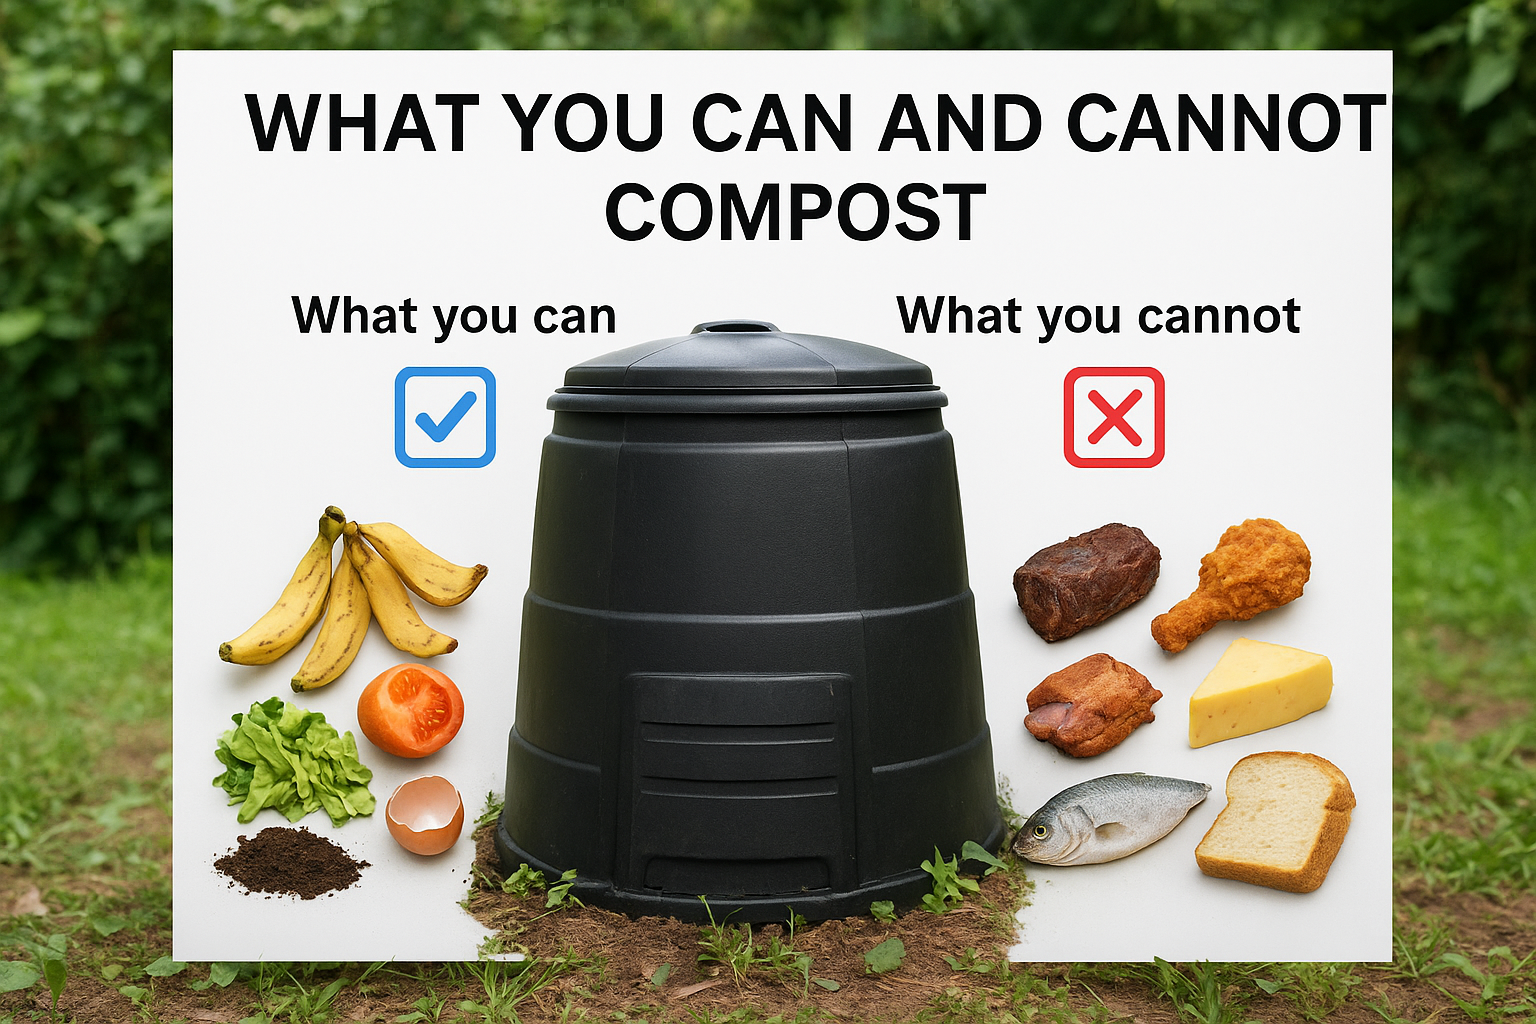
What belongs in your compost bin
Your compost bin thrives on a steady mix of carbon-rich browns and nitrogen-rich greens. For browns, you can add dry leaves, cardboard torn into small pieces, newspaper, paper bags, coconut husks, dried grass, and woody prunings cut short. For greens, fruit and vegetable scraps, coffee grounds, tea bags without staples, fresh grass clippings, and plant trimmings from your garden all work well and decompose quickly in Malaysia's heat.
In Malaysia's tropical climate, fallen leaves and coconut husks are especially useful because they're abundant year-round and give your pile the carbon balance it constantly needs.
Plain cooked rice and bread can technically go into a well-managed pile, though they attract insects more readily than raw produce scraps. If you add them, bury them in the center rather than leaving them exposed on top. Eggshells break down slowly but add calcium and help balance pH over time, so they're worth including despite the pace.
What to keep out of your pile
Some materials cause genuine problems that composting explained at the beginner level often underestimates. Meat, fish, dairy products, and cooked food containing animal fat decompose in ways that produce strong odors and draw rats, flies, and other animals you do not want near your garden. Diseased plant material carries pathogens that may survive unless your pile consistently reaches high thermophilic temperatures, which most home bins rarely sustain long enough.
Pet waste from dogs and cats introduces bacteria, including salmonella, that standard home compost conditions cannot reliably neutralize. Treated or painted wood shavings contain chemical residues that persist in the finished compost and can harm soil biology over time. Weeds that have already gone to seed are risky unless your pile runs consistently hot, since spreading unfinished compost can introduce new weed problems across your beds rather than solving the ones you already have.
Choose a composting method for your home
Not every composting method suits every home or garden. The space you have, the type of waste you generate, and how much time you want to spend managing a system all influence which approach makes sense for you. Understanding your options before you commit saves you from setting up something that doesn't fit your actual lifestyle or property.
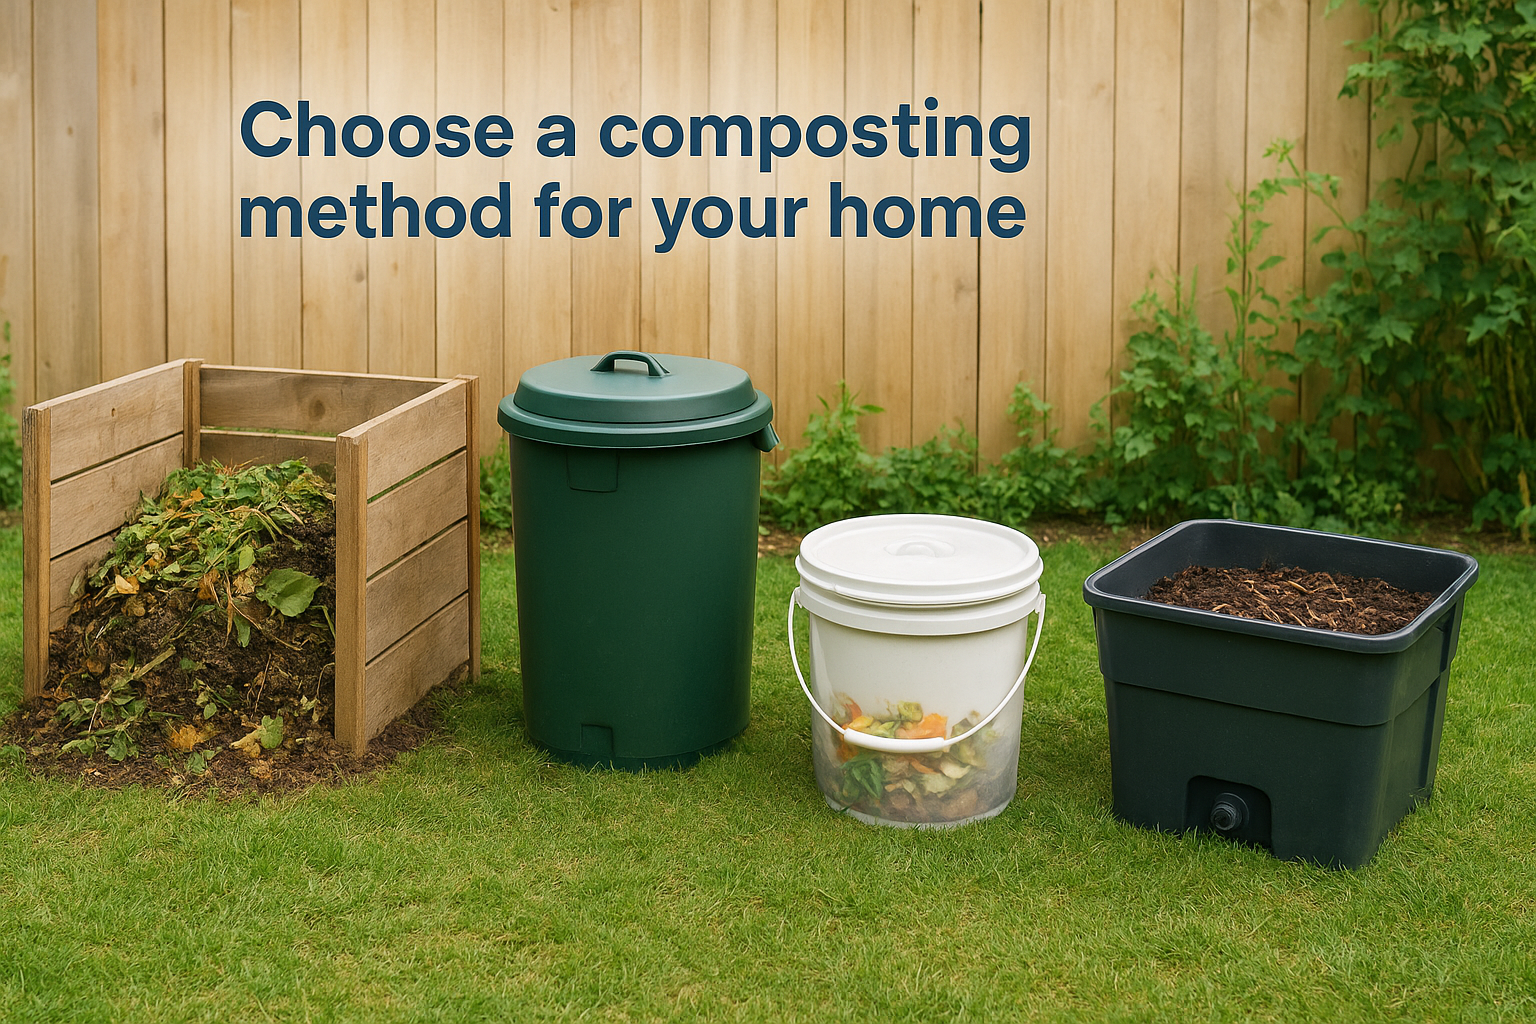
Open heap or bin composting
Open heap composting is the most straightforward approach. You pile organic material directly on the ground in a corner of your garden and turn it regularly to keep oxygen moving through the mass. A three-sided enclosure built from timber, bricks, or wire mesh keeps the pile compact and retains heat better than a loose open heap. This method works well in Malaysian conditions because the warm, humid climate accelerates microbial activity year-round, meaning your pile breaks down faster than it would in a cooler country.
An enclosed plastic bin takes the same approach but seals the top to reduce moisture loss and limit fly access. Most garden centers and hardware stores in Malaysia stock basic compost bins at a reasonable price, and they fit neatly into a corner of a yard or small garden without taking up significant room.
If you have outdoor garden space and generate regular kitchen and yard waste, an open heap or enclosed bin is the most practical and lowest-cost starting point.
Bokashi composting for small spaces
Bokashi is a fermentation-based method that works indoors and handles food waste a standard pile cannot, including small amounts of cooked food and fish scraps. You layer kitchen waste with bokashi bran, a wheat bran inoculated with beneficial microbes, inside a sealed bucket. The fermentation process takes roughly two weeks, after which you bury the pre-digested material in soil where it finishes breaking down within another two weeks.
This approach suits apartment dwellers or anyone without consistent outdoor access. The sealed system produces little odor and fits under a kitchen sink. Composting explained this way removes the need for outdoor space entirely, making it a realistic option for urban homes.
Vermicomposting with worms
Vermicomposting uses red wiggler worms to convert food scraps into castings, one of the most nutrient-dense soil amendments available. A worm bin sits indoors or in a shaded outdoor spot and processes soft food waste faster than a standard heap does. Worm castings improve soil structure and plant uptake measurably, and the liquid that collects in the base of the bin dilutes into a potent liquid fertilizer you can apply directly to your garden beds.
Set up a compost system step by step
Once you've chosen a method that fits your space, the actual setup takes less time than most people expect. Getting the location, layering, and early maintenance right from the start prevents the majority of problems that discourage beginners. Composting explained as a step-by-step process removes the guesswork and gives you a clear path to follow from day one.
Pick your location and container
Position your compost bin or heap in a shaded or partially shaded spot with direct contact with the soil beneath it. In Malaysia's climate, full sun accelerates moisture loss and can dry out your pile faster than microbes can compensate. Ground contact matters because it allows earthworms and beneficial soil insects to migrate up into the pile naturally and accelerate decomposition from below.
Choose a container that matches your volume of waste. A bin with a capacity of at least 200 liters suits most households generating daily kitchen scraps alongside regular garden trimmings. If you plan to use an open heap, build or buy a simple three-sided enclosure to keep the material contained and retain heat more effectively.
Layer your materials correctly
Start with a 5 to 10 centimeter base layer of coarse browns, such as dried leaves, torn cardboard, or coconut husks, to create airflow at the bottom of the pile. Add a thinner layer of greens on top, roughly half the depth of your browns layer, then cover with another thin layer of browns. This alternating pattern keeps the carbon-to-nitrogen balance on track and prevents the pile from compacting into a dense, airless mass.
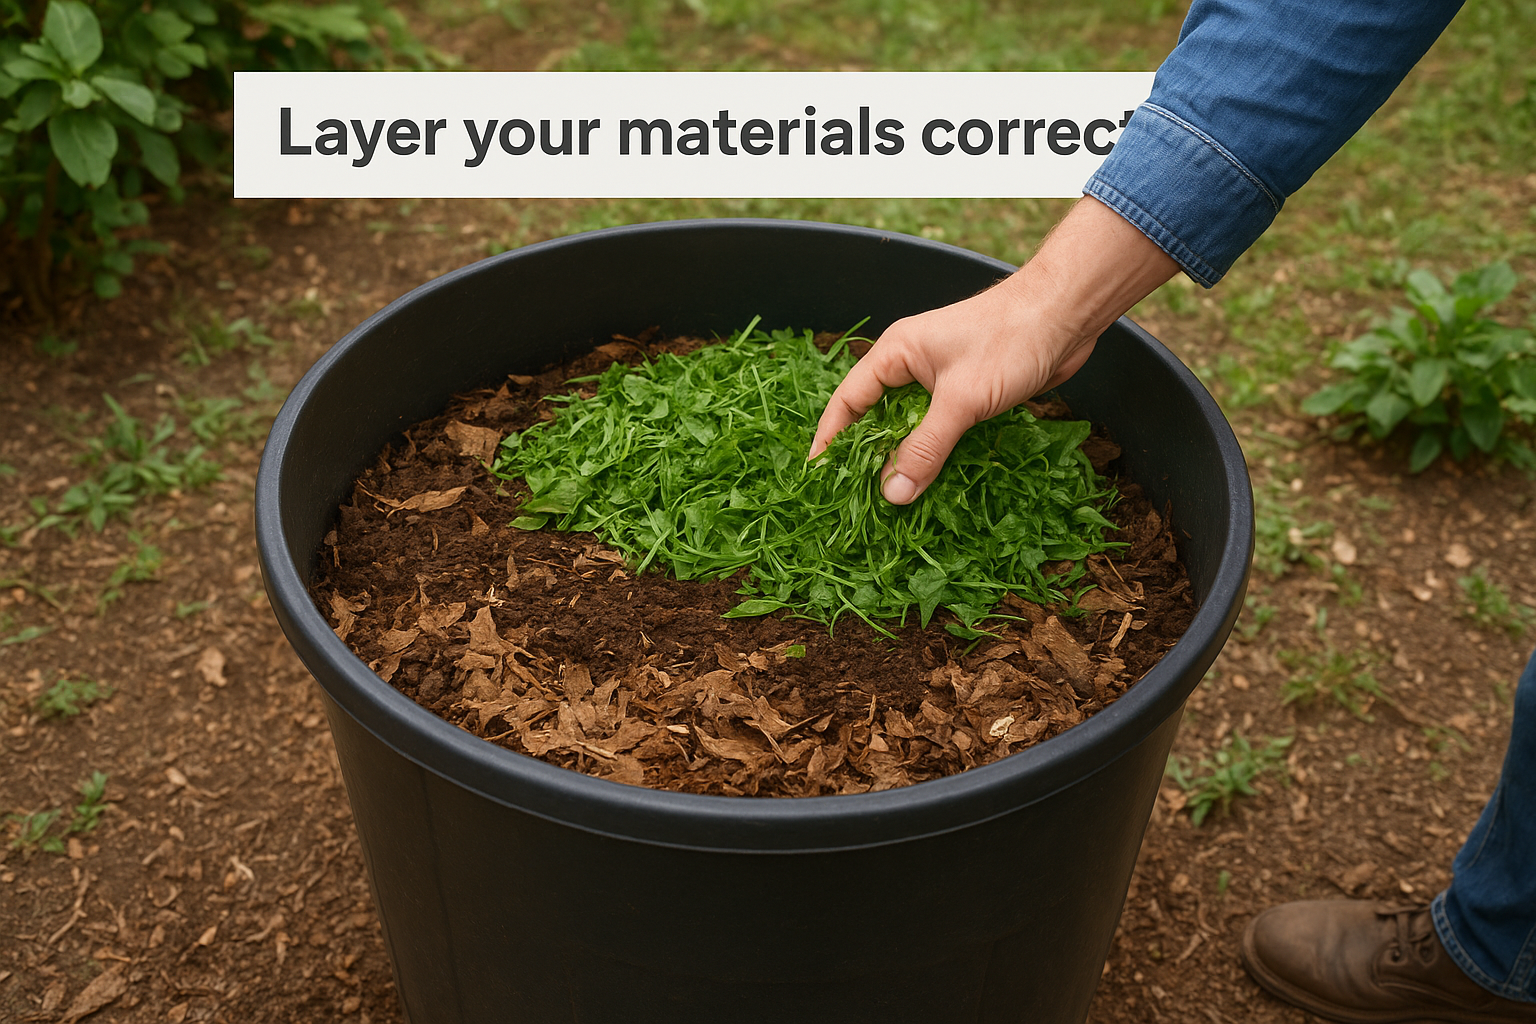
Layering your materials from the very first addition makes balancing your pile much easier than trying to correct the ratio after problems develop.
Sprinkle water between layers if your materials feel dry. Each layer should feel lightly damp but not saturated, since excess water drives out the oxygen your microbes depend on.
Maintain your pile week by week
Turn the pile every one to two weeks using a garden fork, pulling material from the outer edges toward the center where heat concentrates. Check moisture each time you turn and add water or dry browns as needed to bring the texture back to that wrung-out sponge consistency. Adding fresh kitchen scraps in small batches rather than large dumps keeps the system balanced and prevents odor spikes between turnings.
Keep your compost healthy in hot, wet climates
Malaysia's climate is one of the most favorable in the world for fast composting, but it also creates specific challenges that temperate-climate guides rarely address. High temperatures speed up decomposition significantly, while heavy rainfall during the monsoon months can waterlog your pile and shut down aerobic activity almost overnight. Understanding how to work with these conditions rather than fight them makes the difference between a pile that produces finished compost in six to eight weeks and one that sits wet and stagnant for months.
Manage heat and moisture together
Your pile naturally runs warmer in Malaysia's climate, which accelerates microbial activity, but it also dries out more quickly between rain events. Check moisture levels every few days rather than waiting until your weekly turning, and pour a small amount of water over dry sections as needed. Conversely, if the pile feels saturated after heavy rain, turn it immediately and add a generous layer of dry browns like torn cardboard or dried leaves to absorb excess water and restore airflow. The goal is always that slightly damp texture throughout, not a soggy mass at the bottom with a dry crust on top.
Keeping a stock of dry browns nearby at all times gives you a fast correction when your pile swings too wet or too dry between turnings.
Shade matters more than most composting explained guides acknowledge for tropical climates like Malaysia's. Placing your bin under a tree or beside a wall shields the pile from direct afternoon sun, which reduces the evaporation rate and keeps internal temperatures from climbing past the productive range that thermophilic bacteria need to function properly.
Protect your pile from heavy rain
During the northeast or southwest monsoon, rainfall can arrive in high volumes over short periods and overwhelm your compost system quickly. A simple cover makes a significant practical difference. A loose-fitting sheet of corrugated plastic or a breathable tarp keeps rain from saturating the pile while still allowing heat and moisture vapor to escape. Avoid sealing the cover tightly against the sides, since your pile needs air circulation to stay aerobic.
Raising your bin slightly off the ground on bricks or a timber frame improves drainage from the base, preventing the pooling that tends to develop after prolonged rainfall. This small adjustment also makes it easier for air to enter from below and keeps your aerobic decomposition process running steadily through even the wettest months.
Fix common compost problems
Even a well-set-up system runs into issues occasionally. Composting explained as a straightforward process can still surprise you, especially in Malaysia's high-humidity environment where conditions shift quickly. Identifying the problem early and correcting it fast prevents small imbalances from turning into a stalled pile. Most issues trace back to one of three causes: incorrect moisture, wrong carbon-to-nitrogen ratio, or insufficient airflow, all of which you can fix without starting over.
Your pile smells bad
A strong ammonia smell signals too many greens and not enough browns in the mix. Add a generous layer of dry browns, such as torn cardboard, dried leaves, or coconut husks, then turn the pile to distribute them evenly through the material. The ammonia odor fades within a day or two once the carbon-to-nitrogen balance corrects itself.
Rotten egg odor points to a different problem: anaerobic conditions from waterlogging or compaction. Oxygen-starved sections produce hydrogen sulfide, which creates that sulfur smell. Turn the pile immediately, break up any dense clumps, and add dry material to restore air pockets throughout the mass.
If your pile smells consistently bad despite corrections, check that your bin has adequate drainage and airflow at the base before adding anything new.
Your pile is not heating up
A cold, inactive pile usually lacks nitrogen, moisture, or enough mass to generate heat. Add fresh green materials like vegetable scraps or fresh grass clippings to reintroduce the nitrogen thermophilic bacteria need to become active. Common reasons a pile stays cold include:
- Too little nitrogen from insufficient greens
- Pile volume under one cubic meter, which cannot retain heat
- Material too dry for sustained microbial activity
Water the pile lightly and turn it to distribute moisture evenly before adding new material, since dry conditions stop microbial activity almost as quickly as waterlogging does.
Your pile attracts insects or animals
Surface-level food scraps draw flies and rodents. Bury fresh kitchen scraps at least 10 to 15 centimeters deep in the pile rather than leaving them exposed on top. Avoid adding meat, fish, or dairy to an open bin, since these decompose in ways that produce strong odors and attract animals your garden does not need.
Covering your bin with a fitted lid or weighted wire mesh keeps pests out without cutting airflow. Turning the pile regularly also disrupts any insect colonies trying to establish themselves, which remains the most consistent long-term deterrent you have available without any chemical intervention.
How to know compost is finished and use it
Knowing when your compost is actually ready matters more than most composting explained guides acknowledge. Applying unfinished material to your garden can temporarily lock up nitrogen in the soil as microbes continue breaking it down, which starves your plants of the nutrients you intended to deliver. Finished compost looks, smells, and feels distinctly different from the raw scraps and trimmings you added at the start, and checking for those specific signs takes less than a minute.
Signs your compost is ready
Your compost is finished when it no longer resembles any of the original materials you put in. The texture should be dark, crumbly, and consistent throughout, similar to rich garden soil, with no visible chunks of vegetable peel, leaf, or cardboard remaining. The smell shifts from an earthy, active decomposition scent to something closer to fresh forest soil after rain, with no sharp ammonia or rotten odor lingering.
If you still see recognizable food scraps or feel heat at the pile's center, your compost needs more time regardless of how long it has been sitting.
Temperature is a reliable secondary check. A finished pile no longer generates heat when you insert your hand or a probe into the center, because microbial activity has slowed to completion. You can also do a simple bag test: seal a small sample in a plastic bag for a few days. If it smells foul when opened, microbes are still active and breaking down residual material. If it smells neutral, the compost is stable and ready to use.
How to apply finished compost
Spread a 3 to 5 centimeter layer of finished compost across your garden beds and work it lightly into the top layer of soil before planting or at the start of each growing season. For established plants and trees, apply compost as a top dressing around the base without disturbing the roots, then water thoroughly to help nutrients move into the soil profile below.
Mixing compost into potting mixes at a ratio of roughly one part compost to three parts existing medium improves moisture retention and biological activity in containers and raised beds. You can also apply it to your lawn by spreading a thin layer across the surface and letting rain work it down between the grass blades, which strengthens root development steadily over several weeks.
Next steps for your garden
Composting explained from start to finish comes down to one practical truth: healthy soil is the foundation of every successful garden, and building it yourself is well within reach for any homeowner. You now have everything you need to pick a method, set up a system, manage it through Malaysia's climate, troubleshoot problems, and recognize finished compost when it's ready. Start small if you're unsure, even a single kitchen bucket and a compact bin teaches you more in one month than any guide can on its own.
Your garden rewards the effort immediately and consistently over time. Once compost becomes part of your regular routine, the soil quality, plant health, and overall resilience of your outdoor space improve season after season without heavy spending on synthetic inputs. If you want professional guidance on designing an outdoor space that truly works with your soil and climate, get in touch with our landscape design team and we'll help you build something worth maintaining.

