
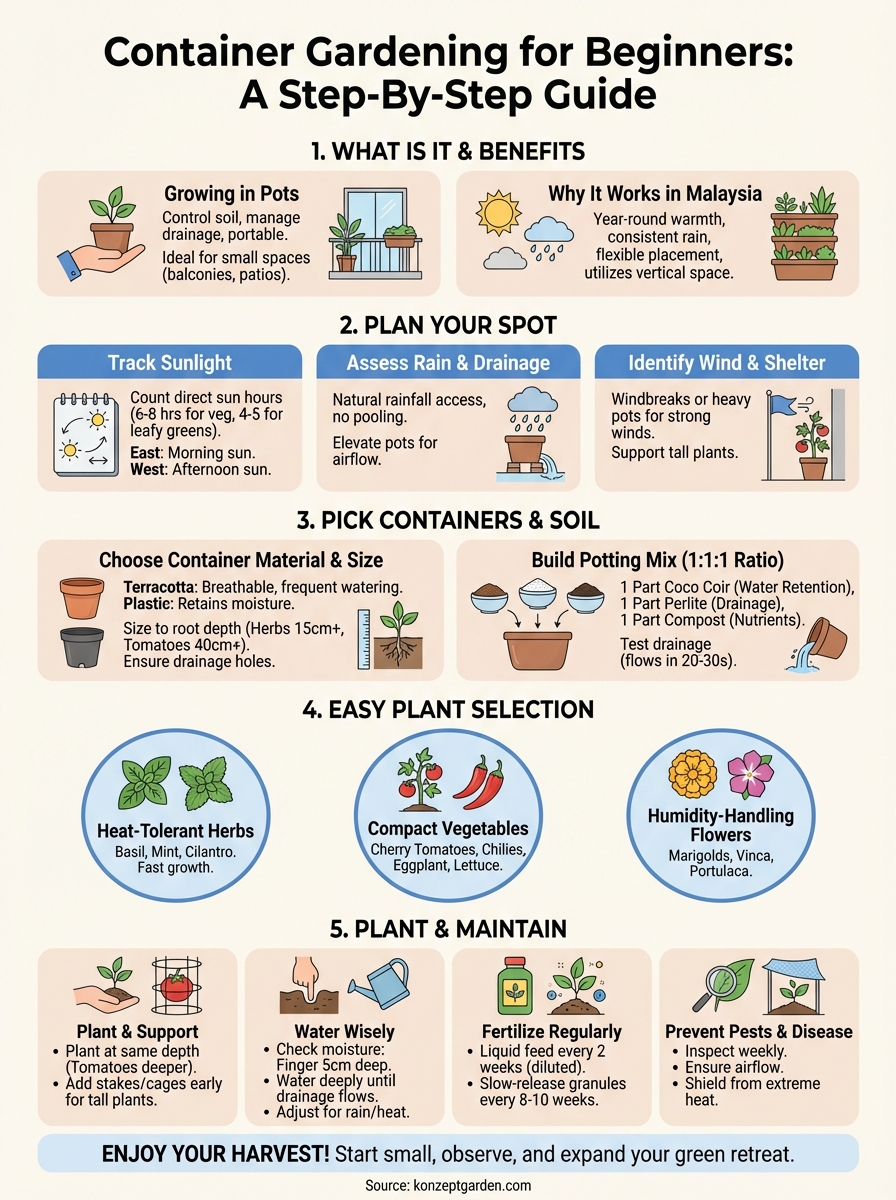
You don't need a sprawling backyard to grow fresh vegetables, herbs, or beautiful flowers. Container gardening for beginners offers a practical entry point into gardening, whether you have a small balcony, a compact patio, or just a sunny windowsill.
At Konzept Garden, we've helped countless Malaysian homeowners transform limited spaces into thriving green retreats. Container gardening is one of the most accessible ways to start your gardening journey, no matter how much (or little) outdoor space you have.
This guide walks you through everything you need to get started. You'll learn how to choose the right containers, select plants that actually thrive in pots, and master the basics of soil, drainage, and watering. By the end, you'll have the confidence to grow your own herbs, vegetables, or ornamental plants, right from your doorstep.
What container gardening is and why it works
Container gardening means growing plants in pots, planters, or any receptacle with drainage, rather than planting directly in the ground. You control the soil quality, manage drainage precisely, and move your garden when needed. This method works for vegetables, herbs, flowers, and even small fruit trees, as long as you match the container size to the plant's root system.
What makes container gardening different
When you plant in containers, you create a self-contained ecosystem that you manage entirely. The soil, nutrients, water, and even the microbial life all depend on what you add and maintain. Ground gardens draw moisture and nutrients from surrounding soil, but container plants rely 100% on you for their needs.
This independence gives you several advantages. You bypass poor native soil entirely, whether it's too clay-heavy, sandy, or chemically imbalanced. Malaysian soil varies wildly across regions, and containers let you customize the growing medium for each plant type without amending an entire garden bed.
Container gardening puts you in complete control of your plant's environment, from soil composition to drainage to placement.
Why containers thrive in tropical climates
Malaysia's year-round warmth and consistent rainfall create ideal conditions for container gardening. You don't face the frost challenges that colder climates deal with, which means you grow continuously rather than seasonally. Most vegetables and herbs flourish in tropical heat, as long as you manage water and sun exposure properly.
Containers also protect plants from waterlogged conditions during heavy monsoon rains. Raised off the ground with proper drainage holes, potted plants avoid the root rot that kills many ground-planted vegetables when Malaysia's intense rains saturate the soil. You can move containers under shelter during extreme weather, giving you flexibility ground gardens lack.
The practical benefits for small spaces
You work with vertical space when you stack or hang containers, multiplying your growing area without expanding your footprint. A single balcony wall can hold tiered planters, hanging baskets, and shelf-mounted pots, creating a productive garden in 2 square meters of floor space.
Containers let you test different locations until you find the sweet spot for each plant. Tomatoes might need full sun on your east-facing balcony, while herbs do better with afternoon shade on the west side. You simply move the pots around during the first few weeks to see what works, something impossible with planted beds.
How drainage and root systems work in pots
Plant roots need oxygen as much as water, and containers deliver both through proper drainage. When you water, excess liquid flows out the bottom, pulling fresh air into the soil through the drainage holes. This constant air exchange keeps roots healthy and prevents the anaerobic conditions that cause rot.
The confined space of a pot actually encourages stronger root development in many plants. Roots circle the container's perimeter, creating a dense root ball that efficiently absorbs water and nutrients. For container gardening for beginners, this means you often get better yields per square foot than traditional garden beds, especially with compact varieties bred specifically for pot culture.
You'll find that containers warm up faster than ground soil, which accelerates germination and extends your growing season. The exposed sides of pots absorb heat, raising soil temperature by several degrees compared to earth-buried roots. This matters for heat-loving crops like chili peppers and eggplant, which grow more vigorously in the warm environment containers provide.
Step 1. Plan your spot for sun, rain, and wind
Your container garden's success starts with location scouting, not plant selection. You need to observe how sun, rain, and wind interact with your available spaces before you buy a single pot or seed packet. Spend three to five days tracking sunlight patterns, noting where rain puddles during storms, and identifying spots where strong winds knock things over.
Track sunlight through the day
You'll measure sun exposure by counting direct sunlight hours your potential spots receive. Walk out with a notebook at 8 AM, noon, 3 PM, and 5 PM to mark where sunlight hits. Most vegetables and herbs need six to eight hours of direct sun daily, while leafy greens tolerate partial shade with just four to five hours.
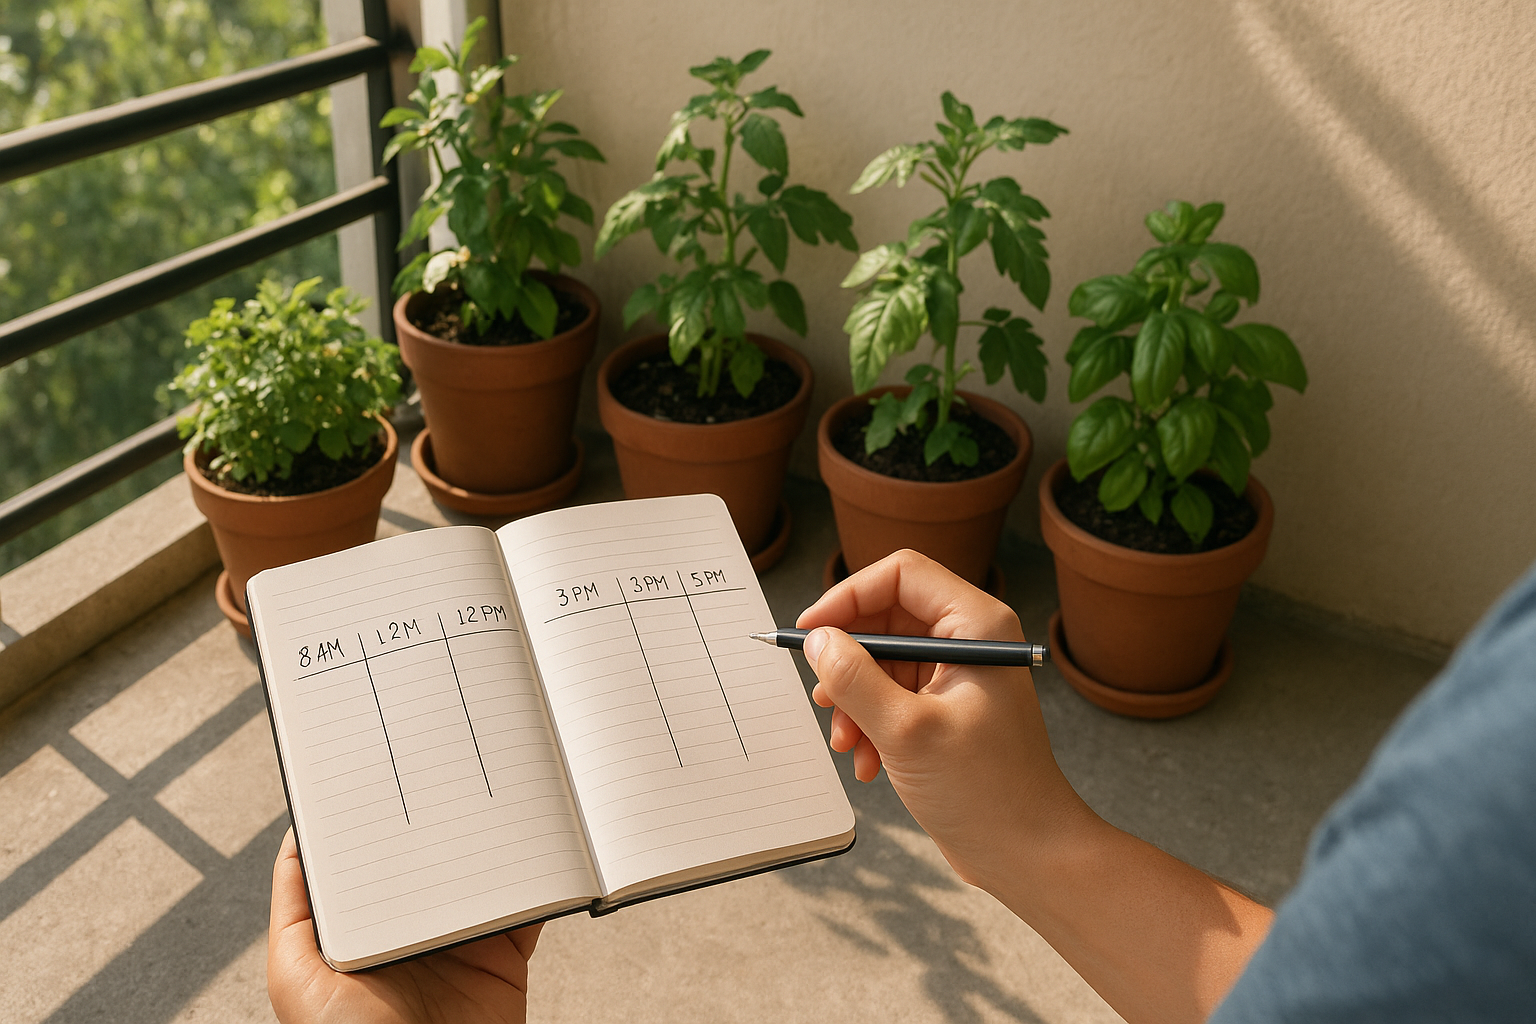
Malaysian balconies facing east get strong morning sun but cool afternoon shade, perfect for herbs like basil and mint that wilt in midday heat. West-facing spots receive intense afternoon sun, ideal for sun-worshippers like tomatoes, peppers, and eggplant. South-facing areas in Malaysia get the most consistent light throughout the day, giving you flexibility to grow almost anything.
For container gardening for beginners, start with an east-facing location that offers morning sun and afternoon shade, which forgives both overwatering and underwatering better than harsh all-day exposure.
Shade from neighboring buildings shifts throughout the year as the sun's angle changes, so your January observations might differ from June conditions. You'll notice patterns after a week of tracking, revealing which spots consistently get enough light for your chosen crops.
Assess rain access and drainage
Position your containers where they receive natural rainfall but won't flood during Malaysia's intense monsoon downpours. You want spots that get wet when it rains, reducing your watering workload, but that also drain quickly without water pooling around the pots' bases.
Balconies with solid floors need slight tilting or raised pot feet to prevent water from sitting under containers. Even with drainage holes, stagnant water underneath creates mosquito breeding grounds and encourages fungal growth. Elevate pots on bricks or specialized plant risers to maintain airflow below.
Identify wind patterns and shelter needs
Strong winds dry out container soil faster and can snap plant stems or topple tall containers entirely. You'll observe wind speed by watching how flags, laundry, or loose papers behave in your potential spots during different times of day.
Corner balconies and exposed rooftops get the strongest wind, requiring either windbreaks or heavier containers with lower centers of gravity. Position taller plants like tomatoes against walls or railings where they get structural support without blocking your entire space. Group multiple containers together to create mutual wind protection, with larger pots shielding smaller ones from the strongest gusts.
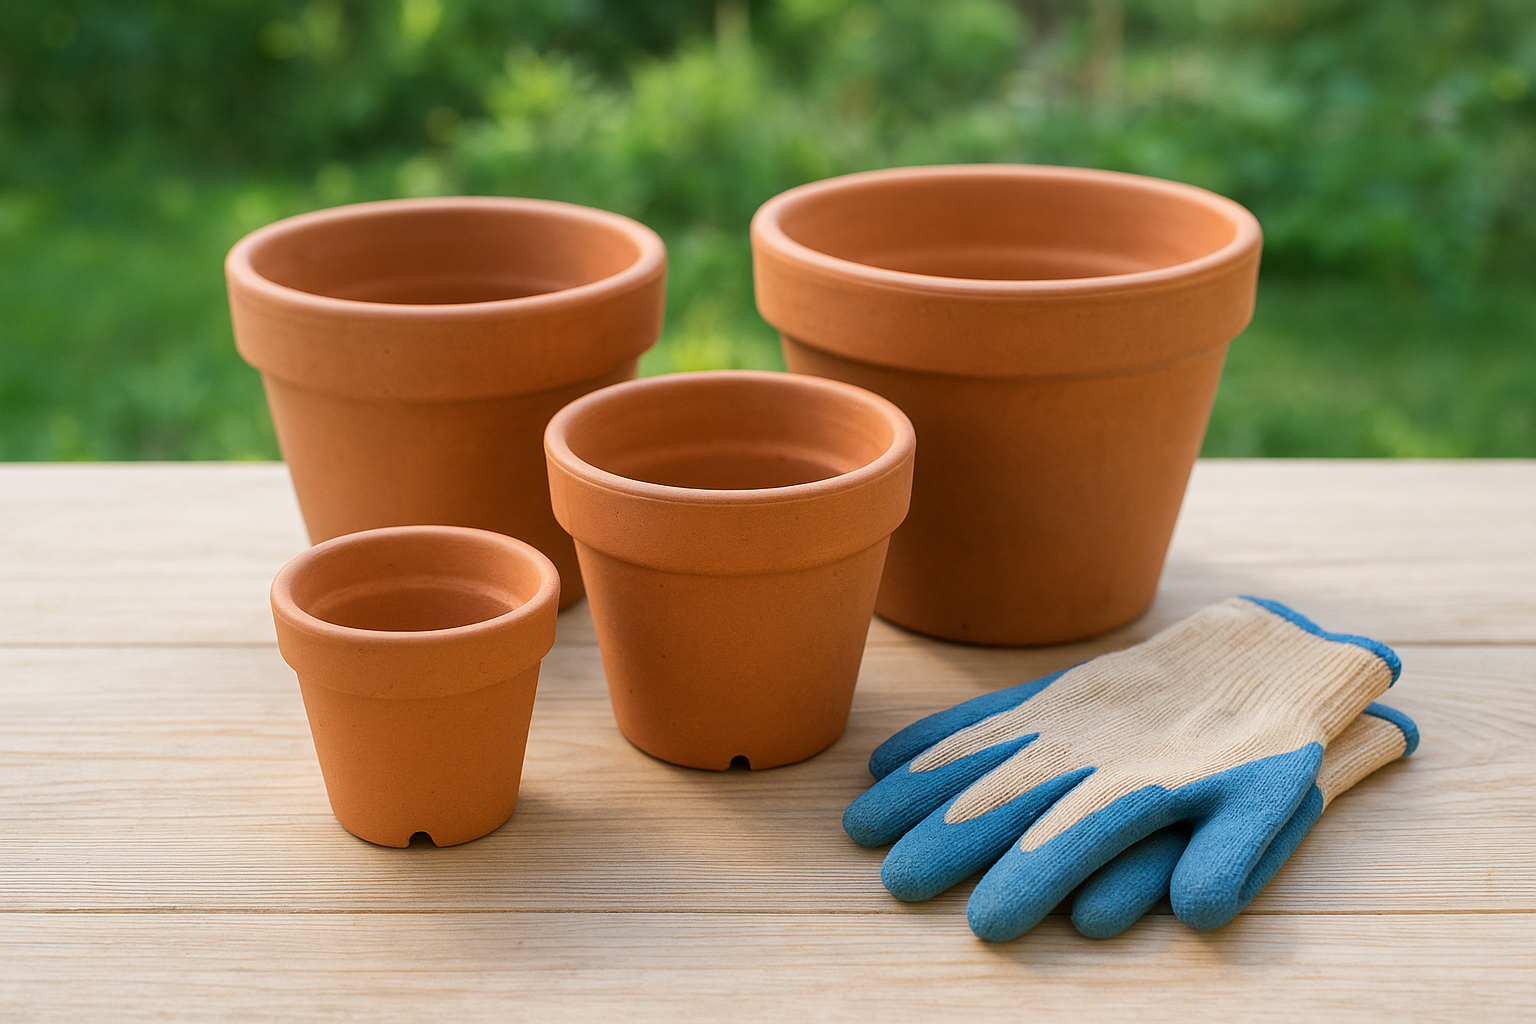
Step 2. Pick the right containers and sizes
Container selection determines how well your plants grow, how often you water, and whether roots have room to develop properly. You'll choose based on material properties, size requirements, and drainage capabilities rather than aesthetics alone. A beautiful pot that's too small or lacks drainage holes will kill your plants faster than any pest or disease.
Match material to your maintenance style
Terracotta pots breathe through their porous walls, which helps prevent overwatering but means you'll water more frequently during Malaysia's hot days. These clay containers work well for container gardening for beginners who tend to water too much, as excess moisture evaporates through the sides. The weight also provides stability in windy locations, though they crack if dropped.
Plastic containers retain moisture longer and cost less, making them practical for busy gardeners or plants that need consistent dampness. You'll find them in every size and color, and they won't break when you rearrange your garden. The downside is poor breathability, which requires more careful watering to avoid root rot in Malaysia's humid climate.
Self-watering planters include a reservoir system that wicks water up to roots as needed. You fill the reservoir every few days instead of watering daily, perfect for travel or forgetful moments. These containers excel with water-hungry crops like tomatoes and lettuce, though they cost more upfront than standard pots.
Match your container material to your watering habits: terracotta for over-waterers, plastic for consistent moisture, and self-watering systems for busy schedules.
Size your pots to root depth
You need minimum depths for different plant types to accommodate their root systems properly. Herbs like basil, cilantro, and mint grow well in containers 15-20 cm deep, while lettuce and other leafy greens need 15-25 cm. Tomatoes, peppers, and eggplant require 40-50 cm depth with at least 30 cm diameter to support their extensive root networks.
| Plant Type | Minimum Depth | Minimum Diameter | Container Volume |
|---|---|---|---|
| Herbs (basil, mint, cilantro) | 15-20 cm | 15-20 cm | 3-5 liters |
| Leafy greens (lettuce, spinach) | 15-25 cm | 20-30 cm | 5-8 liters |
| Peppers, eggplant | 30-40 cm | 25-30 cm | 15-20 liters |
| Tomatoes | 40-50 cm | 30-40 cm | 20-30 liters |
| Root vegetables (carrots) | 30-40 cm | 20-25 cm | 10-15 liters |
Shallow containers under 15 cm deep work only for microgreens and very compact plants. Width matters as much as depth because roots spread horizontally to anchor the plant and access nutrients. A narrow, deep pot grows tall plants poorly because they lack the lateral root support needed to stay upright.
Verify drainage before planting
Every container must have drainage holes in the bottom, typically one hole per 15-20 cm of diameter. You'll drill additional holes yourself if the pot comes without enough, using a 10-15 mm drill bit for plastic or a masonry bit for ceramic. Position holes around the entire base rather than clustering them in the center for even drainage.
Test drainage by filling the empty pot with water and watching how quickly it empties. Water should flow out within 30 seconds, not pool at the bottom. If drainage seems slow, drill more holes or add a layer of gravel at the base before adding soil.
Step 3. Build a potting mix that drains and feeds
You'll never use garden soil straight from the ground in containers because it compacts heavily when confined to pots, suffocating roots and creating drainage problems. Instead, you build a lightweight potting mix designed specifically for container environments, blending materials that hold moisture while allowing excess water to flow through freely. This custom mix becomes the foundation of your container garden's success, providing both structural support and nutrient delivery for your plants.
Create your base potting mix recipe
The simplest effective mix for container gardening for beginners combines three core ingredients in equal parts. You'll mix one part peat moss or coco coir (for water retention), one part perlite or vermiculite (for drainage and aeration), and one part good quality compost (for nutrients and beneficial microbes). This 1:1:1 ratio works for most vegetables and herbs in Malaysian containers.
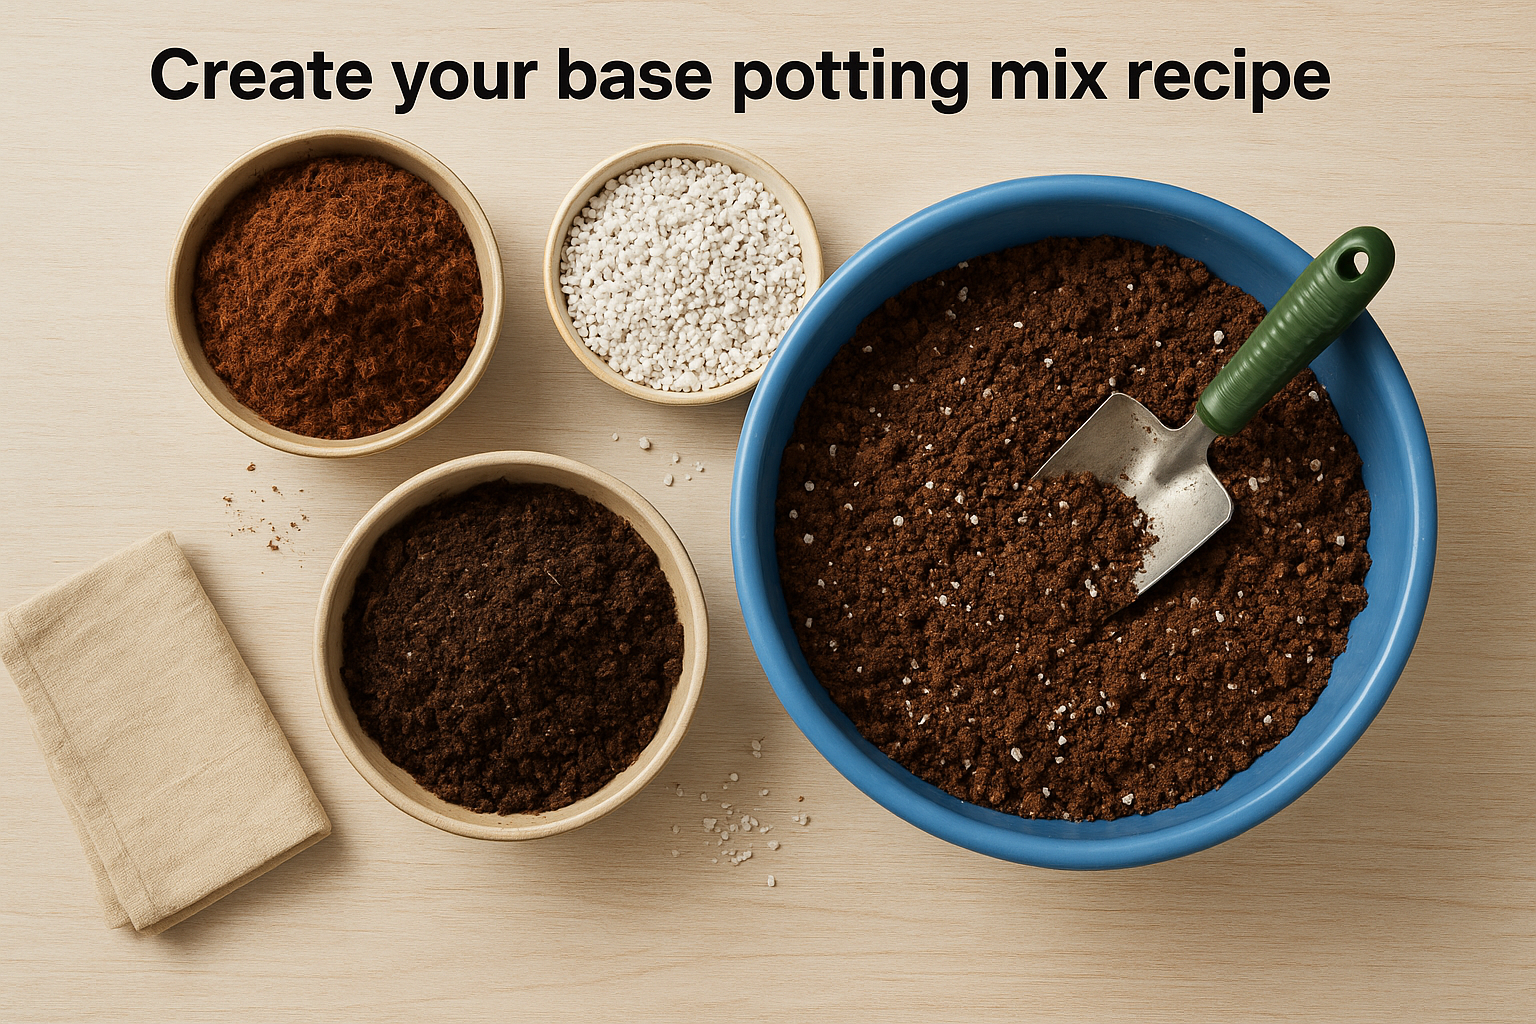
Coco coir outperforms peat moss in tropical climates because it resists breakdown in heat and humidity, maintaining its structure for multiple growing seasons. You'll find compressed coco coir blocks at most garden centers, which expand significantly when you add water. Perlite, those white lightweight pellets, creates air pockets that prevent soil compaction while improving drainage speed.
Mix your potting blend in a large basin or on a clean tarp, adding water gradually until the mixture feels like a wrung-out sponge when you squeeze a handful.
Your base recipe looks like this:
| Ingredient | Amount | Purpose |
|---|---|---|
| Coco coir or peat moss | 10 liters | Water retention, root anchoring |
| Perlite or vermiculite | 10 liters | Drainage, aeration, lightness |
| Aged compost | 10 liters | Nutrients, beneficial organisms |
| Total yield | 30 liters | Enough for 2-3 large pots |
Test and adjust drainage speed
Pour water through your mixed potting blend in an empty container to verify drainage speed before adding plants. Water should flow through within 20-30 seconds, not pool on the surface or drain instantly. Slow drainage means you need more perlite, while water that rushes straight through indicates insufficient water-holding materials like coco coir.
Malaysian humidity keeps potting mix moist longer than drier climates, so you might increase perlite to 40% of your total mix for plants prone to root rot. Tomatoes and peppers appreciate this extra drainage, while leafy greens tolerate a slightly moisture-retentive blend with less perlite.
Add nutrients for sustained feeding
Your initial compost provides nutrients for roughly four to six weeks before plants exhaust the available food supply. Mix in a slow-release organic fertilizer at planting time, following package directions for container applications. You'll typically add 2-3 tablespoons per 10 liters of potting mix, which breaks down gradually over the growing season.
Worm castings boost your mix's nutrient profile while improving soil structure and water retention. Add one part worm castings to your base recipe for plants with heavy feeding requirements like tomatoes, or use them as a top dressing monthly throughout the growing season.
Step 4. Choose easy plants for Malaysian weather
You'll find success fastest with plants that thrive naturally in tropical heat, high humidity, and intense rainfall rather than fighting against Malaysia's climate. The best starter plants for container gardening for beginners tolerate temperature swings between morning cool and afternoon heat, resist common fungal diseases that flourish in moisture, and produce harvests within 60-90 days so you see results quickly. These plants forgive beginner mistakes like inconsistent watering or imperfect fertilizing while still delivering worthwhile yields from your containers.
Start with heat-tolerant herbs
Herbs adapt brilliantly to Malaysian container conditions because most varieties originated in warm Mediterranean or tropical regions. Basil grows aggressively in Malaysia's heat, producing harvestable leaves within three to four weeks from seed. You'll get multiple harvests by pinching off the top leaves regularly, which encourages bushier growth and prevents early flowering.
Thai basil and holy basil (tulsi) outperform sweet basil in extreme heat conditions, maintaining flavor intensity even during Malaysia's hottest months. Mint spreads vigorously and needs container confinement to prevent it from taking over, making pots actually ideal. Cilantro (coriander) grows best during slightly cooler periods but produces usable leaves within four weeks if you keep containers in morning sun locations.
Curry leaf plants thrive as perennial herbs in Malaysian containers, growing into small bushes that provide fresh leaves year-round. Pandan leaves grow easily from cuttings placed in water until roots develop, then transfer them to containers for continuous harvests.
Malaysian heat accelerates herb growth dramatically compared to temperate climates, letting you harvest edible leaves in half the time traditional gardening guides suggest.
Select compact vegetables for year-round production
Container-specific vegetable varieties labeled "patio," "bush," or "dwarf" produce full-sized harvests in confined root spaces. Cherry tomatoes like 'Tiny Tim' or 'Tumbling Tom' grow just 30-40 cm tall but yield dozens of fruits per plant in containers as small as 20 liters. Regular tomatoes need 40-liter pots minimum, but these compact types succeed in half that space.
Eggplant varieties bred for Asian markets handle Malaysian humidity better than European types, with 'Malaysian Long Purple' producing prolifically in containers. Chili peppers, especially bird's eye chilies and Thai peppers, grow as perennial plants in Malaysia, producing for multiple years if protected from root-bound conditions.
| Plant Type | Days to Harvest | Minimum Container Size | Best Season |
|---|---|---|---|
| Thai basil | 25-30 days | 3 liters | Year-round |
| Cherry tomatoes | 60-70 days | 20 liters | Year-round |
| Bird's eye chili | 90-100 days | 10 liters | Year-round |
| Eggplant | 70-80 days | 20 liters | Drier months |
| Lettuce (loose-leaf) | 30-40 days | 5 liters | Cooler months |
Leafy greens like kangkong (water spinach) and lettuce grow rapidly during Malaysia's slightly cooler months from November through February. Plant new batches every two weeks for continuous harvests, as tropical heat causes most greens to bolt quickly once temperatures peak.
Pick flowering plants that handle humidity
Marigolds tolerate Malaysia's full sun and actually repel certain pests that attack vegetables, making them valuable companion plants in mixed containers. Vinca (periwinkle) blooms continuously through heat and humidity, requiring minimal deadheading or care beyond regular watering.
Portulaca (moss rose) thrives in Malaysia's hottest, driest conditions, making it perfect for containers that occasionally dry out between waterings. These low-maintenance bloomers succeed even when you forget to water, storing moisture in their succulent leaves.
Step 5. Plant, space, and support for good growth
You'll plant your containers using techniques that differ from ground gardening because roots spread differently in confined spaces. Proper depth, strategic spacing, and early support systems determine whether your plants grow into productive specimens or struggle with crowding and weak stems. These planting fundamentals for container gardening for beginners set up everything that follows, from watering efficiency to harvest yields.
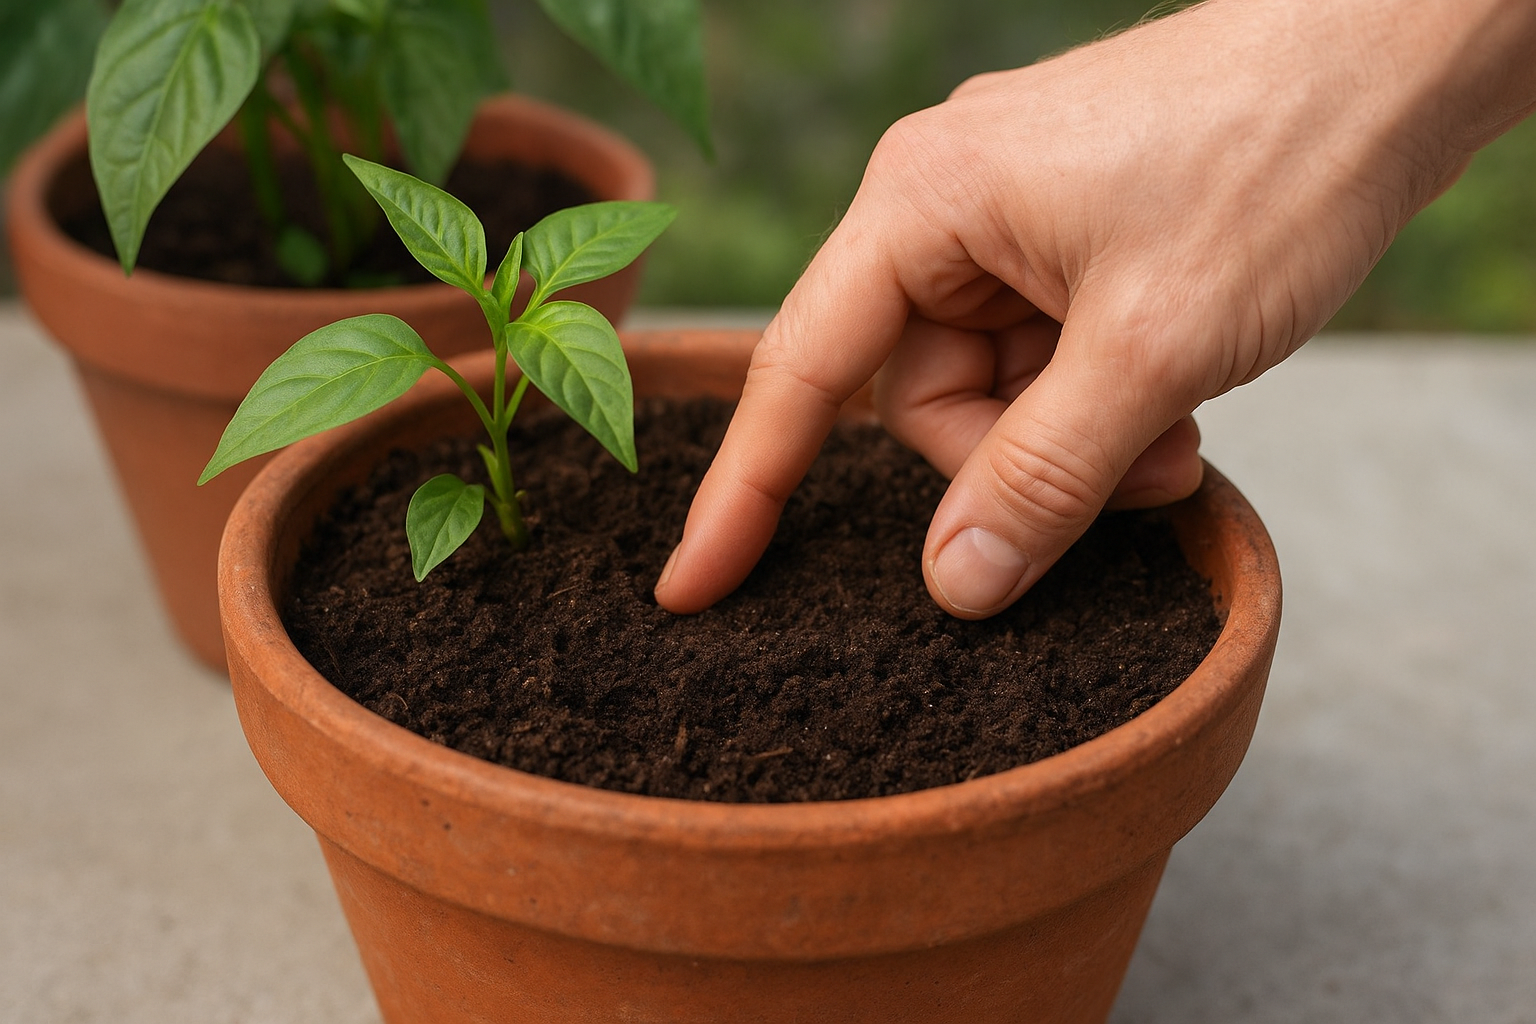
Plant at the right depth for strong roots
Most vegetables and herbs go into containers at the same depth they grew in their starter pots, with the soil line matching exactly. You'll dig a hole in your prepared potting mix that accommodates the entire root ball without bending or cramping roots against the container sides. Tomatoes break this rule because you can bury stems up to the first true leaves, and they'll develop additional roots along the buried portion for stronger plants.
Seedlings planted too shallow develop exposed roots that dry out rapidly, while those buried too deep suffocate from lack of oxygen around the stem. Fill in around the root ball gently, pressing just enough to eliminate air pockets without compacting the mix. Water immediately after planting to settle soil around roots and establish contact between root hairs and the potting medium.
Plant tomatoes deeper than other vegetables by burying stems up to their lowest leaves, which creates additional root systems for better nutrient uptake and plant stability.
Space plants for airflow and light access
You'll determine spacing by the mature size each plant reaches, not its current seedling dimensions. Crowded plants compete for light, creating weak, leggy growth that produces poorly. Malaysian humidity makes airflow particularly critical because stagnant air around dense foliage invites fungal diseases like powdery mildew and blight.
| Plant Type | Plants per Container Size | Spacing Between Plants |
|---|---|---|
| Herbs (basil, mint) | 2-3 per 20 cm pot | 10-15 cm apart |
| Cherry tomatoes | 1 per 20-liter pot | N/A (solo planting) |
| Lettuce | 3-4 per 30 cm pot | 15-20 cm apart |
| Peppers | 1 per 15-liter pot | N/A (solo planting) |
| Mixed herb containers | 3 plants per 30 cm pot | 12-15 cm apart |
Single large plants like tomatoes, eggplant, and peppers need entire containers to themselves because their root systems fill the available space quickly. Compact herbs and leafy greens tolerate closer spacing, but you still maintain 10-15 cm minimum between plants for adequate air circulation.
Add supports before plants need them
Install stakes, cages, or trellises at planting time rather than waiting until plants flop over or break. Driving stakes through established root systems damages the plant, while early installation lets roots grow around supports naturally. Tomatoes need sturdy cages or stakes at least 120 cm tall, secured firmly because Malaysian winds and heavy fruit loads stress unsupported plants.
You'll tie plants to supports using soft cloth strips or garden velcro, never wire or string that cuts into stems as they thicken. Loop ties loosely in a figure-eight pattern, with one loop around the support and the other around the stem, creating space that prevents rubbing. Check ties every two weeks and adjust as stems expand, retying looser if material starts constricting growth.
Climbing plants like peas and beans need trellis structures you install before seeds germinate. Position trellises on the container's north side so they don't shade other plants, and angle them slightly backward for stability against Malaysia's afternoon winds.
Step 6. Water consistently without drowning roots
You'll kill more container plants through improper watering than any other single mistake, either drowning roots with constant moisture or letting them dry to the point of permanent damage. Containers dry out faster than ground soil because exposed sides lose moisture to air, but their confined spaces also trap excess water if you pour too much too often. Malaysian humidity complicates this further because the air feels wet even when your potting mix runs dry, creating false confidence that plants have enough moisture.
Check soil moisture before every watering
You'll test moisture by pushing your index finger 5 cm deep into the potting mix at several spots around each container. If the soil feels damp or cool against your skin, wait another day before watering. Dry soil pulls away from container sides and feels warm or room-temperature when you touch it, signaling that plants need water soon.
Different plants need different moisture levels even in identical containers. Tomatoes and peppers prefer soil that dries slightly between waterings, reaching just barely moist before you water again. Leafy greens and herbs like basil need consistently moist conditions without complete drying, so you'll water when the top 2-3 cm feels dry rather than waiting for deeper drying.
For container gardening for beginners, the finger test beats any moisture meter or watering schedule because it accounts for your specific conditions: container size, plant type, weather, and location.
Water deeply until drainage flows
Pour water slowly across the entire soil surface, not just at the stem base, until liquid runs freely from drainage holes. This deep watering ensures moisture reaches all roots throughout the container, not just surface layers. Shallow watering creates roots that cluster near the top, making plants vulnerable to heat stress and drought.
You'll need 2-3 passes with your watering can for large containers, letting water soak in between pours rather than rushing off the surface. Wait 30 seconds after the first watering, then add more water until drainage starts. Potting mix that's completely dried out actually repels water initially, requiring multiple applications before it absorbs properly.
Adjust frequency for Malaysian rainfall
Track rainfall amounts during monsoon season because heavy downpours saturate containers as effectively as manual watering. You'll skip watering for 1-2 days after significant rain, checking soil moisture instead of following a fixed schedule. Move containers under shelter during extreme rainfall periods that last multiple days, as constant saturation invites root rot even in well-draining potting mix.
| Condition | Watering Frequency | Signs to Watch |
|---|---|---|
| Hot, sunny, dry season | Daily, sometimes twice | Wilting by afternoon |
| Monsoon/rainy periods | Every 2-3 days or less | Water pooling, yellowing leaves |
| Cooler months | Every 1-2 days | Slower soil drying |
| Newly planted seedlings | Daily, light amounts | Keep surface moist |
Malaysian heat evaporates moisture rapidly during dry season months, requiring daily attention for most containers. Early morning watering works best because plants absorb water before peak heat, and foliage dries quickly to prevent fungal issues.
Recognize overwatering and underwatering signals
Overwatered plants develop yellow lower leaves that feel soft and mushy, while roots turn brown or black with a foul smell. You'll notice fungus gnats hovering around constantly wet soil, and the potting mix stays soggy even several days after watering. Reduce watering immediately and improve drainage by adding more perlite to your mix.
Underwatered plants show crispy brown leaf edges, drooping that doesn't recover overnight, and stunted growth with smaller leaves. Extreme drying causes potting mix to shrink away from container sides, creating gaps where water runs straight down without absorbing. Rehydrate severely dried containers by setting them in water basins for 30 minutes, letting moisture wick up from the bottom.
Step 7. Fertilize on a simple schedule
Container plants exhaust nutrients faster than ground-planted vegetables because their roots can't spread into surrounding soil to find more food. Your potting mix starts with enough nutrients for four to six weeks, then plants begin showing deficiency symptoms unless you add fertilizer regularly. You'll establish a simple feeding routine that matches plant growth stages rather than guessing when to fertilize or overdoing it with too much too often.
Choose between liquid and granular feeding
Liquid fertilizers work fastest for container gardening for beginners because you mix them with water and pour directly onto soil, delivering nutrients that roots absorb within hours. You'll dilute concentrated formulas according to package directions, typically 5-10 ml per liter of water, then apply during regular watering sessions. Fish emulsion and seaweed extracts provide organic options that feed both plants and beneficial soil microbes.
Granular slow-release fertilizers break down gradually over two to three months, reducing how often you need to fertilize but offering less control over nutrient timing. Scatter granules across the soil surface at planting time, then reapply every eight weeks throughout the growing season. These pellets release nutrients when you water, making them convenient for travelers or busy schedules.
Liquid fertilizers give you precise control over feeding schedules and let you adjust nutrient levels quickly when plants show deficiency symptoms.
| Fertilizer Type | Application Frequency | Best For | NPK Ratio |
|---|---|---|---|
| Liquid fish emulsion | Every 2 weeks | Leafy greens, herbs | 5-1-1 |
| Liquid balanced feed | Every 2 weeks | Tomatoes, peppers, general use | 10-10-10 |
| Slow-release granules | Every 8-10 weeks | Low-maintenance containers | 14-14-14 |
| Liquid bloom booster | Weekly during flowering | Fruiting vegetables | 5-10-10 |
Follow a two-week liquid feeding cycle
You'll fertilize every 14 days during active growth, starting when seedlings develop their second set of true leaves. Mix liquid fertilizer at half the recommended strength for the first two applications to avoid burning tender young roots, then increase to full strength as plants mature. Skip fertilizing during extremely hot weeks when plants grow slowly, as unused nutrients build up to toxic levels in containers.
Water containers thoroughly with plain water one day before fertilizing to prevent root burn from concentrated nutrients contacting dry roots. Apply your diluted fertilizer solution until it drains from the bottom, just like regular watering. Plants actively growing during Malaysia's optimal conditions need more frequent feeding, while those stressed by extreme heat require less.
Watch for nutrient deficiency signals
Pale yellow leaves spreading from bottom to top indicate nitrogen deficiency, the most common container problem. You'll increase feeding frequency to weekly or boost nitrogen levels with fish emulsion until green color returns. Purple leaf undersides or stunted growth signal phosphorus shortage, requiring a bloom-booster fertilizer with higher middle numbers in the NPK ratio.
Brown leaf edges with yellow spots between veins suggest potassium deficiency, while overall yellowing with green veins indicates iron shortage from overly alkaline potting mix. Flush containers with plain water if leaves show brown tips or burned edges, signs of fertilizer buildup from overfeeding.
Step 8. Prevent pests, disease, and heat stress
You'll face three main challenges in Malaysian container gardens: insects that target tender growth, fungal diseases that thrive in humidity, and heat stress during the hottest months. Prevention beats treatment every time because small pest populations explode rapidly in tropical conditions, and diseases spread faster than you can control them once established. Regular monitoring and simple preventive measures keep your container gardening for beginners projects healthy without resorting to harsh chemicals or expensive interventions.
Inspect plants weekly for early pest detection
Walk through your containers every three to four days, checking leaf undersides, stem joints, and new growth where pests congregate first. You'll spot aphid colonies as tiny green or black dots clustered on tender shoot tips, while whiteflies flutter up in clouds when you brush against leaves. Caterpillars leave behind chewed leaf edges and dark droppings on foliage, making them easy to identify before they strip entire plants.
Remove pests by hand when populations stay small, crushing aphids between your fingers or dropping caterpillars into soapy water. Blast stubborn aphid colonies with strong water spray from your hose, which knocks them off without chemicals. Spider mites appear as fine webbing between leaves during dry periods, requiring daily misting to raise humidity levels they can't tolerate.
Catching pest problems during the first week of infestation lets you control them manually without any sprays or treatments.
| Pest Type | Early Signs | Manual Control Method |
|---|---|---|
| Aphids | Clusters on new growth, sticky residue | Crush by hand or water spray |
| Whiteflies | White clouds when disturbed | Yellow sticky traps |
| Caterpillars | Chewed leaves, droppings | Hand-pick into soapy water |
| Spider mites | Fine webbing, stippled leaves | Daily water misting |
Prevent fungal diseases through airflow management
Space containers at least 15-20 cm apart so air circulates freely between plants, reducing the moisture buildup that invites fungal growth. Water only in early morning so foliage dries completely before nightfall, as wet leaves overnight create perfect conditions for powdery mildew and leaf spot diseases. Remove any yellowing or spotted leaves immediately, disposing of them in the trash rather than composting to prevent spore spread.
Malaysian humidity makes fungal prevention critical because spores germinate within hours on damp surfaces. You'll avoid overhead watering that wets foliage, instead directing water at the soil surface only. Prune overcrowded branches to open up plant centers for better airflow, especially on tomatoes and peppers that grow dense foliage.
Shield containers from afternoon heat extremes
Move containers to partial shade locations during Malaysia's hottest months when temperatures exceed 35°C regularly, as extreme heat stops fruiting and causes flowers to drop without setting. You'll group pots together so they shade each other's sides, reducing soil temperature by several degrees. Apply a 5 cm layer of mulch across soil surfaces to insulate roots from heat radiating through container sides.
Watch for heat stress signals like leaf curl, blossom drop, and wilting that doesn't recover with watering. Relocate stressed plants to morning sun positions where they receive four to five hours of direct light but afternoon shade protection during peak heat periods.
Bring your first pot harvest home
You've learned the complete system for container gardening for beginners, from choosing your location through harvesting your first crops. Your containers now hold thriving plants that you water confidently, feed on schedule, and protect from common problems before they escalate. The herbs, vegetables, or flowers you started weeks ago will soon produce harvests you can actually use, whether that means fresh basil for your cooking or tomatoes picked at peak ripeness.
Container gardening builds momentum naturally because each success teaches you something new. You'll notice patterns in how your plants respond to watering, recognize nutrient needs faster, and develop instincts about when to move containers or adjust care routines. These portable gardens expand easily by adding more pots as your confidence grows.
Ready to transform your entire outdoor space beyond containers? Contact our landscape design team to explore how professional garden planning creates cohesive spaces where containers complement larger plantings, water features, and hardscaping elements throughout your Malaysian property.

