Getting mulching flower beds right can mean the difference between plants that struggle and plants that thrive. Mulch controls weeds, locks in moisture, regulates soil temperature, and gives your flower beds a clean, finished look. But spread it too thick, at the wrong time, or with the wrong material, and you can actually harm your plants instead of helping them.
At Konzept Garden, we've designed and implemented gardens across Malaysia, from compact residential courtyards to large commercial landscapes, and proper mulching is a step we never skip. It's one of the simplest things you can do to protect your investment in a well-designed outdoor space and keep it looking sharp year-round.
This guide breaks down exactly when to mulch your flower beds, how deep to go, what materials work best, and the step-by-step process to do it properly. Whether you're maintaining a garden we built or tackling your own planting beds, these are the practices we follow on every project.
Mulch basics: benefits, types, and timing
Mulch is a layer of material applied over the soil surface around your plants. It sounds simple, but what it does beneath the surface is what makes it effective. A proper mulch layer insulates roots from temperature swings, reduces evaporation, suppresses weed germination, and adds organic matter as it breaks down over time. Done right, mulching flower beds transforms the long-term health and appearance of your garden with minimal ongoing effort.
Why mulch works
When you lay mulch correctly, it creates a buffer between the soil and the outside environment. Moisture retention is one of the biggest wins, especially in Malaysia's heat, where bare soil can lose significant water to evaporation within hours of watering. Mulch slows that process down, so your plants stay hydrated longer between waterings and your overall water use drops noticeably.
A 5-cm layer of mulch can cut soil moisture loss by up to 70%, which adds up to real water savings across an entire flower bed over a dry season.
Weed suppression is the other benefit most gardeners underestimate. Weed seeds need light to germinate. A consistent mulch layer blocks that light, which cuts your weeding time dramatically. This also means fewer root disturbances near your flowers from pulling weeds out of bare soil.
Types of mulch for flower beds
Not all mulch materials perform the same way, and the type you choose affects both function and appearance. Organic mulches break down over time, feeding the soil and improving its structure with each passing season. Inorganic mulches like gravel or rubber chips don't decompose, which makes them longer-lasting but less beneficial to soil health.
Here's a comparison of the most common options:
| Mulch Type | Breaks Down | Best For | Drawbacks |
|---|---|---|---|
| Wood chips | Yes (slowly) | Shrubs, perennials | Can tie up nitrogen temporarily |
| Bark mulch | Yes | Mixed flower beds | Variable quality between suppliers |
| Compost | Yes (quickly) | Annuals, vegetable beds | Needs frequent replenishment |
| Coconut coir/husk | Yes | Tropical gardens | Can compact over time |
| Gravel or pebbles | No | Succulents, dry gardens | Does not improve soil |
| Rubber mulch | No | Paths, play areas | Not suitable near edible plants |
For most ornamental flower beds in Malaysia, bark mulch or coconut coir offers the best balance of moisture retention, visual appeal, and long-term soil improvement. Both are widely available and handle tropical rainfall well without washing away easily.
When to mulch
Timing matters more than most gardeners expect. The best time to apply mulch is after planting and once any heavy rainfall has settled the soil. In Malaysia's tropical climate, you can mulch year-round, but avoid spreading fresh mulch immediately before monsoon rains because strong runoff can displace a fresh layer before it has a chance to settle in place.
Plan to refresh your mulch layer once or twice a year, typically at the start of the dry season and again mid-year. Keeping the depth consistent ensures the layer continues to block weeds and regulate soil moisture effectively as the older material breaks down.
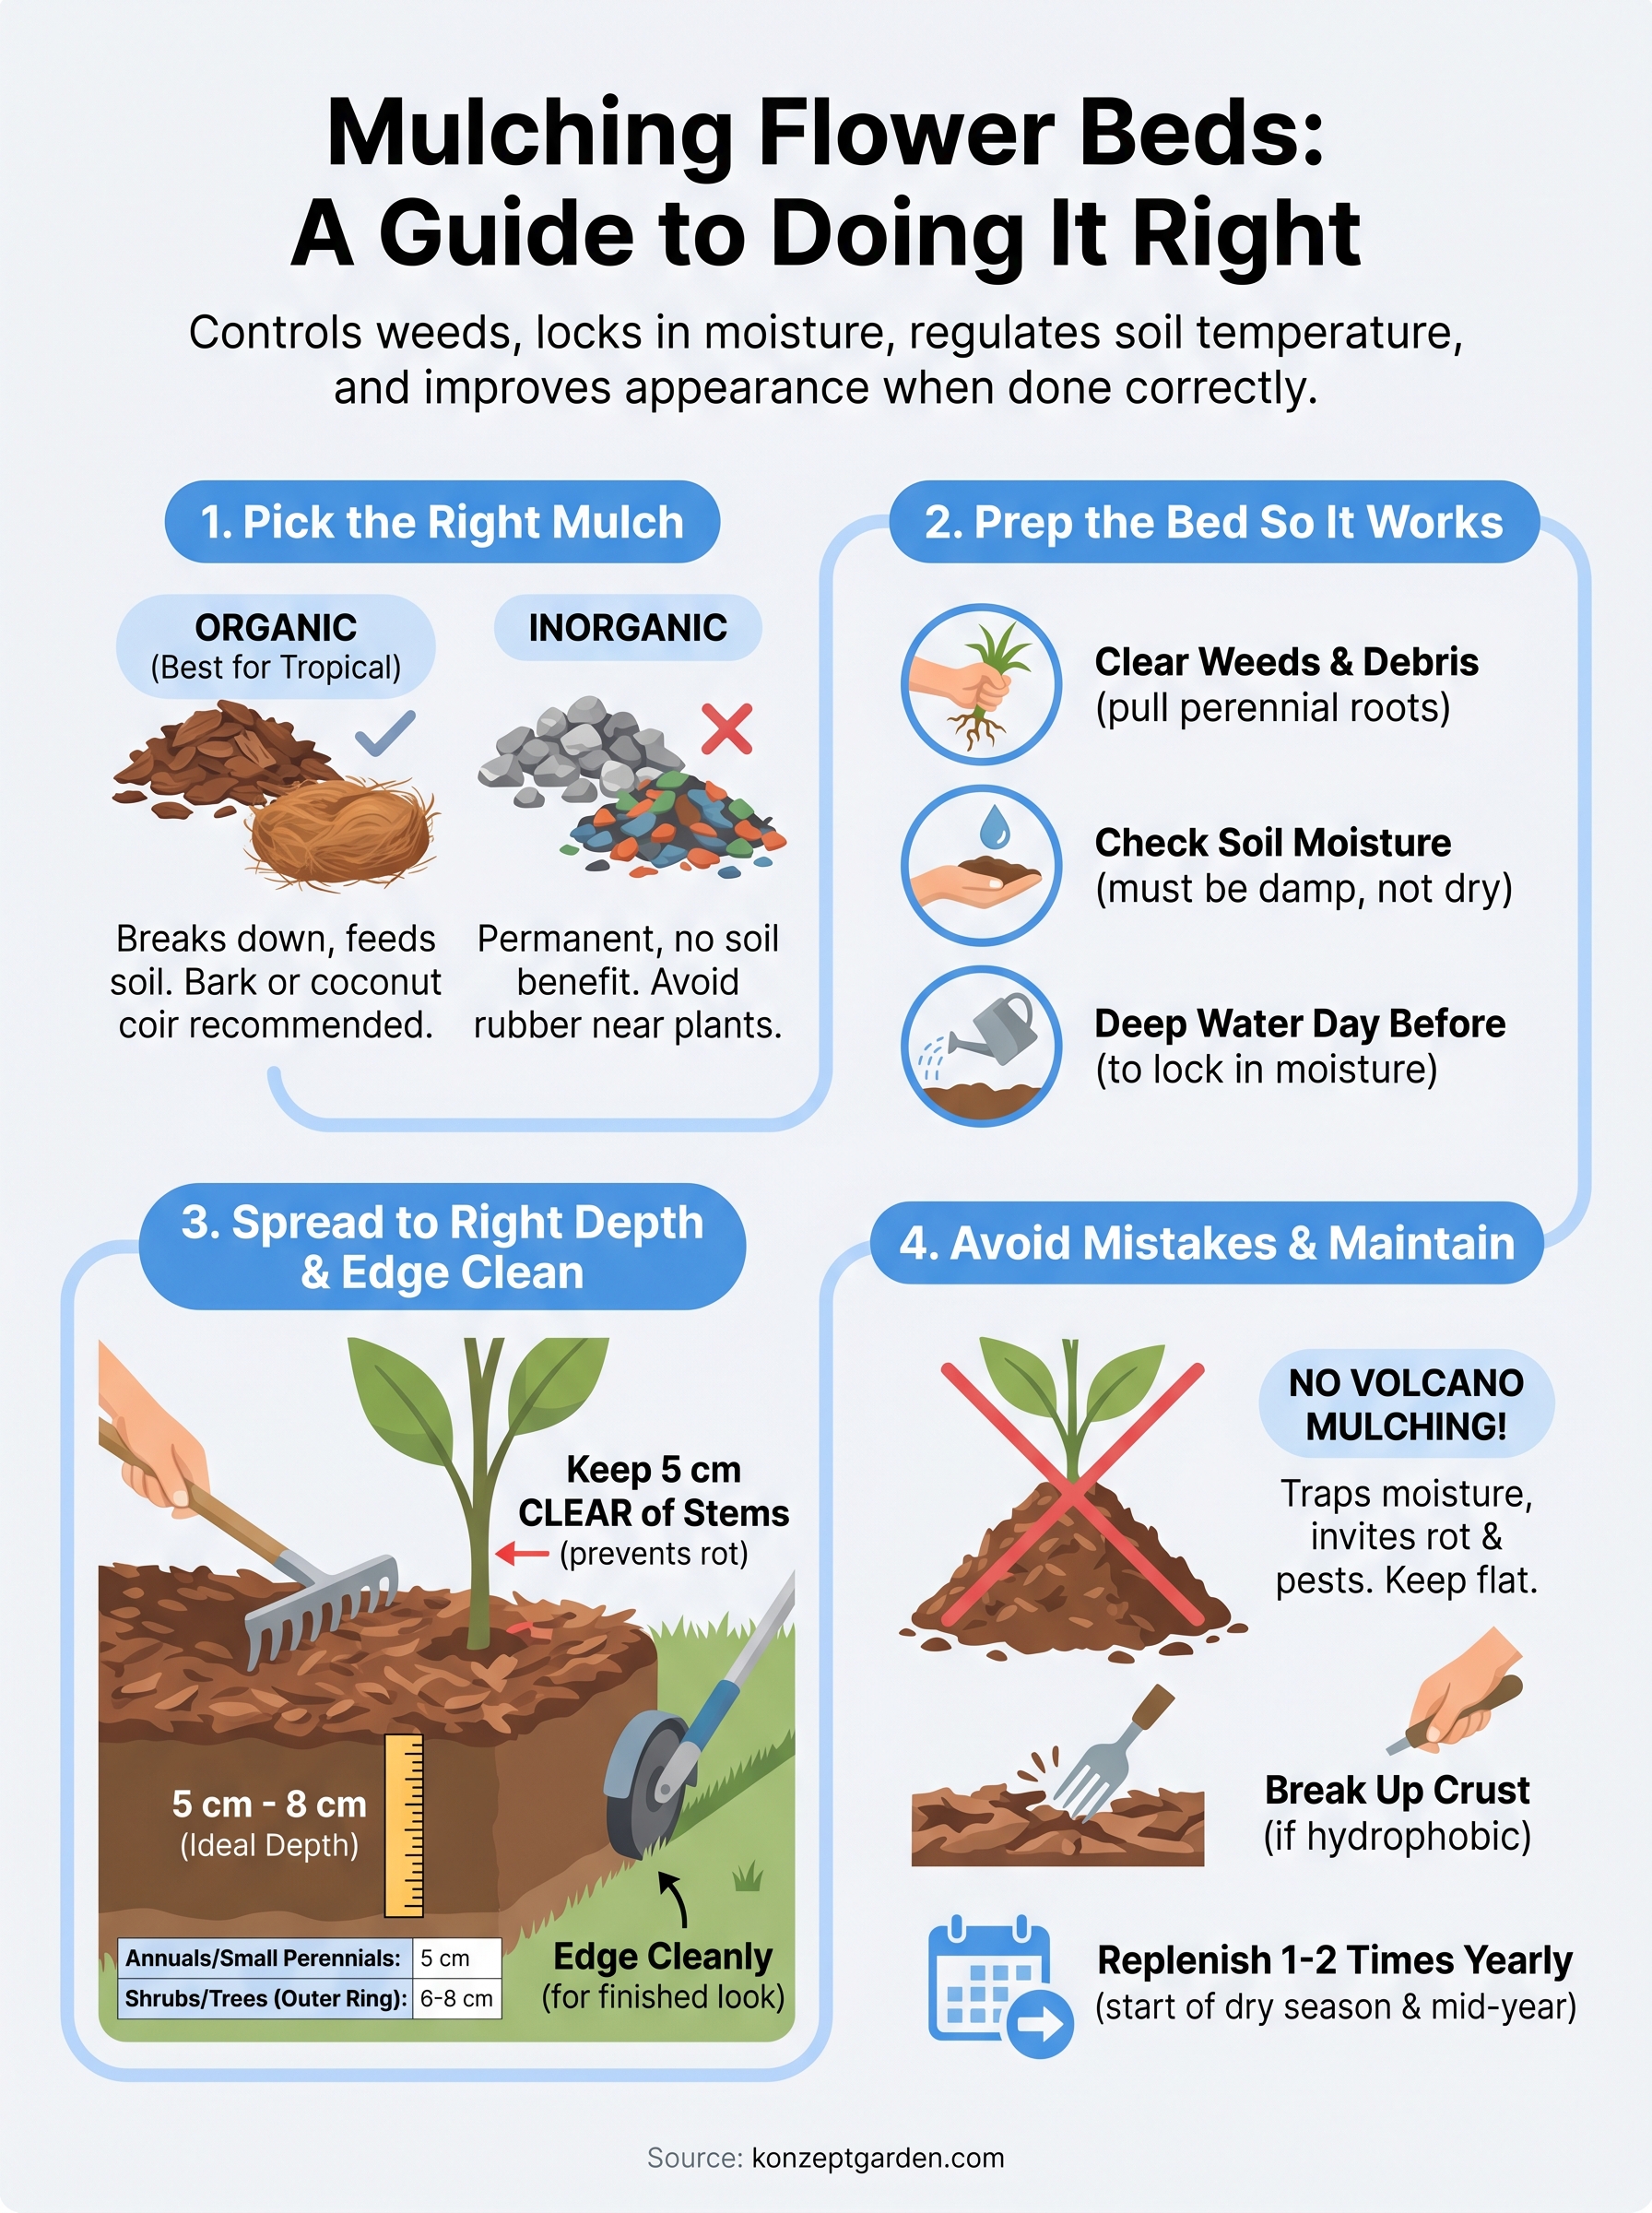
Step 1. Pick the right mulch for your flower beds
The mulch you choose directly affects how well your flower beds perform over the coming months. Organic mulches break down over time and feed your soil, while inorganic options like gravel stay in place indefinitely but offer no nutritional benefit to your plants. For most flowering plants in Malaysia's climate, organic materials give you better long-term results.
Organic mulch options for tropical gardens
For ornamental flower beds, bark mulch and coconut coir are the two most practical organic choices available in Malaysia. Bark mulch breaks down slowly, which means you won't need to top it up as often, and it handles heavy rainfall without compacting badly. Coconut coir absorbs moisture well and looks natural in a tropical garden setting, though it can mat down over a season and may need occasional loosening.
When mulching flower beds with organic material, use partially aged material rather than fresh, since fresh wood chips can temporarily pull nitrogen from your soil as they decompose.
Here are a few other organic options worth knowing:
- Compost: Great for soil nutrition but breaks down fast and needs frequent replenishment
- Dried leaves: Free and effective, but chop them first so they don't form a water-resistant mat
- Rice husks: Lightweight, locally available, and decent for moisture retention in smaller beds
When to choose inorganic mulch
Gravel and decorative stones suit specific situations well, such as dry garden beds featuring succulents or sections where you want a permanent, low-maintenance finish. You won't get the soil-building benefits that organic material provides, but inorganic mulch stays in place for years without seasonal replenishment, which makes it a sensible choice for the right spot.
Avoid rubber mulch around flowering plants or any edible garden bed. It holds heat in ways that stress roots, adds no organic value to your soil, and once it's spread, it's genuinely difficult to remove without disturbing the bed entirely.
Step 2. Prep the bed so mulch actually works
Skipping bed preparation is the most common reason mulch underperforms. If you lay mulch over existing weeds or dry, compacted soil, you lock in problems rather than prevent them. A few minutes of prep work before you spread anything will make your mulch significantly more effective from day one.
Clear weeds and debris first
Pull or cut every weed you can see before you open a bag of mulch. Established weeds that get covered will push through in many cases, especially if they have deep roots. Annual weeds are easier to smother, but perennial weeds with taproots like nutgrass need to come out completely before you mulch over them.
Once the weeds are out, remove all dead leaves, fallen branches, and plant debris from the surface of the bed. Decomposing material trapped under your mulch layer can harbor pests and fungal issues that spread to your plants over time.
Use this quick prep checklist before mulching flower beds:
- Pull all visible weeds, including roots
- Cut back any overgrown plant stems
- Rake out dead leaves and debris
- Break up any surface crust in the soil with a hand fork
- Check that no plant stems are sitting in standing water
Check soil moisture before you lay mulch
Mulch traps whatever moisture condition is already in your soil when you spread it. If the soil is bone dry when you apply your mulch layer, it will stay dry underneath until you water deeply enough to penetrate through.
Water your flower bed thoroughly one day before you mulch so the soil retains good moisture from the start, then the mulch layer works to lock that in.
Give the bed a deep watering the day before you plan to mulch. The soil surface should feel damp but not waterlogged when you're ready to spread. This one step sets your mulch up to deliver the moisture retention benefits it's supposed to provide from the first day.
Step 3. Spread mulch to the right depth and edge it clean
Getting the depth right is what separates mulch that performs well from mulch that causes problems. Too thin and weeds push through. Too thick and you suffocate roots, block water penetration, and create damp conditions that rot plant stems. For most flower beds, 5 to 8 cm is the target range.
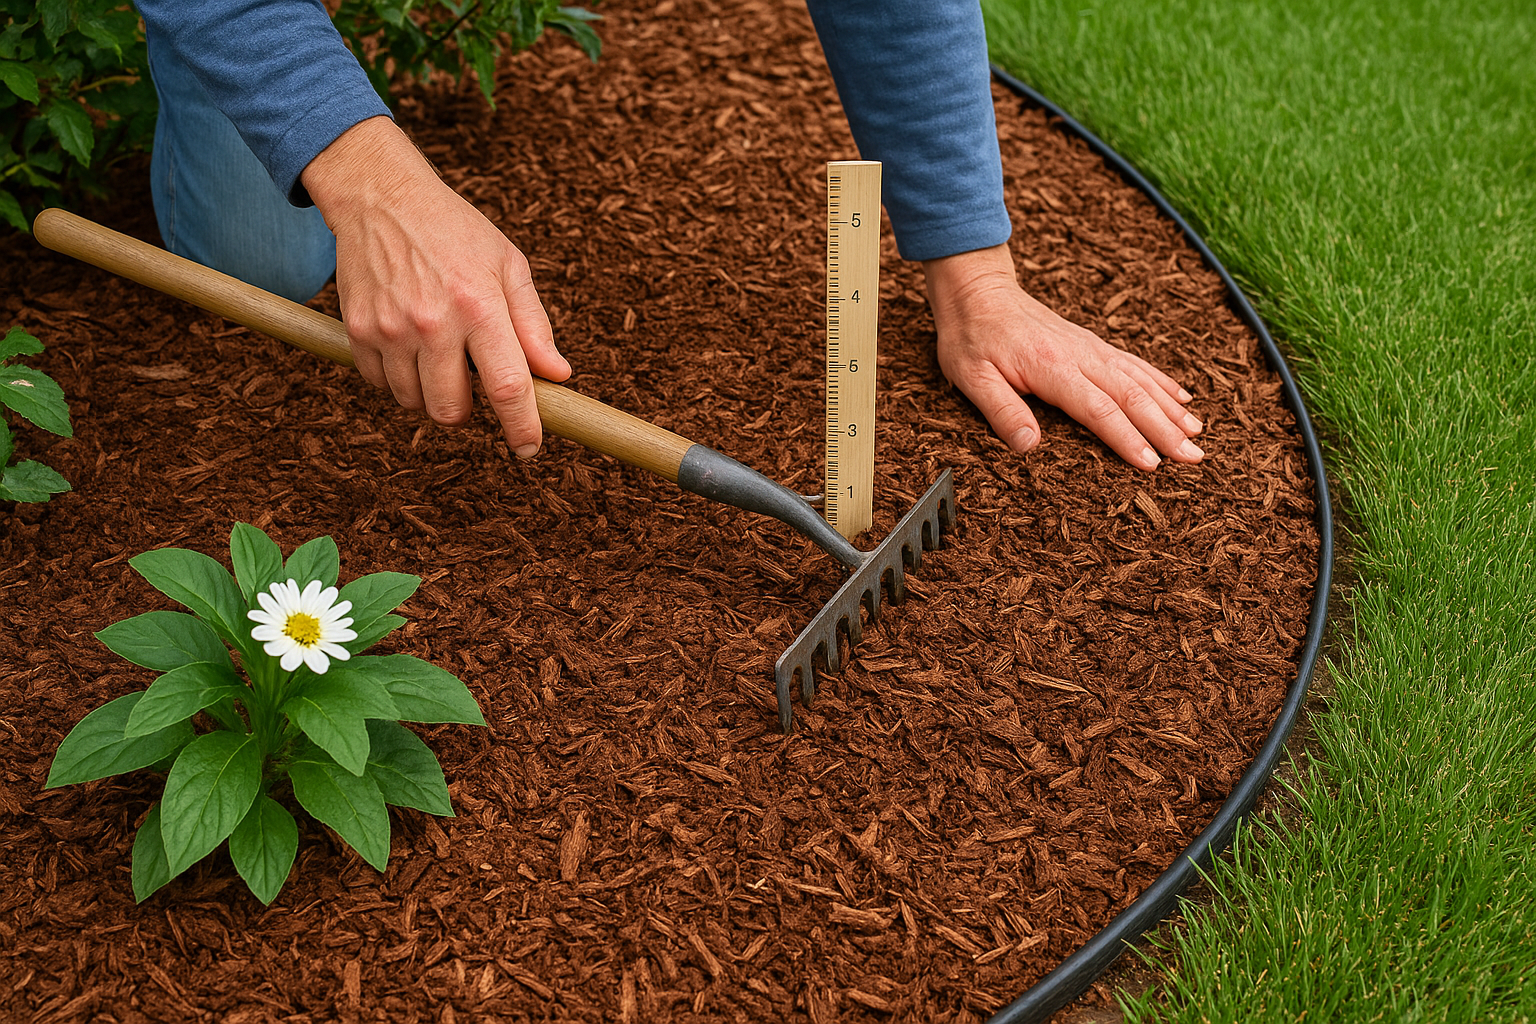
Apply the right depth for your plants
Spread mulch evenly across the bed, working from the edges inward. Use a rake or your hands to distribute it consistently, and check your depth as you go with a ruler or a stick marked at 5 cm and 8 cm. The goal is a uniform layer with no thin patches that weeds can exploit.
Keep mulch at least 5 cm away from the base of every plant stem. Mulch piled against stems holds moisture directly against bark, which leads to rot and can kill otherwise healthy plants over a single wet season.
Different plants tolerate slightly different depths, so use this as a quick reference:
| Plant Type | Recommended Depth |
|---|---|
| Annuals and small perennials | 5 cm |
| Established shrubs and perennials | 6 to 8 cm |
| Tree base (outer ring only) | 8 cm max, keep clear of trunk |
| Succulents and cacti | 2 to 3 cm (gravel preferred) |
Edge your beds for a clean finish
Once the mulch is spread, define your bed edges cleanly. Use a half-moon edger or a flat spade to cut a crisp line between the mulched bed and your lawn or paving. This stops grass from creeping into the bed and keeps the finished look sharp for months without extra maintenance.
After edging, use a soft brush or gloved hand to sweep any stray mulch back into the bed rather than leaving it scattered on paths or lawn. When mulching flower beds through this final stage, a clean edge makes the whole garden look intentional and well-maintained, which reflects the work you put into every earlier step.
Step 4. Avoid common mulching mistakes and problems
Even when you've done everything right up to this point, a few persistent mistakes can undo your work fast. Most mulching problems come from either applying too much material or ignoring what happens to the layer once it's been down for a season. Catching these issues early means you won't have to replant or start the entire bed over from scratch.
Mistakes that damage your plants
Volcano mulching is the single most destructive habit in any flower bed. It's the practice of piling mulch high in a thick cone around a plant's base, which traps moisture directly against the stem and invites rot, fungal disease, and pest activity at the crown. Keep your mulch layer flat and maintain that 5 cm clearance around every plant stem without exception.
Mulch piled against stems looks like a volcano from the side. If yours does, pull it back immediately before the next rainfall drives moisture into the bark.
Another common error is spreading a layer that's too thin across the bed. Anything under 4 cm gives weed seeds enough light to germinate underneath and push through within a few weeks. Check your depth across the entire bed after spreading, not just in one spot, because uneven application is one of the main reasons mulch underperforms in practice.
Recognizing and fixing problems after mulching
When mulching flower beds, watch for the layer becoming hydrophobic over time. Older organic mulch can form a dry, hard crust on top that repels water rather than letting it soak through to the soil below. Break up any compacted surface with a hand fork every few months to keep water moving through freely.
Also watch for signs of fungal growth like white mycelium or slime mold appearing on your mulch surface. These are usually harmless to plants, but they signal that the layer is staying too wet between rain events. Pull the affected mulch back, let the soil breathe for a day or two, then reapply at the correct depth with better spacing around plant crowns.
Quick recap
Mulching flower beds comes down to four things done in the right order: pick the right material, prep the bed properly, spread to the correct depth, and keep the layer maintained over time. Organic mulches like bark or coconut coir work best in Malaysia's climate, and 5 to 8 cm is the depth that delivers results without smothering your plants.
Clear weeds before you spread anything, water the soil the day before, and always keep mulch away from plant stems to prevent rot. Check the layer every few months, break up any crust that forms, and top it up once or twice a year to maintain consistent coverage.
Your outdoor space deserves that same level of care and attention at every stage of the design. If you want professional guidance on building a garden that's set up to thrive from the start, talk to the Konzept Garden team and get a free consultation today.

