A poorly drained flat roof doesn't just damage the building, it wrecks everything beneath it, including the garden and outdoor spaces you've worked hard to create. Standing water leads to leaks, structural stress, and uncontrolled runoff that erodes landscaping and floods planting beds. That's why a solid flat roof drainage design guide matters to anyone planning a property's outdoor environment from the top down.
At Konzept Garden, our landscape design work in Malaysia often starts with understanding how water moves across an entire property, roof surfaces included. Drainage from flat roofs directly shapes how we plan gardens, pathways, and planting zones below. Get it wrong, and even an award-winning landscape suffers. Get it right, and water becomes an asset rather than a threat.
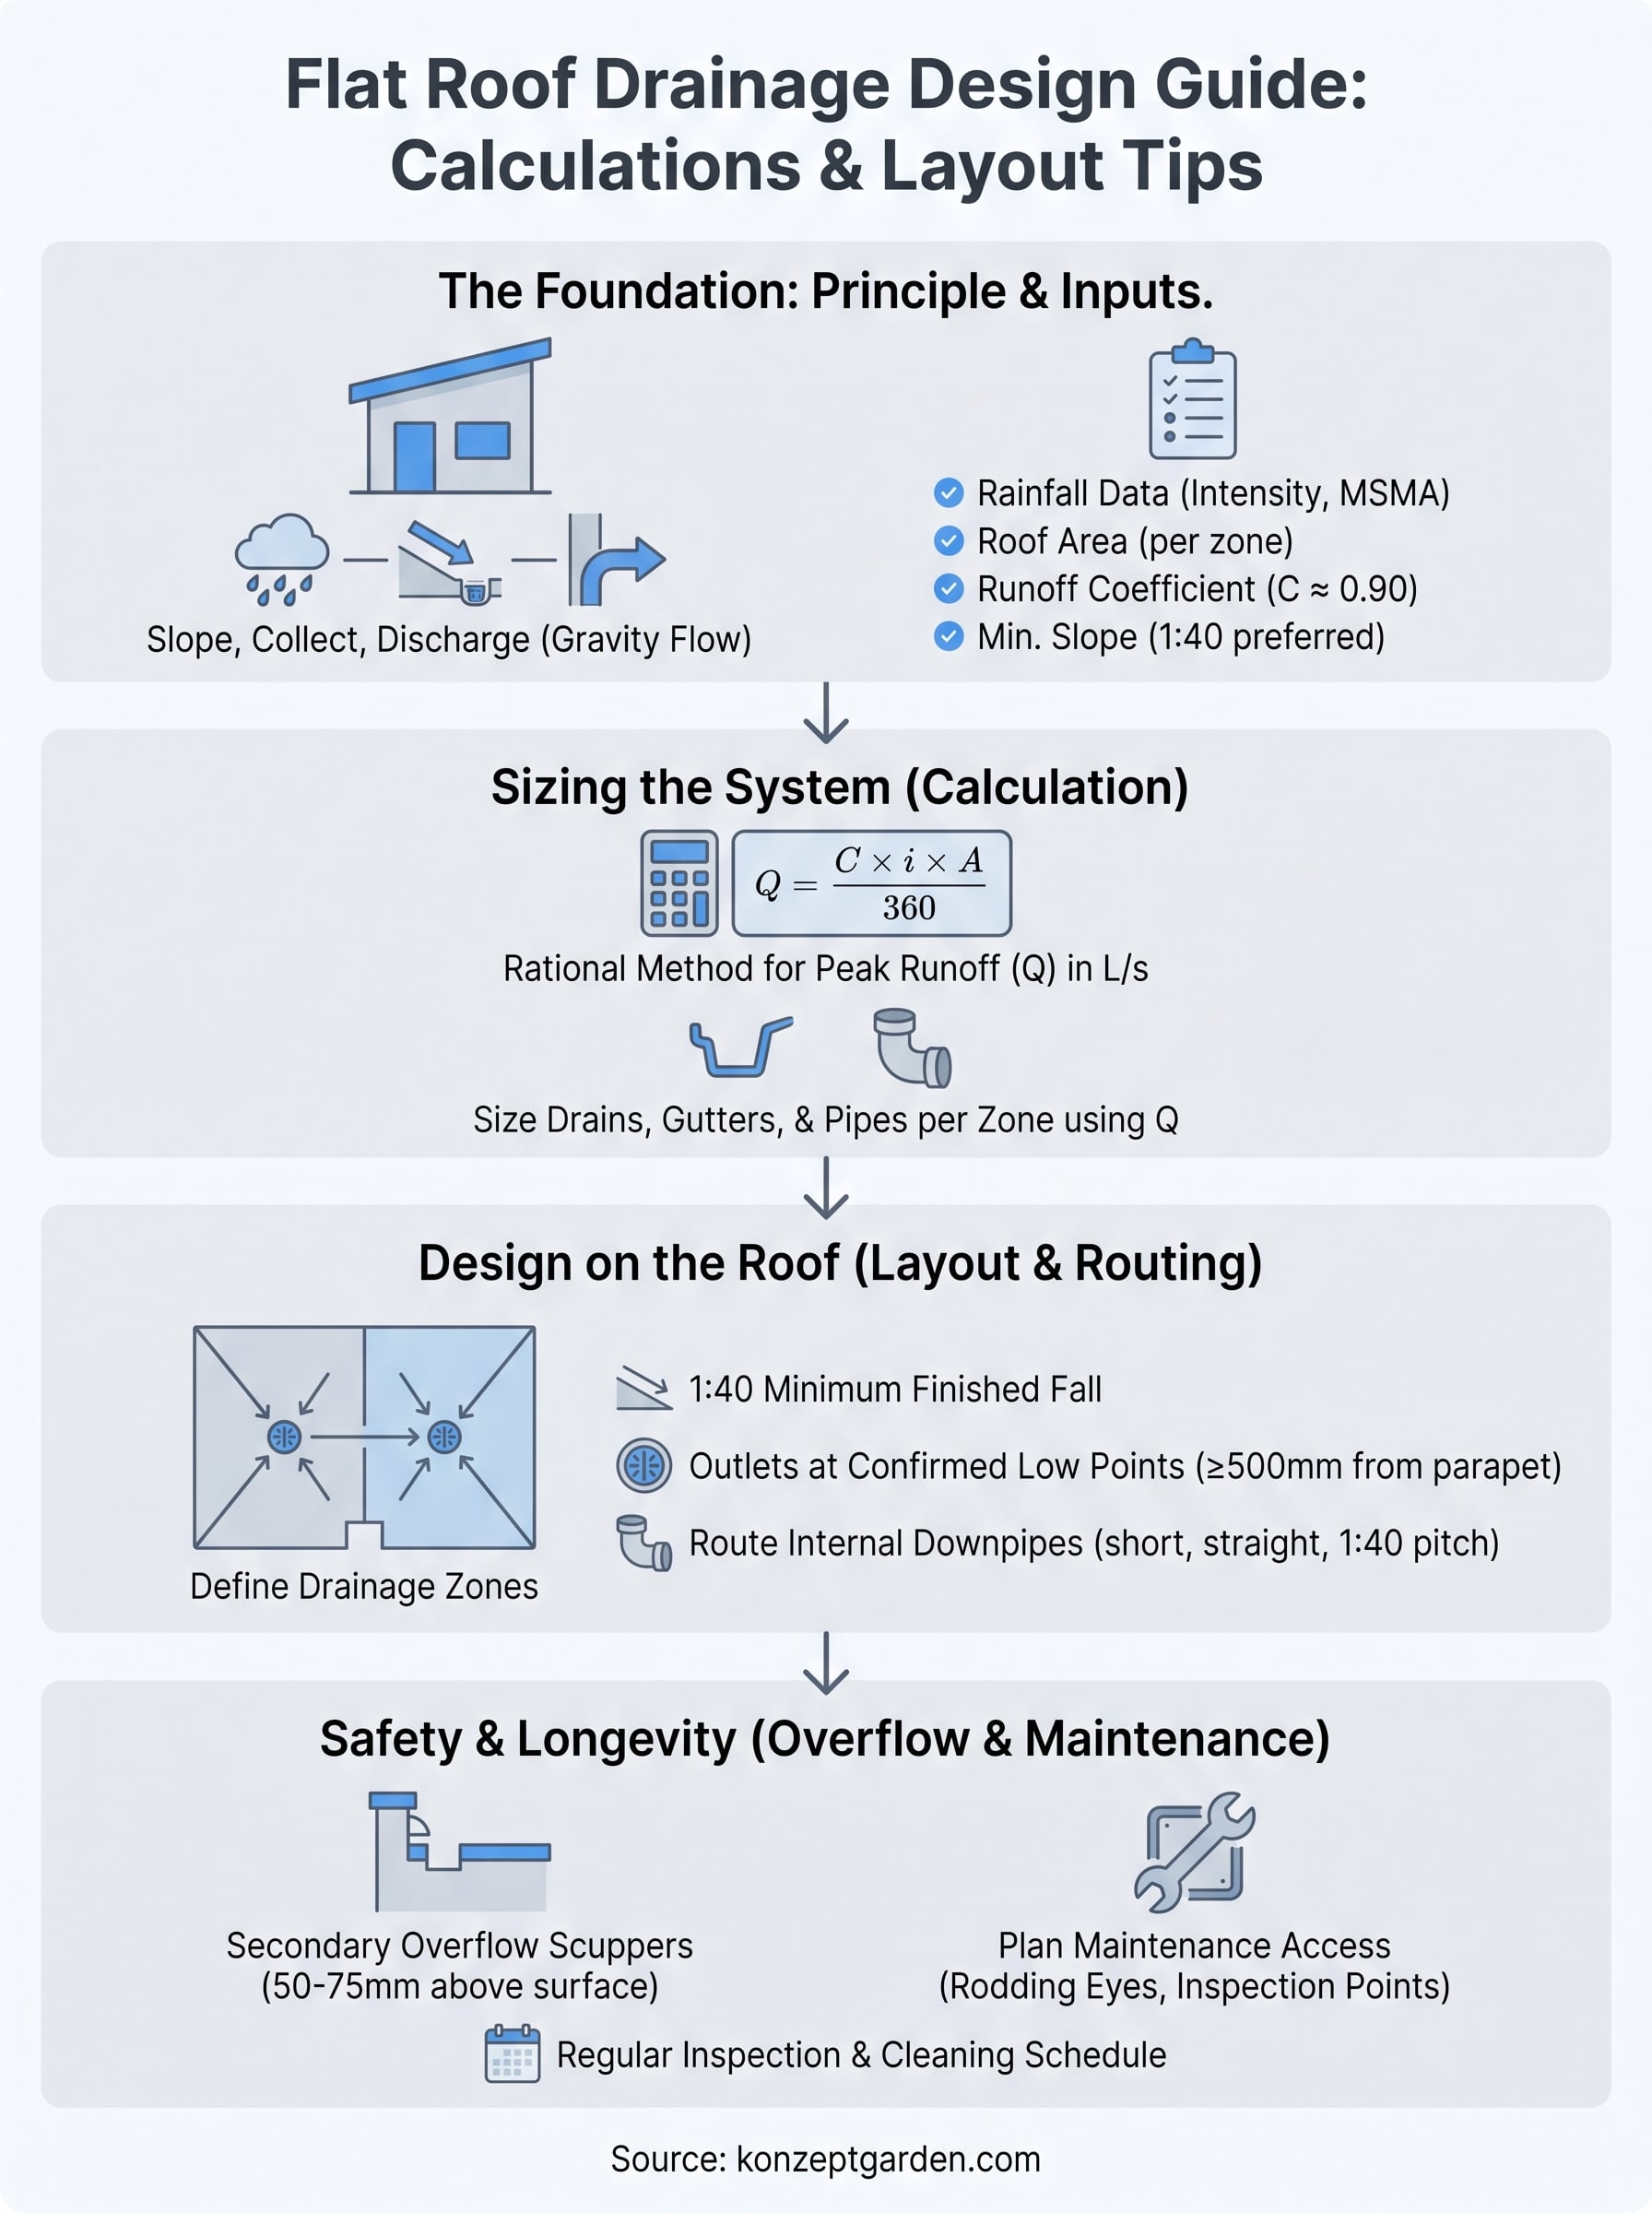
This guide walks you through the calculations, slope requirements, layout strategies, and compliance standards you need to design a flat roof drainage system that actually performs. Whether you're a homeowner, developer, or designer, you'll find practical methods you can apply to your next project.
How flat roof drainage works and what you need
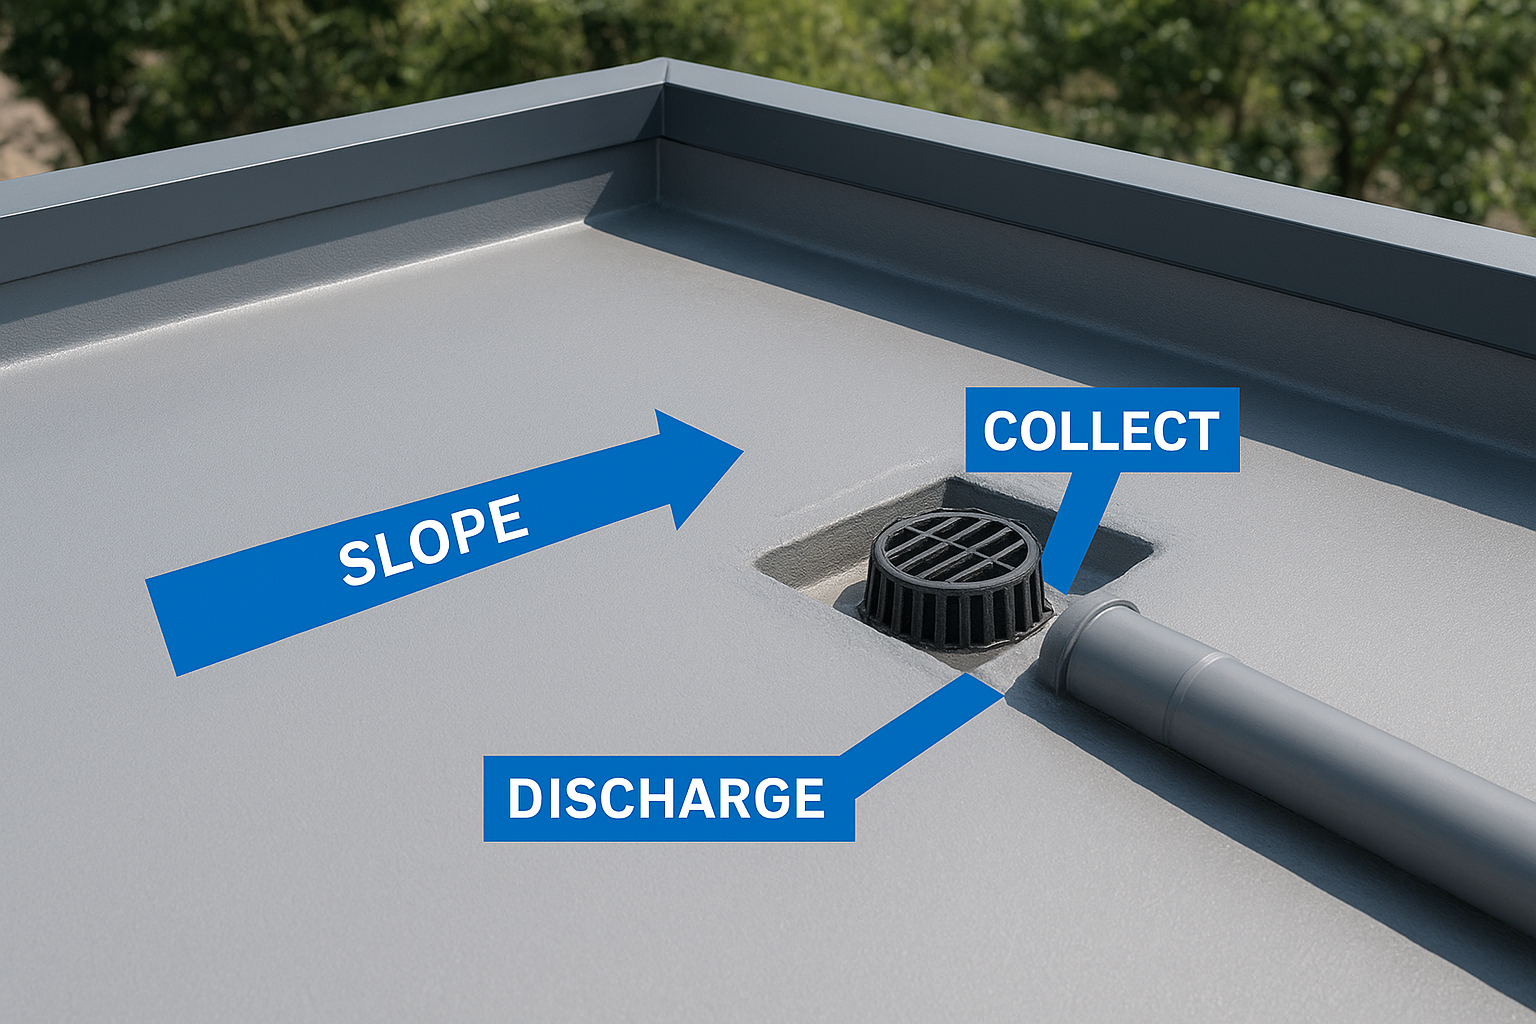
Flat roofs look level, but they must never be truly flat. Every effective flat roof drainage system relies on three linked actions: directing water toward outlets via deliberate slopes, collecting it through drains or gutters, and discharging it safely away from the building and its surroundings. In Malaysia's high-rainfall climate, this chain must handle intense downpours fast, or water backs up, overflows, and saturates everything at ground level including planting beds, pathways, and soil structures below.
The drainage principle: slope, collect, discharge
Water on a flat roof moves by gravity, so the slope you build into the deck determines how quickly it reaches the outlet. MS 1064 (Malaysian Standards for roofing) and international references such as BS EN 12056-3 recommend a minimum finished fall of 1:80 (approximately 1.25%) across the roof surface, though 1:40 is a more reliable working target that accounts for construction tolerances and structural deflection under live loads.
A fall of 1:80 is the absolute minimum; design to 1:40 wherever possible to protect against ponding when the structure deflects under load or construction tolerances compound.
Outlets, whether internal gravity drains, siphonic heads, or perimeter gutters, sit at the low points of each drainage zone you define. Pipe runs then carry collected water to a storm drain, soakaway, or rainwater harvesting tank. Every component in this chain must be sized to handle the same design storm event, or the weakest link floods first.
Components you need on site
Before you calculate anything, confirm you have the right physical components and site information ready. A poorly specified component list is the most common reason flat roof drainage designs fail during construction or inspection.
Here is what you need to specify for a complete system:
- Roof area per drainage zone (measured in m²)
- Roof surface material and its runoff coefficient
- Outlet type (conventional gravity drain, siphonic drain, or overflow scupper)
- Rainwater pipe diameter and material (uPVC, cast iron, or HDPE)
- Overflow provision height and discharge location
- Access points for future inspection and blockage clearing
Each item on this list feeds directly into the hydraulic calculations covered in the steps that follow, so confirm them before you open a spreadsheet.
Step 1. Gather inputs and set design criteria
Before any calculation makes sense, you need accurate site data and a clear set of agreed design criteria. Skipping this step produces a system sized for the wrong storm event or the wrong roof area, which means either costly overdesign or, worse, a drainage failure during a heavy Malaysian downpour.
Rainfall data for Malaysia
Malaysia's rainfall intensity varies significantly by region and storm duration. MSMA 2nd Edition (Manual Saliran Mesra Alam), published by the Department of Irrigation and Drainage (DID), is the primary reference for design rainfall data in Malaysia. Use it to extract the short-duration intensity (typically 5 or 10 minutes) for your specific location and your chosen return period, since a roof drain responds to peak intensity, not daily totals.
For residential flat roofs, a 1-in-50-year return period is a standard design benchmark in Malaysia; commercial and critical structures typically require 1-in-100-year storm sizing.
Inputs checklist before you calculate
Gather the following values and record them on a single design sheet before moving to Step 2. Having everything in one place prevents errors when you start running numbers.
| Input | Reference source | Typical value |
|---|---|---|
| Rainfall intensity (mm/hr) | MSMA 2nd Ed. / DID IDF curves | 150-250 mm/hr (KL, 10-min, 50-yr) |
| Roof drainage area (m²) | Architectural drawings | Measured per drainage zone |
| Runoff coefficient (C) | BS EN 12056-3 surface table | 0.90 for impermeable membrane |
| Minimum design slope | MS 1064 / project specification | 1:40 preferred |
Your flat roof drainage design guide calculations in the next step depend entirely on the quality of these inputs. Confirmed data now means fewer revisions later.
Step 2. Calculate runoff and size drains and gutters
With your inputs confirmed, you can now calculate the peak runoff flow rate your drainage system must handle. This single number drives every sizing decision you make for drains, gutters, and downpipes. Use the Rational Method, which is the standard approach referenced in MSMA 2nd Edition for small impermeable catchment areas like flat roofs.
The rational method formula
The Rational Method gives you peak runoff in liters per second. Apply it to each drainage zone separately, not the total roof area, so each outlet handles only the flow it actually collects.
The formula is:
Q = (C × i × A) / 360
Where:
- Q = peak runoff flow rate (L/s)
- C = runoff coefficient (0.90 for impermeable membrane roofing)
- i = rainfall intensity (mm/hr from your MSMA IDF curve)
- A = drainage zone area (m²)
Example: A 120 m² zone in Kuala Lumpur using a 200 mm/hr intensity (10-min, 50-year storm) gives Q = (0.90 × 200 × 120) / 360 = 60 L/s.
Size each outlet for the full Q value of its zone; never share a single outlet between zones without confirming it handles the combined peak flow.
Sizing gutters and downpipes
Once you have Q per zone, match it against manufacturer flow capacity tables for your chosen drain or gutter profile. As a working reference, a 100 mm diameter uPVC downpipe typically carries around 8-12 L/s under gravity flow at a 1:40 pipe gradient. Size up by one pipe diameter if your calculation lands near the top of the capacity range, since partial blockages reduce effective capacity during real storms.
Step 3. Lay out falls, outlets, and pipe routing
With your flow rates confirmed, you can now turn numbers into a physical layout on the roof deck. This step is where your flat roof drainage design guide moves from spreadsheet to drawing board. Good layout decisions reduce pipe lengths, eliminate flat spots where water pools, and position outlets where they can actually be serviced without disrupting the building's regular use.
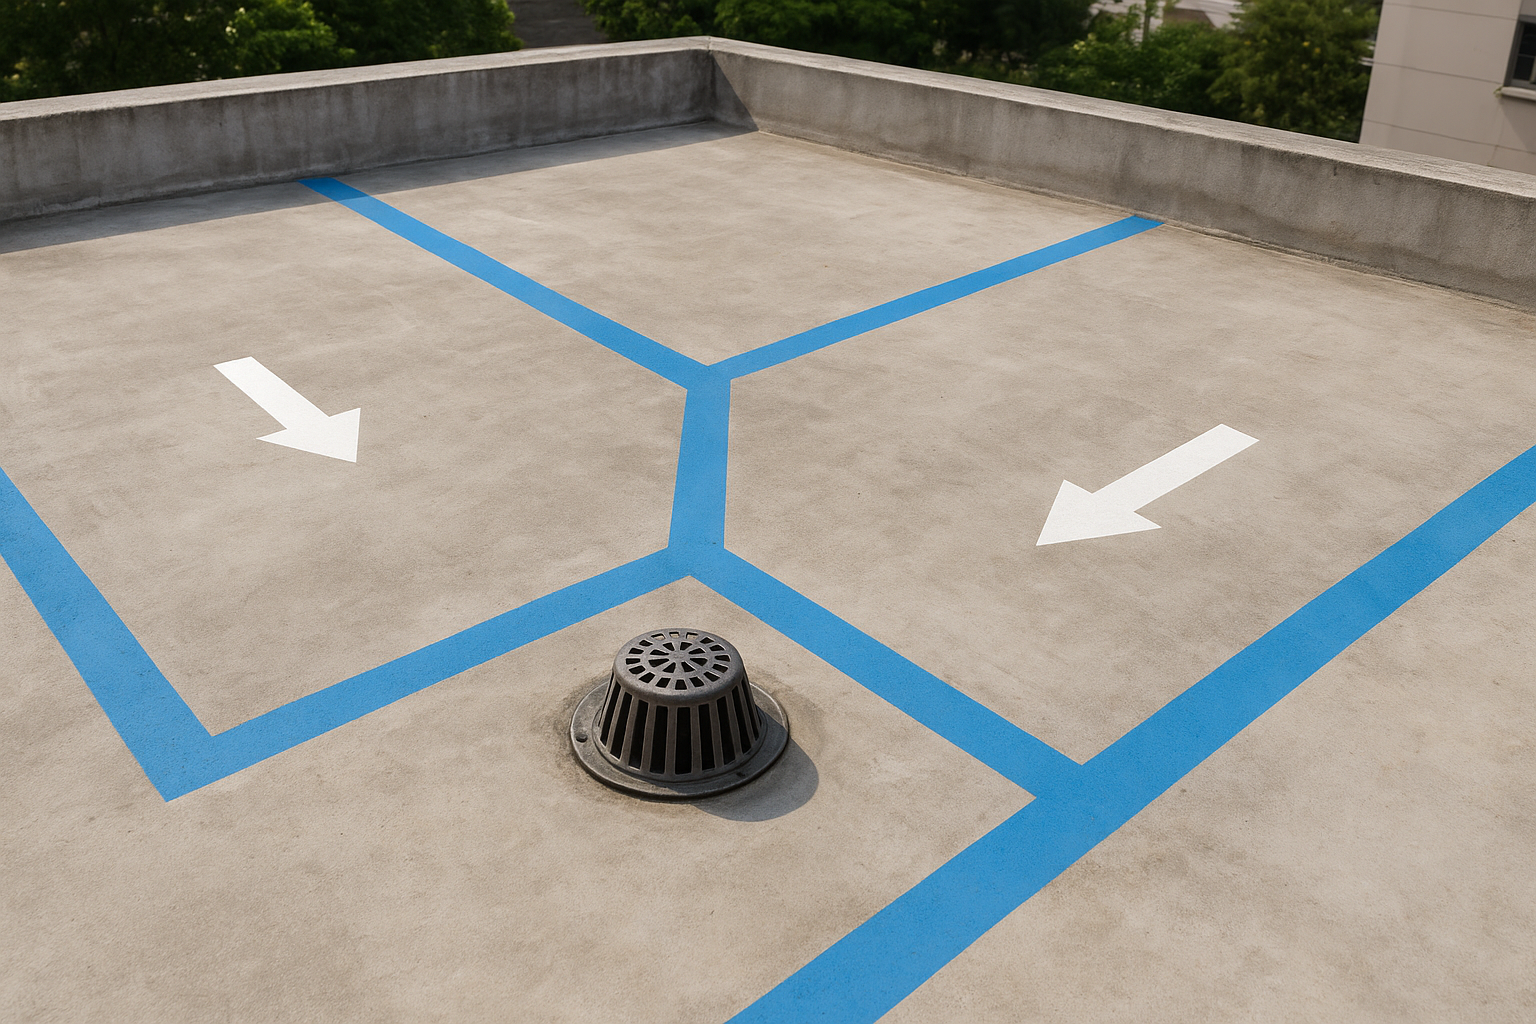
Define drainage zones and fall directions
Divide the roof into clearly bounded zones, each sloping toward a single low-point outlet. On a standard rectangular roof, two zones draining from a central ridge toward opposite parapets is the most efficient arrangement. On irregular shapes, use tapered insulation boards to create consistent falls where structural falls alone cannot achieve your target gradient. Mark every zone boundary on your layout drawing before you fix any outlet positions.
Avoid designing internal valley gutters where two roof slopes converge; these concentrate the full combined flow at one point and fail first when leaves or debris partially block the outlet.
Apply these fall rules as your layout checklist:
- Minimum finished fall: 1:40 across every zone
- Use tapered insulation where structural falls fall short of 1:40
- No flat area larger than 0.5 m² anywhere on the finished surface
Position outlets and route pipes
Place each outlet at the lowest confirmed point of its zone, at least 500 mm from any parapet wall or upstand so water moves freely around the drain body. Route downpipes internally through the building envelope wherever possible in Malaysia's climate; exposed external pipes expand and contract significantly under direct sun and suffer physical damage from maintenance traffic. Keep every horizontal pipe branch short, straight, and pitched at a minimum 1:40 gradient to prevent sediment settling inside the pipe.
Step 4. Add overflow paths and plan maintenance access
Every flat roof drainage design guide treats the primary outlet as the main event, but secondary overflow provision is what prevents a blocked drain from becoming a structural disaster. If your primary outlet blocks under debris or heavy rain, water must have a controlled escape route that discharges safely before it reaches a damaging depth on the roof deck.
Design overflow scuppers and secondary outlets
Position overflow scuppers or secondary outlets 50-75 mm above the finished roof surface, which keeps them inactive during normal rainfall but activates immediately when primary drainage fails. Size each scupper to discharge at least the same peak flow rate as your primary drain for the zone it serves. A standard opening of 150 mm wide by 75 mm tall in a parapet wall typically handles around 15-20 L/s, but confirm this against your calculated Q from Step 2.
Never direct overflow discharge toward a neighboring property or onto a lower roof level without a controlled channel; uncontrolled overflow causes more structural damage than the original blockage.
Plan maintenance access points
Your drainage system only performs as designed if blockages get cleared before they accumulate. Mark access hatches, inspection chambers, and rodding eyes on your layout drawing so maintenance teams can reach every section of pipework without cutting into the roof membrane. Place a rodding eye at every change of pipe direction and at the base of every downpipe before it connects to the underground drain.
Include this maintenance schedule template in your handover documentation:
| Inspection item | Frequency | Action |
|---|---|---|
| Roof drain grates | Monthly | Clear debris, check seating |
| Overflow scuppers | Monthly | Confirm clear and unobstructed |
| Downpipe rodding eyes | 6-monthly | Rod through and flush |
| Pipe gradients and joints | Annually | Check for settlement or leaks |
Wrap-up and next steps
This flat roof drainage design guide covers everything from gathering MSMA rainfall data to sizing downpipes, laying out falls, and adding overflow scuppers. Follow the four steps in order: confirm your inputs, run the Rational Method for each zone, place outlets at confirmed low points, and always include secondary overflow paths. Skipping any one step creates a system that works on paper but fails during the first heavy Malaysian downpour.
Good roof drainage protects more than the building. It protects your entire outdoor environment below, including soil structures, planted beds, pathways, and water features. At Konzept Garden, we design landscapes with roof runoff routes in mind from the start, so nothing you build at ground level suffers from uncontrolled discharge above. If you're planning a property transformation that includes garden water features alongside your drainage improvements, talk to our landscape design team to get started with a free consultation.
