
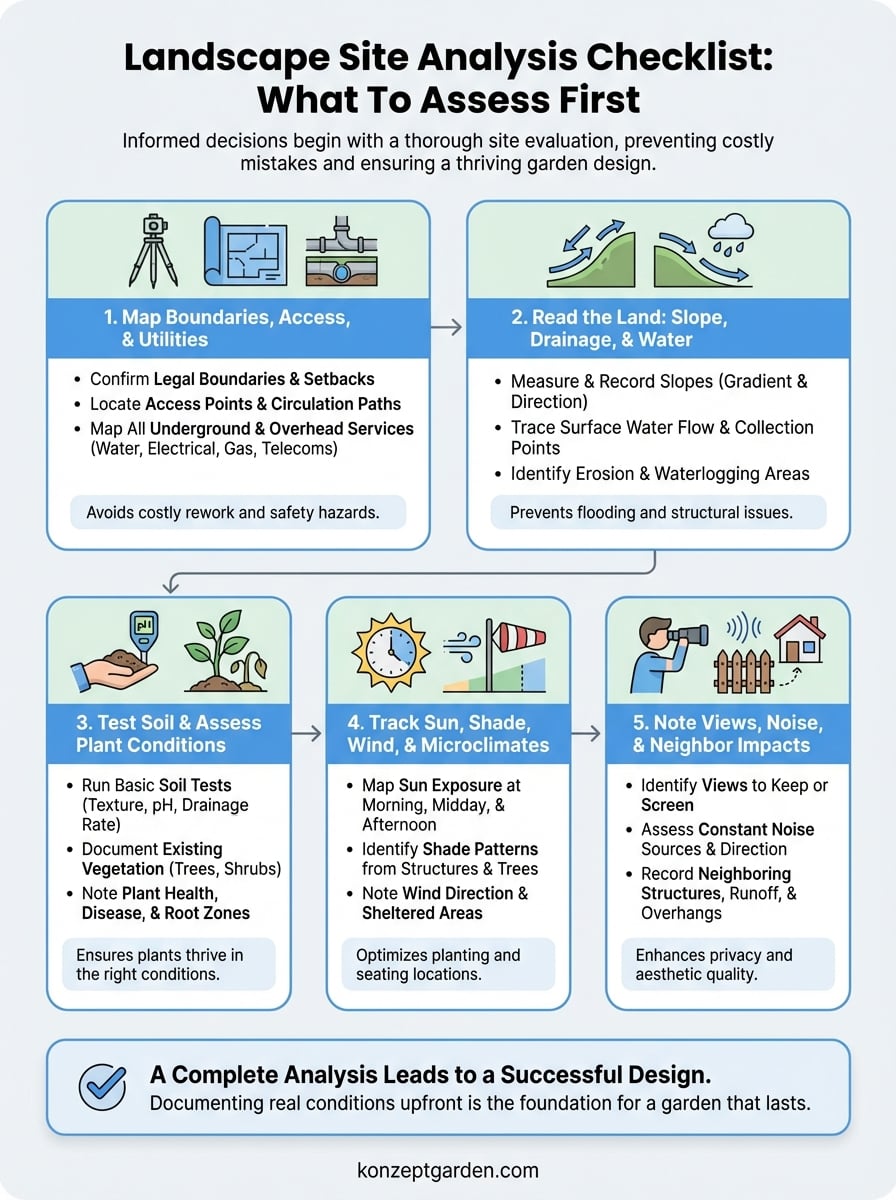
Every successful garden begins before a single plant goes into the ground. It starts with understanding what you're working with, the soil, the slope, the sun, the drainage, and a dozen other factors that will either support your design or quietly sabotage it. A proper landscape site analysis checklist is the tool that keeps you from guessing and helps you make informed decisions from day one.
Skip this step, and you risk choosing plants that won't survive your microclimate, placing structures where water pools, or designing walkways that fight the natural terrain. We've seen it happen. At Konzept Garden, our design process always starts with a thorough site evaluation, it's the foundation behind every award-winning project we deliver across Malaysia, and it's non-negotiable for good results.
This guide walks you through every factor you need to assess before putting pencil to paper, from soil quality and topography to existing vegetation and local regulations. Whether you're a homeowner planning a garden renovation or a developer scoping out a commercial project, this checklist gives you a clear starting point and helps you avoid costly mistakes that show up months after the work is done.
What a landscape site analysis checklist covers
A landscape site analysis checklist is a structured inventory of everything that exists on, above, and beneath your property before any design work begins. It captures physical characteristics like slope and drainage, environmental conditions like sun and wind patterns, and contextual factors like neighboring structures, legal setbacks, and buried utilities. Think of it as a diagnostic tool that tells you what your land can and cannot support.
The checklist doesn't just document what's there. It helps you identify constraints and real opportunities that would otherwise stay hidden until they become problems. A low-lying area might look like a perfect spot for a seating nook, but if it collects standing water after every rain, you'll spend years managing a soggy, unusable space. The checklist surfaces that reality upfront.
Knowing your site's limitations before you design around them is the difference between a garden that thrives and one that constantly fights you.
The physical and topographic conditions
Your first category covers the land itself: its shape, grade, and how water moves across it. You need to document slopes, note high and low points, and identify where surface water flows or collects. This directly affects drainage design, structural placements like walls and paths, and which plants can establish without ongoing stress.
Also under this category is soil condition, which covers texture, composition, pH, and drainage capacity. Malaysian soils vary significantly from one district to another. Sandy coastal soils drain fast and lack nutrients. Heavy clay soils in older residential areas hold water and compact easily. Knowing what you have before you select plants or plan irrigation is not optional.
Climate and environmental conditions
This category includes sun exposure, shade patterns, wind direction, and how humidity behaves across your specific site. A site analysis doesn't just record what the climate is in general. It maps how climate behaves on your actual plot, because a single garden can have multiple microclimates depending on structures, trees, walls, and orientation.
Tracking which areas receive full sun, which stay shaded for most of the day, and how wind enters the space matters especially in Malaysia's tropical climate. Managing heat and afternoon sun is critical for both plant survival and human comfort. Skipping this step turns your planting selections into guesses rather than informed choices.
Existing features, vegetation, and services
This category covers what's already on the site: trees, shrubs, hardscape, and buildings that you may want to keep, relocate, or remove. Existing trees affect root zones, shade coverage, and moisture competition. A mature tree that looks like an obstacle can turn into a significant design asset once you understand its canopy spread and growth behavior.
You also need to map all underground and overhead services, including water pipes, drainage lines, electrical conduits, and telecommunications cables. Digging into a live utility line is not just expensive. It's dangerous, and it can shut down a project entirely while repairs are completed. This layer of the checklist protects both your timeline and your safety.
| Category | Key items to document |
|---|---|
| Physical and topographic | Slopes, drainage paths, high/low points, soil type and pH |
| Climate and environment | Sun hours, shade zones, wind direction, microclimates |
| Existing features | Trees, structures, hardscape, buried or overhead utilities |
| Legal and regulatory | Setbacks, easements, covenants, local authority guidelines |
Including a legal and regulatory layer in your checklist is equally important. Property setbacks, easement zones, and local authority guidelines in Malaysia, such as those from your municipal council (Majlis Perbandaran), can restrict where you build, plant, or install water features. Ignoring this layer can force you to redo completed work at full cost.
Before you visit: prep, tools, and data sources
Arriving at a site unprepared wastes time and leaves gaps in your data. Before you walk the property, spend an hour pulling together existing records and confirming what information you can gather remotely. A well-prepared landscape site analysis checklist starts at your desk, not at the site entrance, and the documents you collect beforehand will shape every observation you make once you're on the ground.
Gather existing documents and data
Start with your property survey or cadastral plan, which shows legal boundaries, easements, and any registered encumbrances. In Malaysia, you can request this from your local land office (Pejabat Tanah) or obtain a copy through a licensed surveyor. If the property is a new development, the developer typically provides a set of as-built drawings that include drainage layouts, utility runs, and structural elements.
Collecting these documents before your site visit prevents you from mapping things that are already officially recorded, and it surfaces legal constraints you might otherwise miss entirely.
Beyond legal records, check satellite imagery and topographic data using freely available tools like Google Maps or Google Earth. These give you a preliminary read on site orientation, tree coverage, neighboring structures, and approximate slope direction. You won't get exact measurements this way, but you'll arrive with a working mental map of the space before you take a single step on the ground.
What to bring on site
Your on-site kit doesn't need to be elaborate, but the right tools make your observations measurable rather than approximate. Pack a long measuring tape (at least 30 meters), a compass for tracking sun orientation, and a soil pH test kit so you can take readings on the spot rather than waiting for lab results. A smartphone or digital camera is essential for systematic photo documentation.
Bring a printed base plan or grid paper to sketch dimensions and note features as you move through the site. Even a rough hand-drawn plan with accurate measurements gives you something concrete to work from back at the desk. Label each sketch with the direction you're facing and the time of day, because light conditions shift significantly across a tropical day in Malaysia and those details matter when you assess shade patterns in a later step.
Pre-visit checklist:
- Property survey or cadastral plan
- As-built drawings (if available)
- Google Maps or Google Earth screenshots for reference
- 30-meter measuring tape
- Compass
- Soil pH test kit
- Smartphone or camera
- Printed base plan or grid paper
Step 1. Map boundaries, access, and utilities
The first physical step in your landscape site analysis checklist is mapping exactly what you own, how people move through it, and what runs beneath it. This isn't about aesthetics yet. You need a factual layer of the site locked down before you design anything, because every decision you make about planting, structures, and hardscape depends on knowing where the legal lines sit and where the buried infrastructure runs.
Confirm your legal boundaries
Walk the perimeter of the property and cross-reference every boundary marker against your cadastral plan. Look for concrete boundary pillars, metal pins, or fencing that marks the legal edges of the site. Measure the full perimeter and note the dimensions on your base plan. If any section of the boundary is unclear or disputed, flag it now. Attempting to design right up to a boundary line that turns out to be wrong is a problem that costs real money to fix.
An incorrect boundary assumption is one of the most common reasons residential garden projects require expensive rework after construction begins.
While you confirm boundaries, record all setback requirements that apply to your local authority zone. In Malaysia, different municipal councils (Majlis Perbandaran) apply different rules about how close you can build to a property line. Note these setbacks directly on your base plan so they become a visible constraint during design rather than a surprise during permit submission.
Locate access points and circulation paths
Mark every existing entry point onto the property, including gates, driveways, side passages, and rear access lanes. Note the width of each opening, because this determines what equipment can enter during construction and what maintenance vehicles can access later. A rear gate that's too narrow for a ride-on mower or a delivery of materials affects your design choices in practical ways.
Also document how pedestrian and vehicle traffic currently flows through the site. Look at wear patterns in grass or soil, which often show the natural desire lines people already follow. Designing against established movement patterns leads to paths that nobody uses.
Map all utilities
Use your as-built drawings to locate every service line running through or under the site: water supply, drainage, electrical conduits, gas lines, and telecommunications cables. Mark each one on your base plan with its approximate depth if the records include that information. Where records are unclear, contact your local utility provider before any ground work begins.
Use this template to log each service:
| Utility type | Location on site | Approximate depth | Source of data |
|---|---|---|---|
| Water supply | Along north boundary | 600mm | As-built drawing |
| Stormwater drain | Centre of rear garden | 900mm | Site survey |
| Electrical conduit | From meter box to garage | 450mm | As-built drawing |
| Telecoms cable | Along east boundary | 300mm | Provider records |
Filling in this table completely before any digging starts protects your project timeline and prevents the kind of on-site emergency that shuts down work for days.
Step 2. Read the land: slope, drainage, and water
After you lock down boundaries and utilities, your next task in the landscape site analysis checklist is understanding how the land moves and where water goes. Slope and drainage are two of the most influential factors in any garden design, and in Malaysia's climate, where heavy rainfall arrives fast and intensely, getting this step wrong leads to waterlogged planting beds, eroded paths, and flooded structures.
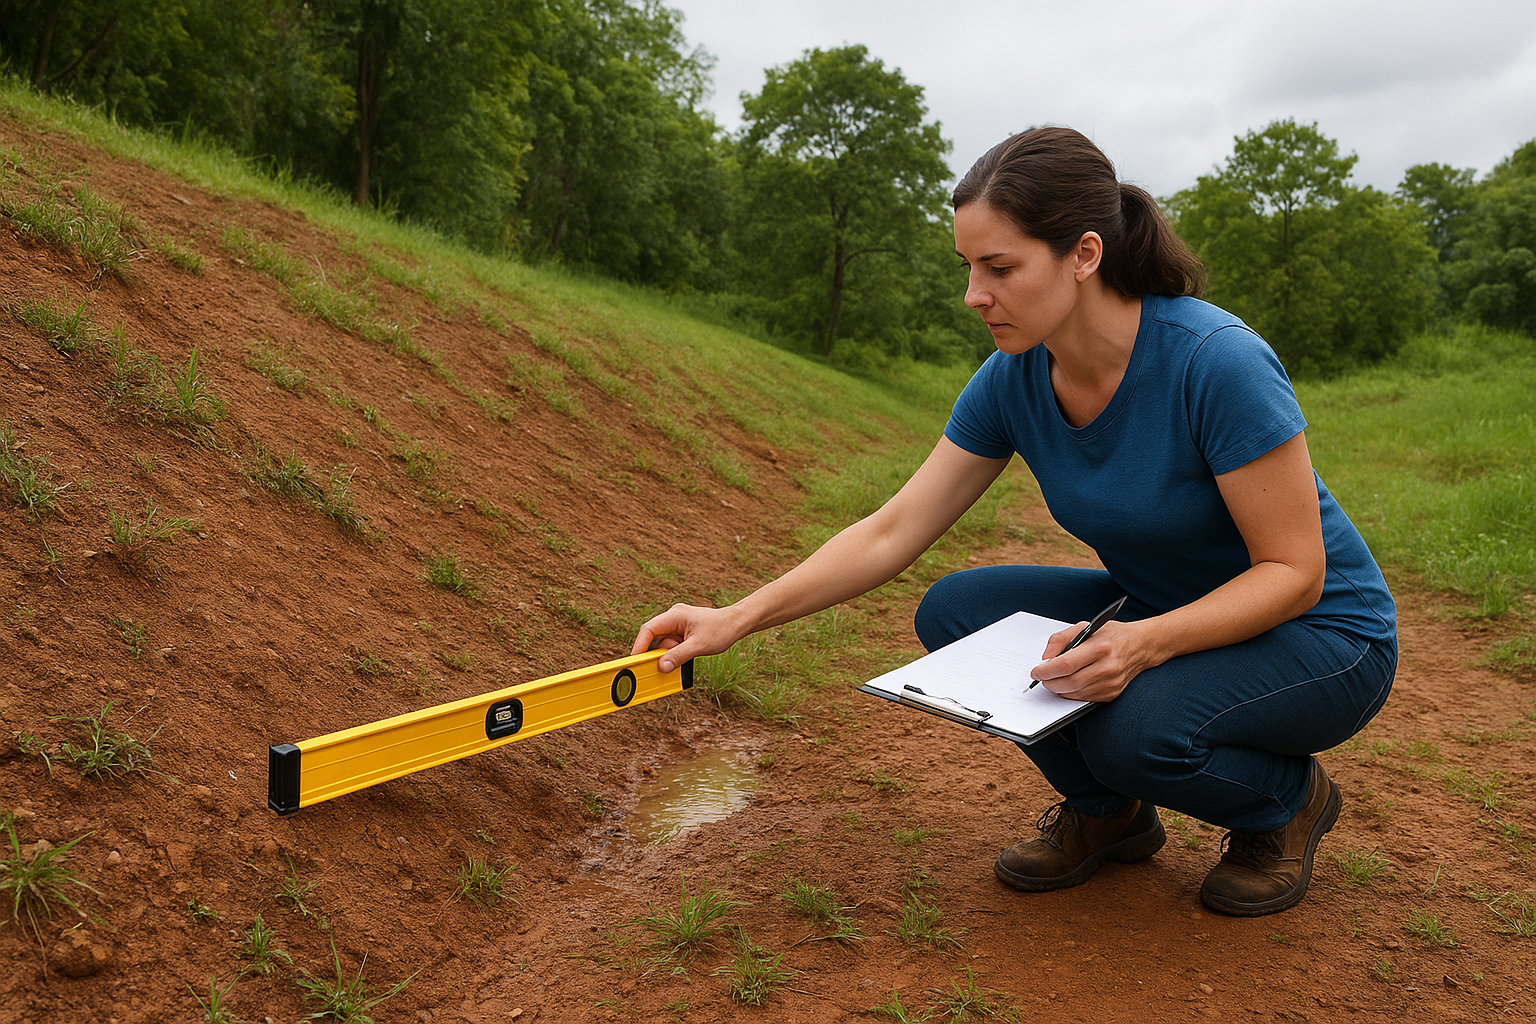
Measure and record slopes
Walk the site from its highest point to its lowest and mark both on your base plan. You don't need survey-grade precision at this stage. A simple optical level or even a long spirit level and a tape measure gives you workable gradient readings. A slope of more than 1:10 (a 10cm drop over 1 meter) typically requires retaining elements or graded terracing in your design to prevent soil movement and erosion.
Record slope direction, not just gradient. Note whether the land falls toward the street, toward neighboring properties, or toward the building. Each scenario creates a different drainage responsibility and directly affects where you can locate flat zones like lawns, decks, and seating areas without ongoing stability problems.
Trace surface water and drainage paths
Surface water always tells the truth about your site, and you should read it before you design over it.
Look at the site during or immediately after rain if you can. Standing water, saturated patches, and erosion channels are the clearest indicators of where drainage is failing or where natural flow concentrates. Mark these zones on your base plan and treat them as hard constraints, not just cosmetic issues.
If a site visit during rain isn't possible, look for physical evidence of past water movement: soil discoloration, moss growth, compacted surface channels, and any existing drains that appear overwhelmed or backed up. These signs reliably indicate recurring drainage problems that will reappear after construction if you don't address them in the design.
Use this template to log drainage observations as you move through the site:
| Zone on site | Observed condition | Likely cause | Design implication |
|---|---|---|---|
| North corner | Standing water after rain | Low point, no outlet | Requires subsurface drain or rain garden |
| Central lawn | Saturated topsoil | Compacted clay subsoil | Needs aeration or soil amendment |
| South path | Surface erosion | Steep slope, no edging | Requires retaining or permeable paving |
Filling this table out on the ground gives you a clear, actionable record that feeds directly into your drainage design decisions later.
Step 3. Test soil and assess plant conditions
Soil quality and existing plant health are two elements that your landscape site analysis checklist cannot skip. What's beneath the surface determines whether your design will establish successfully or spend years struggling. Understanding your soil type and the condition of plants already on site gives you a realistic picture of what the ground can support and what work needs to happen before planting begins.
Run a basic soil test
Your soil test should cover four core properties: texture, pH, drainage rate, and organic matter content. You can run a basic pH test on site using a simple kit, and you can assess texture by taking a handful of moist soil and rolling it between your fingers. Sandy soil falls apart immediately. Clay soil holds its shape and feels sticky. Loam, which is the most workable, crumbles slightly but holds brief form. Malaysian soils in urban residential areas often lean toward compacted clay, particularly in developments where topsoil was removed during construction.
Testing soil drainage by pouring water into a small hole and timing how fast it absorbs will tell you more about waterlogging risk than any visual check alone.
Use this template to record your soil readings across different zones of the site:
| Zone | Texture | pH reading | Drainage rate | Notes |
|---|---|---|---|---|
| Front garden | Clay loam | 5.5 | Slow (over 1 hr) | Likely compaction |
| Rear border | Sandy loam | 6.2 | Fast (under 15 min) | May need organic amendment |
| Central lawn | Clay | 5.8 | Very slow | Consider subsurface drainage |
Completing this table across at least three zones on the site gives you a comparable record that informs both your soil amendment plan and your plant selection.
Document existing plants and vegetation
Walk the site and record every plant that's already established: trees, shrubs, ground covers, and any weeds that indicate soil conditions. Large trees need special attention because their root zones typically extend well beyond their canopy spread, and cutting into those roots during construction causes long-term decline even if the tree looks healthy afterward.
Note the condition of each plant. Check for signs of disease, pest damage, or stress such as yellowing leaves, bare patches, or structural leaning. A healthy mature tree is a design asset worth designing around. A diseased one that's close to a structure becomes a liability. Document each specimen with its approximate size, location on your base plan, and a basic health rating so you can make a clear keep, relocate, or remove decision during the design phase.
Step 4. Track sun, shade, wind, and microclimates
Understanding how light and air move across your site is one of the most practical things you can do as part of your landscape site analysis checklist. In Malaysia's tropical climate, sun intensity and wind behavior vary dramatically from morning to late afternoon, and a spot that feels comfortable at 8am can become unusable by 2pm. Recording these patterns accurately means your planting positions, seating areas, and shade structures end up where they actually work.
Map sun exposure and shade patterns
Visit the site at three different times during the same day: early morning (around 8am), midday (around 12pm), and late afternoon (around 4pm). At each visit, note which areas receive direct sun, which are in full shade, and which sit in partial shade where light shifts through the day. Mark these zones on your base plan using a simple notation system: S for sun, PS for partial shade, and FS for full shade.

Tracking shade from buildings, walls, and trees separately matters because each casts a different quality of shade, and plants respond to those differences.
Also note the direction your site faces. A west-facing garden in Malaysia receives the harshest afternoon heat, which stresses many plants and makes outdoor spaces uncomfortable without deliberate shade design. Use this template to log your sun readings:
| Zone | 8am | 12pm | 4pm | Primary shade source |
|---|---|---|---|---|
| Front entrance | Full sun | Full sun | Partial shade | Boundary wall |
| Side passage | Full shade | Partial shade | Full shade | Neighboring building |
| Rear garden | Partial shade | Full sun | Full sun | Open sky |
Filling this table across a full day gives you a clear record of light availability for every area you intend to plant or design.
Identify wind and microclimate zones
Stand in different parts of the site on a typical day and pay attention to where air moves freely and where it stalls. Walls, dense hedges, and buildings create sheltered pockets that hold heat and moisture, while open corners and gaps between structures channel wind and increase evaporation stress on plants.
Note any areas that feel noticeably hotter, cooler, wetter, or drier than the rest of the site. These are your microclimates. A shaded low corner that retains moisture behaves completely differently from a sunny raised bed along a hot boundary wall, even if they're only a few meters apart. Recording each microclimate zone on your base plan lets you match plant selections to real conditions rather than generalizing across the whole plot.
Step 5. Note views, noise, and neighbor impacts
The final category in your landscape site analysis checklist deals with what surrounds your site rather than what's on it. Neighboring structures, street activity, and ambient noise all shape how your finished garden looks and feels in daily use, and these factors are easy to overlook when you're focused on the ground beneath your feet. Mapping them now saves you from designing a beautiful space that turns out to be uncomfortable or visually cluttered once the plants are in.
Identify views worth keeping and screening
Stand at the main use areas of the site, including where you plan to locate seating, dining zones, and key garden paths, and look outward in each direction. Note every view that's worth preserving and every sight line you'd rather block. A borrowed view of mature trees beyond your boundary can become a design asset. A direct line of sight into a neighbor's kitchen or a busy street adds no value and reduces privacy.
Mapping views from seated height as well as standing height matters, because what you see from a chair is often completely different from what you see while walking.
Record each view using a simple table on your base plan:
| Direction | View observed | Keep or screen | Suggested treatment |
|---|---|---|---|
| North | Neighbor's boundary wall | Screen | Dense hedge or vertical garden |
| East | Open sky and mature trees | Keep | Avoid planting that blocks sightline |
| South | Street traffic and parked cars | Screen | Timber screen or tall shrub border |
| West | Neighboring rooftop and AC units | Screen | Pergola or overhead shade structure |
Assess noise sources and their directions
Walk the site perimeter and listen for consistent noise sources rather than occasional sounds. Persistent noise comes from roads, commercial activity, air conditioning units, or industrial areas nearby. Note which directions the noise comes from and how loud it is at different points on the site. A dense planting buffer won't eliminate road noise completely, but correctly positioned evergreen hedging and earth mounding can reduce it noticeably.
Record the approximate noise level (low, moderate, or high) and its source for each affected zone. This information feeds directly into your planting layout decisions and helps you justify screening elements to a client or your local authority if permits are required.
Record neighbor and boundary impacts
Your neighbors' properties affect your site in ways beyond views and noise. Overhanging tree branches, roof runoff, and cast shadow from adjacent walls all create conditions on your land that you need to document rather than discover after planting. Walk each boundary and note any encroachments, drainage outflows, or structures that sit close enough to affect your design zone.
In Malaysia, boundary disputes and drainage responsibility between adjoining landowners are common sources of project delay. Documenting what exists at each boundary before work begins gives you a clear baseline and protects you if disagreements arise later.
Wrap-up and what to do next
A complete landscape site analysis checklist covers every layer of your property before any design decision gets made: boundaries, utilities, slope, drainage, soil, sun, wind, views, noise, and neighbor impacts. Working through each step systematically means your design responds to real conditions rather than assumptions that collapse once construction begins.
Run through this checklist before you draw a single line, and you'll catch the constraints and opportunities that most homeowners miss until they're paying to fix them. Every observation you document now becomes a decision you make with confidence later, rather than a problem you discover mid-project.
If you want a professional team to handle the site analysis and turn those findings into a garden design that actually works for your property, get in touch with the Konzept Garden team. We handle the full process from initial site evaluation through to implementation, so you get results that last.
