Healthy gardens start below the surface, with soil that has the right amount of moisture. Whether you're building an automated irrigation system for your backyard or prototyping a smart planter, the SparkFun soil moisture sensor gives you real-time data on how wet or dry your soil actually is. It's a small, affordable board that pairs directly with Arduino and other microcontrollers, making it one of the most accessible sensors for DIY garden tech.
At Konzept Garden, we design and build outdoor spaces across Malaysia, and we've seen firsthand how proper soil moisture management affects plant health long after a garden is installed. That's why tools like this sensor matter, they bridge the gap between landscape design and hands-on garden care.
This guide walks you through everything you need to get started: wiring the sensor to an Arduino, writing the code to read moisture levels, and calibrating it for accurate results. No prior experience with electronics required, just follow along step by step.
What you need and which sensor version to pick
Before you write a single line of code, gather the right hardware. The SparkFun soil moisture sensor setup is deliberately minimal, but picking the correct version from the start will save you from rewiring everything halfway through the build. This section covers both sensor options and lists every component you need for the analog build that the rest of this guide follows.
Choosing between the analog and Qwiic versions
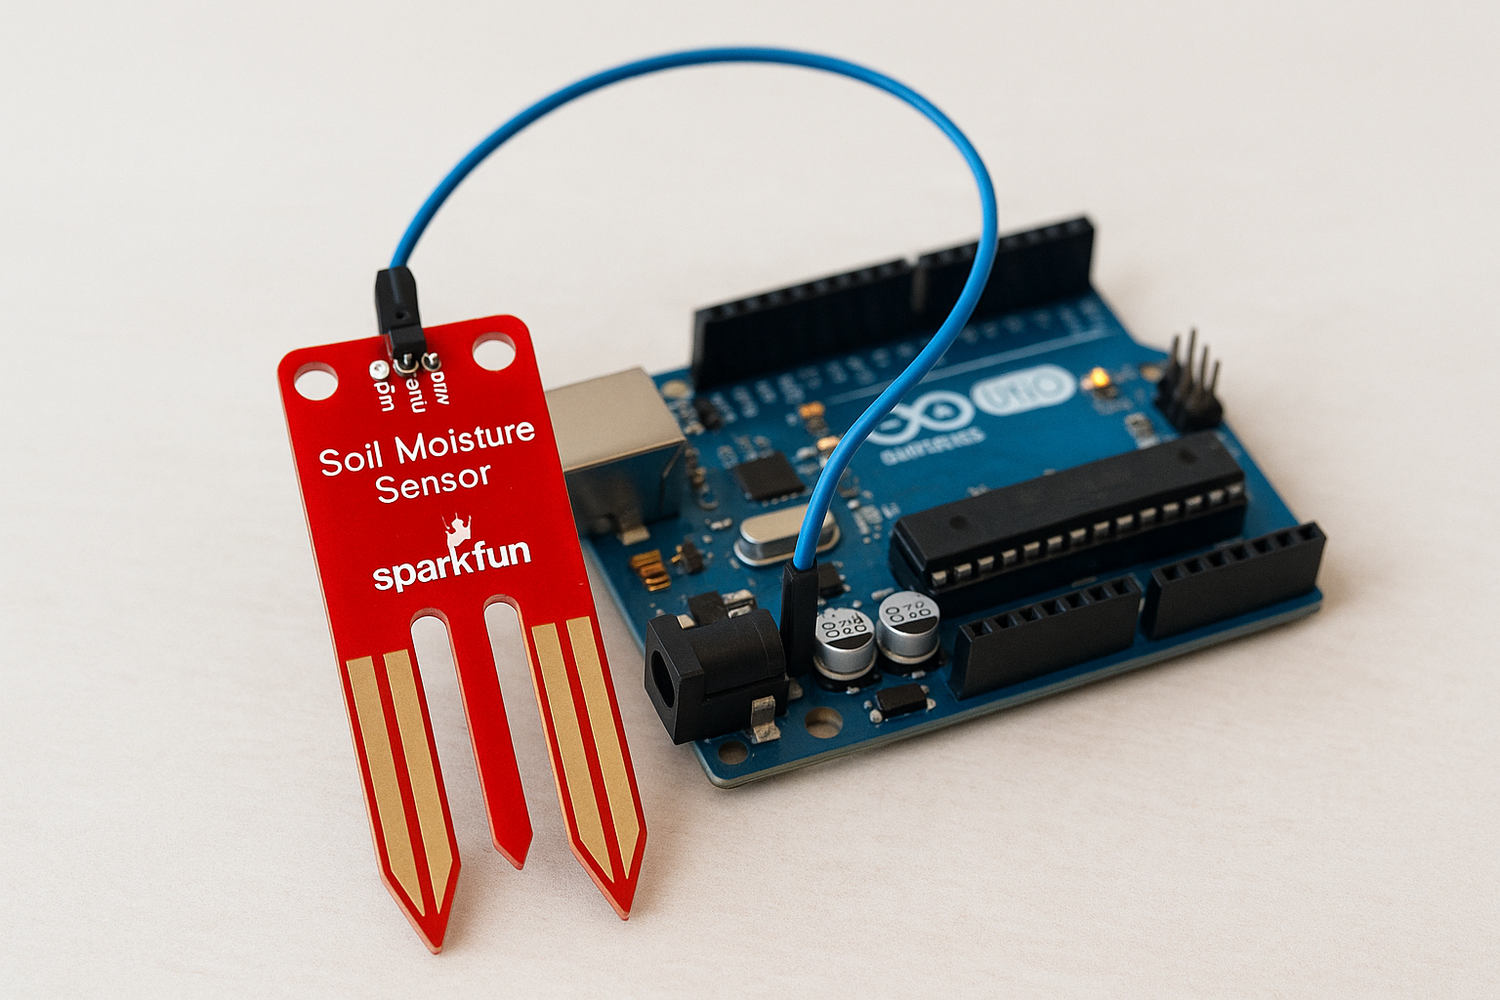
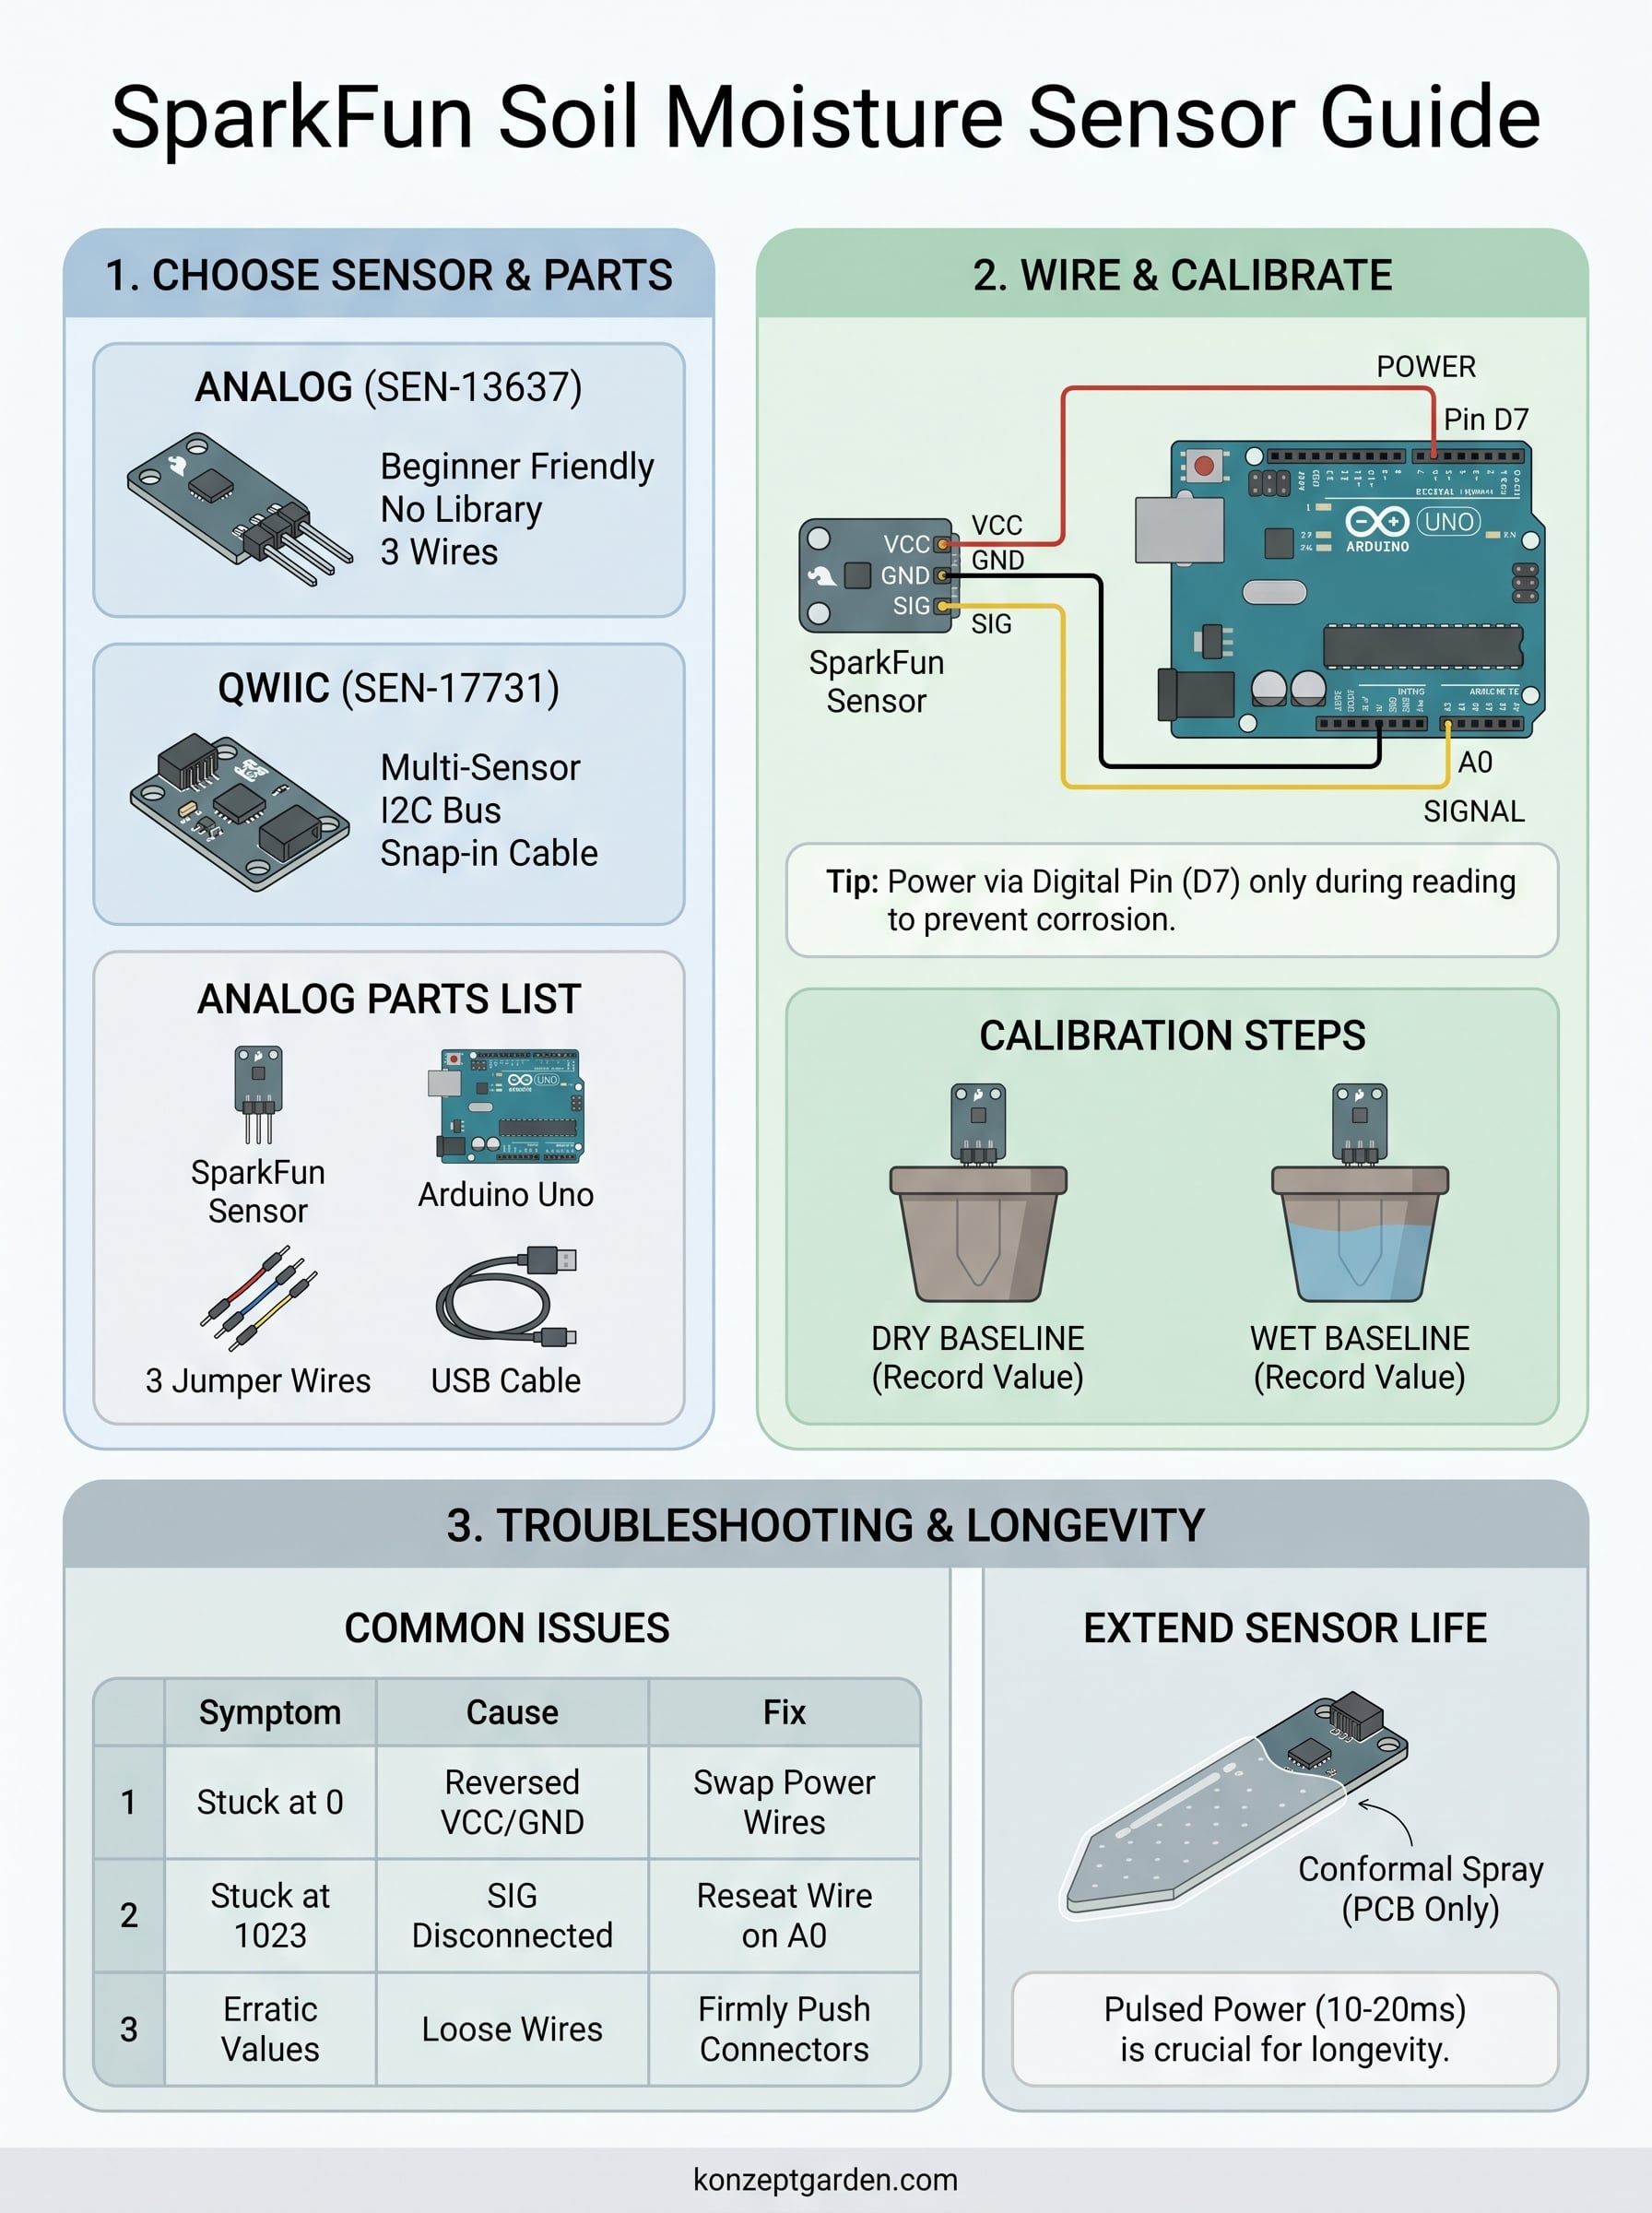
SparkFun sells two distinct versions of this sensor, and each one suits a different type of project. The SEN-13637 is the standard analog version. It reads soil moisture as a variable voltage that your Arduino converts into a number between 0 and 1023 through its built-in analog-to-digital converter. This version works with virtually any microcontroller that has an analog input pin, and it requires no extra libraries to get running.
If you are new to electronics, start with the analog version (SEN-13637). It needs only three jumper wires and produces results you can see in the Serial Monitor within minutes.
The SEN-17731 is the Qwiic-enabled I2C version. Instead of jumper wires, it snaps into SparkFun's Qwiic connector system, letting you chain multiple sensors on a single two-wire I2C bus. This version makes sense if you already own a Qwiic-compatible Arduino or if your project needs to monitor several plant pots at once from a single board. For everything else, the analog version is the faster and simpler path.
| Feature | SEN-13637 (Analog) | SEN-17731 (Qwiic / I2C) |
|---|---|---|
| Connection type | Analog pin + power pins | I2C via Qwiic cable |
| Library required | None | SparkFun I2C Soil Moisture |
| Wiring complexity | 3 jumper wires | 1 Qwiic cable snap |
| Best for | Beginners, single-sensor builds | Multi-sensor setups |
| Output format | 0 to 1023 (analog integer) | Registers read over I2C |
Full parts list for the analog build
This guide uses the analog SEN-13637 because it is the most beginner-friendly option and requires no soldering if you purchase the version with headers already attached. Pull together everything in the list below before you move to the wiring step.
- SparkFun Soil Moisture Sensor SEN-13637 with pre-soldered male headers
- Arduino Uno R3 or any Arduino board with at least one analog input pin
- 3 male-to-male jumper wires (or male-to-female if your sensor uses header sockets)
- USB-A to USB-B cable to connect the Arduino to your computer
- Arduino IDE installed on your machine, available free at arduino.cc
- A small breadboard if you want a cleaner, more stable layout during testing
No resistors, capacitors, or voltage dividers are needed for the basic circuit. The sensor board already includes onboard signal conditioning that delivers a clean voltage to your Arduino analog pin. Once you confirm the sensor is reading correctly, you can extend the project by adding a relay module and a small submersible pump to automate watering based on live moisture data. For now, focus on getting the hardware connected and producing your first reading.
How the SparkFun soil moisture sensor works
The SparkFun soil moisture sensor uses a straightforward electrical principle to detect water in soil. Two exposed conductive pads sit at the tip of the sensor board. When you push those pads into soil and apply power, the sensor measures how easily electrical current flows between them. Wet soil conducts electricity better than dry soil, so the output voltage rises as moisture increases and drops as the soil dries out.
The resistive measurement principle
The sensor works by passing a small current through the soil between its two metal pads. Soil resistance drops when water is present because water and dissolved minerals together form a conductive path. The onboard circuitry converts that resistance change into a variable output voltage between 0V and the supply voltage, typically 3.3V or 5V depending on your Arduino. You feed that voltage into an analog input pin, and the Arduino's ADC turns it into a number between 0 and 1023.
Power the sensor only when you are taking a reading. Leaving it powered continuously accelerates corrosion on the exposed pads and shortens the sensor's usable life significantly.
What the output values actually mean
Raw readings from the sensor do not come labeled as wet or dry. Instead, you get an integer from 0 to 1023, where lower numbers generally indicate drier soil and higher numbers indicate wetter soil. The exact range depends on your specific soil type, the mineral content of your water, and how deep you insert the sensor.
Two threshold values matter most: the dry threshold, which is the highest reading you see when soil is completely dry, and the wet threshold, which is the reading you get right after watering. Everything between those two numbers represents the usable moisture range for your setup. You will calibrate these values in Step 3, but understanding what drives them now helps you interpret readings correctly from the first moment data appears in your Serial Monitor.
Step 1. Wire the analog sensor to an Arduino
The SparkFun soil moisture sensor connects to an Arduino using just three jumper wires: power, ground, and signal. No additional components sit between the sensor and the board, so the wiring takes under two minutes once you have your parts laid out in front of you. Keep the Arduino unplugged from your computer while you make these connections.
The three connections you need
Your sensor board has three labeled pins on the header: VCC, GND, and SIG. VCC supplies power to the sensor, GND closes the circuit, and SIG carries the analog voltage that represents the current moisture level in your soil. Connect each pin to its matching location on your Arduino Uno using the table below.
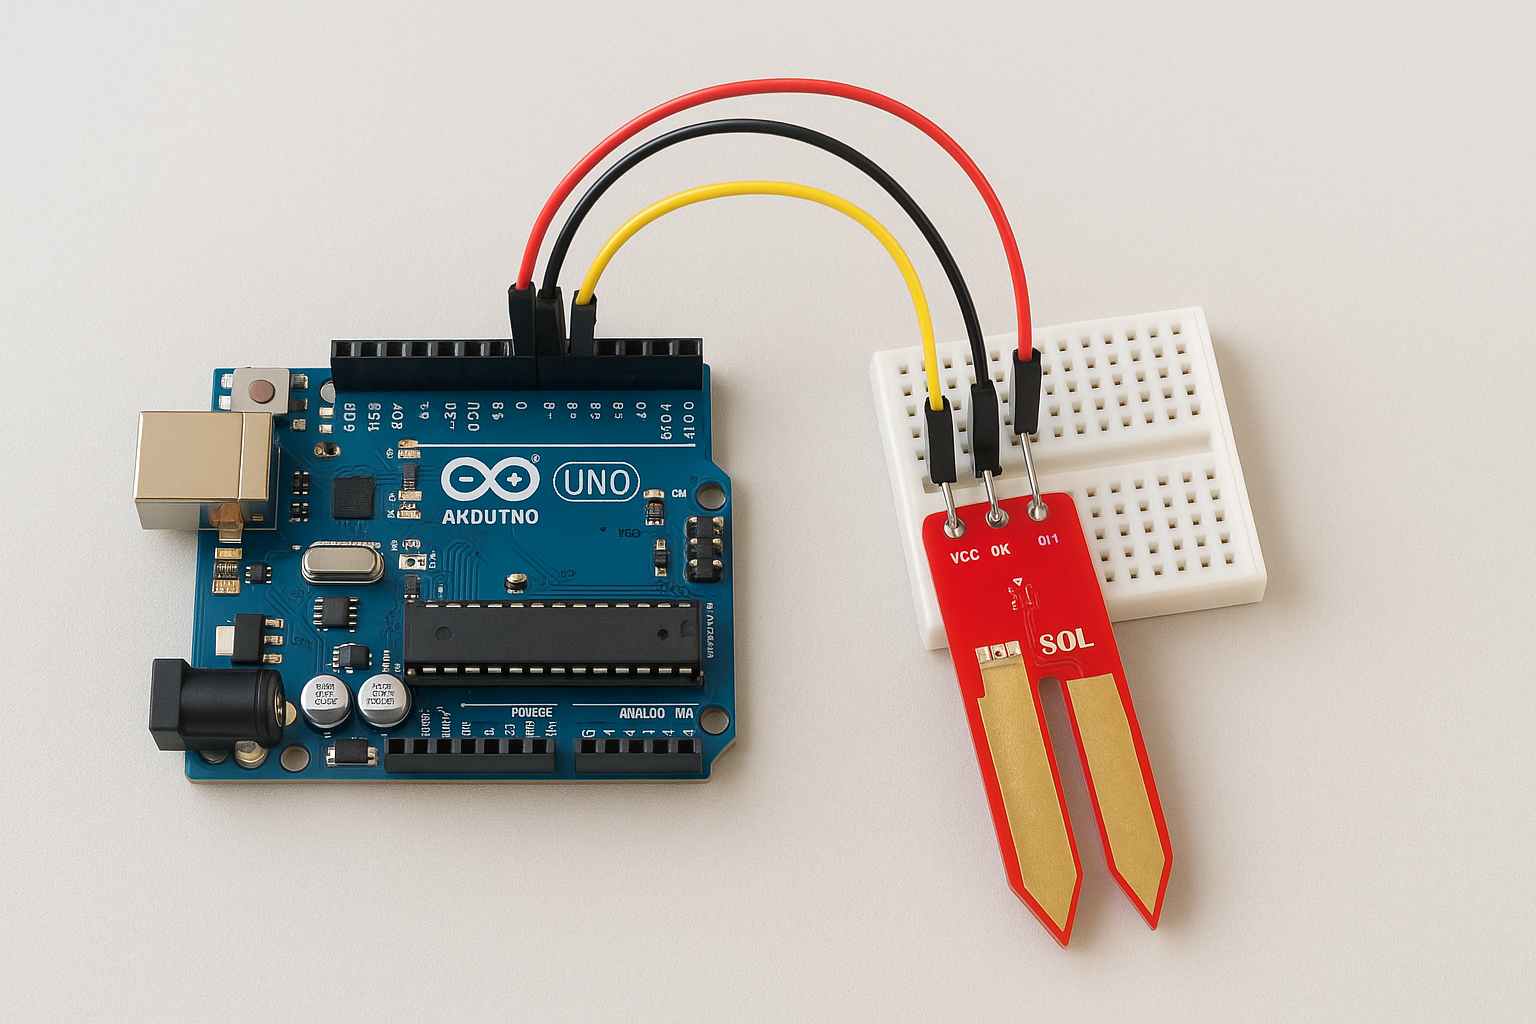
| Sensor Pin | Arduino Pin | Suggested Wire Color |
|---|---|---|
| VCC | 5V | Red |
| GND | GND | Black |
| SIG | A0 | Yellow |
Connect VCC to the 5V pin on your Arduino and GND to any available GND pin. Plug the SIG wire into analog pin A0, which is the pin the sample code in Step 2 reads by default. If you choose a different analog pin, remember to update the pin number in the sketch to match your physical connection.
Double-check every connection before plugging in your USB cable. A reversed VCC and GND connection will not necessarily destroy the sensor immediately, but it will produce no useful readings and may degrade the pads faster than normal use would.
Keeping the circuit stable during testing
A small breadboard makes this circuit far more reliable during testing than holding jumper wires in place by hand. Push the sensor's male headers into a breadboard row, then run your jumper wires from that same row to the Arduino. This approach keeps each connection firmly seated and eliminates the false readings that result from wires shifting when you handle the sensor or press it into soil.
Once your wiring matches the table, set the sensor on a dry surface and connect the Arduino to your computer via USB. You do not need to insert the sensor into soil yet. Confirming that power flows correctly and that the board receives a stable signal is the only goal at this stage before moving on to the code.
Step 2. Upload code and read values in Serial Monitor
With your wiring complete, the next task is getting the Arduino sketch onto your board and confirming that the SparkFun soil moisture sensor is producing live readings you can see on screen. This step requires no additional libraries, just the code below and a couple of clicks inside the Arduino IDE.
The Arduino sketch
Paste the full sketch below into a new Arduino IDE window. It reads the analog voltage on pin A0 once per second and prints the raw integer value to your Serial Monitor. Notice that the code controls sensor power through digital pin 7 rather than the constant 5V supply, which matches the best practice of powering the sensor only during a reading to reduce pad corrosion over time. If you wired VCC directly to the 5V pin in Step 1, move that wire to digital pin 7 now before uploading.
const int sensorPin = A0;   // SIG wire connects here
const int powerPin  = 7;    // VCC wire connects here
int sensorValue     = 0;

void setup() {
  Serial.begin(9600);
  pinMode(powerPin, OUTPUT);
  digitalWrite(powerPin, LOW);
}

void loop() {
  digitalWrite(powerPin, HIGH); // turn sensor on
  delay(10);                    // allow voltage to stabilize
  sensorValue = analogRead(sensorPin);
  digitalWrite(powerPin, LOW);  // turn sensor off
  Serial.print("Moisture: ");
  Serial.println(sensorValue);
  delay(1000);                  // one reading per second
}
Keeping the delay at 10 milliseconds before reading gives the sensor time to produce a stable output voltage, which removes the erratic spikes you would otherwise see in the first reading after power-on.
Opening the Serial Monitor and reading output
After the sketch uploads successfully, open the Serial Monitor by pressing Ctrl+Shift+M on Windows or Cmd+Shift+M on Mac. Set the baud rate in the bottom-right corner to 9600 to match the value in Serial.begin(9600). You should see a new "Moisture:" line appear every second.
Hold the sensor in open air and note the number. Then press the tip into a cup of water and watch the value climb. A working sensor typically reads below 300 in dry air and above 800 in standing water. If you see a steady 0 or 1023, recheck your wiring before moving to calibration.
Step 3. Calibrate dry-to-wet and set thresholds
Raw numbers from the SparkFun soil moisture sensor are meaningless until you anchor them to two real-world conditions: completely dry soil and freshly watered soil. Calibration gives you those two boundary values so every reading in between maps to an actual moisture level your code can act on.
Record your dry and wet baseline values
Start by filling a small container with the same soil type you plan to use in your actual planter or garden bed. Let it dry completely over 24 hours, then push the sensor into the soil, run the sketch from Step 2, and note the number in your Serial Monitor. That number is your dry threshold, the floor of your usable range. Write it down.
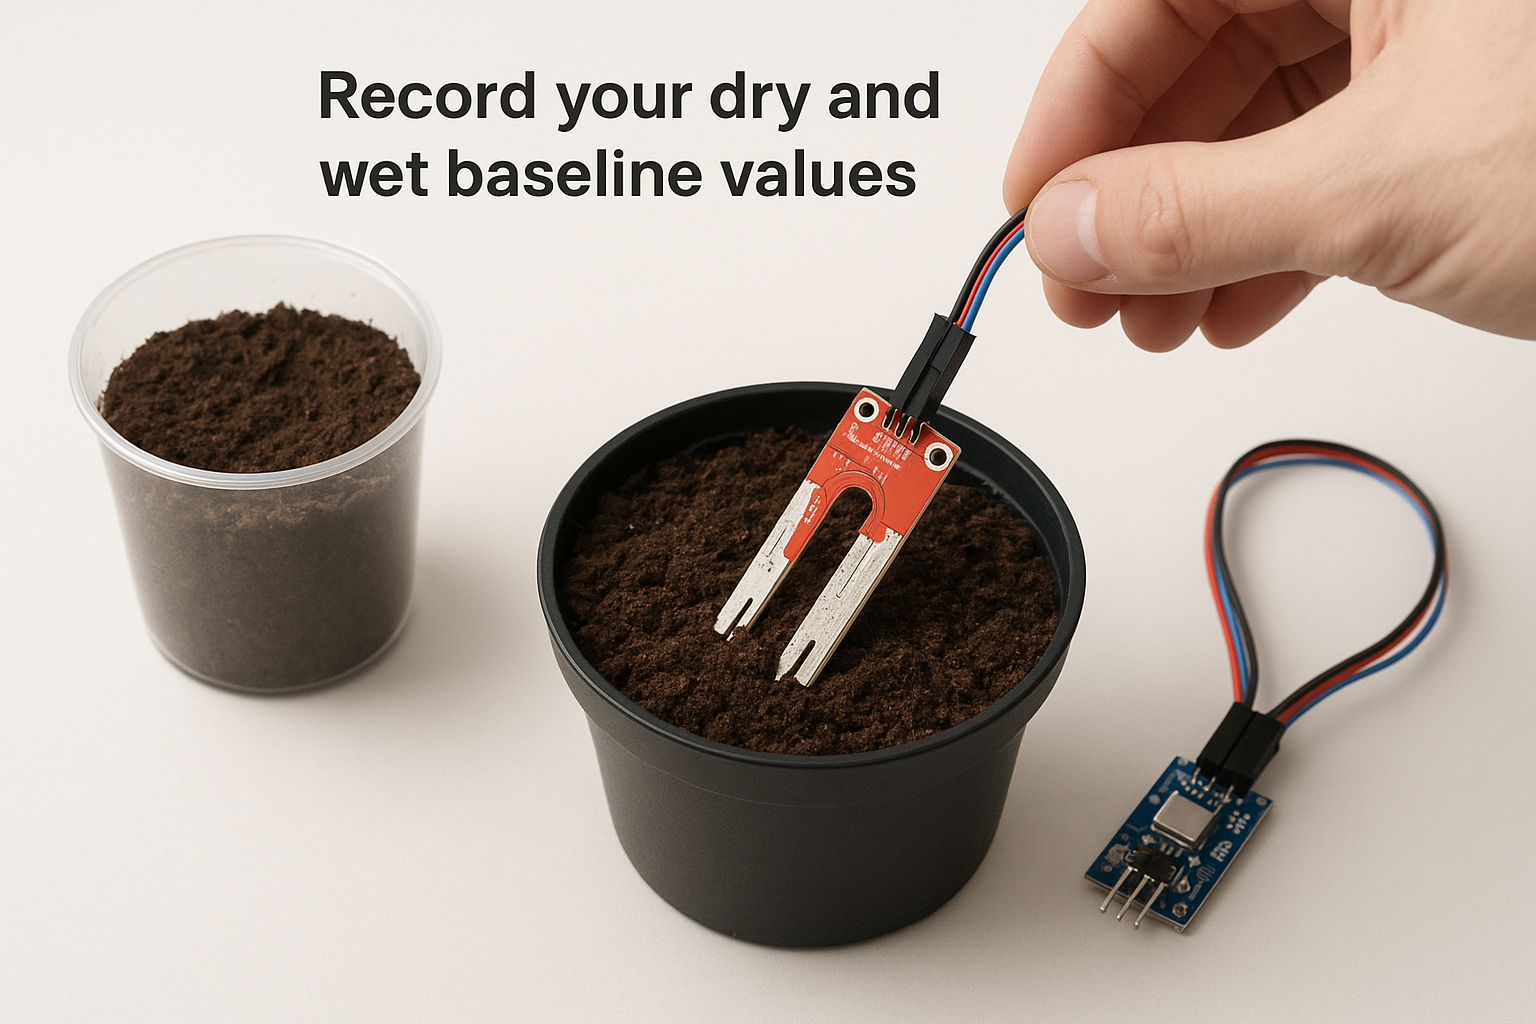
Calibrate with the same soil you will use in the final installation. Sandy soil and clay soil produce very different readings, so a value that means "dry" in a cactus mix may mean "moist" in a peat-based potting blend.
Next, water the soil slowly until it reaches the moisture level you consider ideal for your specific plant, not until water drains from the bottom, just comfortably moist. Read the sensor again and record that value as your wet threshold. Repeat the watering once more to find the maximum wet reading you want to trigger a stop condition in your automation logic.
Map readings to moisture zones in code
With both baseline values recorded, update your sketch to translate raw integers into named zones your code can branch on. The example below uses 400 as a dry threshold and 700 as a wet threshold. Replace those numbers with the actual values you recorded above.
const int dryThreshold = 400;  // replace with your dry reading
const int wetThreshold = 700;  // replace with your wet reading

void loop() {
  digitalWrite(powerPin, HIGH);
  delay(10);
  sensorValue = analogRead(sensorPin);
  digitalWrite(powerPin, LOW);

  if (sensorValue < dryThreshold) {
    Serial.println("Status: DRY - water needed");
  } else if (sensorValue >= wetThreshold) {
    Serial.println("Status: WET - no watering needed");
  } else {
    Serial.println("Status: OK - moisture acceptable");
  }
  delay(1000);
}
Adding this logic turns raw sensor data into actionable status messages that you can later use to trigger a relay, send an alert, or log readings to an SD card as your project grows.
Troubleshooting and best practices for long life
Most issues with the SparkFun soil moisture sensor trace back to two root causes: wiring errors and corrosion on the exposed metal pads. Working through a short checklist eliminates connection problems in minutes, and a few consistent habits during regular use keep corrosion from cutting the sensor's life short before you finish your project.
Diagnosing common reading problems
When your Serial Monitor shows a flat 0 or 1023 regardless of soil conditions, the fault is almost always in the physical connections rather than the code. Check the points below in order before touching anything in your sketch.
| Symptom | Likely cause | Fix |
|---|---|---|
| Reading stuck at 0 | VCC and GND reversed | Swap the power wires |
| Reading stuck at 1023 | SIG wire disconnected | Reseat the wire on A0 |
| Erratic jumping values | Loose jumper wire | Push all connectors firmly into headers |
| Reading drops mid-session | Digital pin not held HIGH long enough | Increase stabilization delay to 20ms |
After reseating your connections, re-upload the sketch and confirm the baud rate in the Serial Monitor matches Serial.begin(9600). A mismatched baud rate produces garbled output that looks like sensor failure but is actually a simple communication setting you can fix in two clicks.
If the sensor reads correctly in open air but fails inside soil, the pads may have oxidized. Clean them gently with fine-grit sandpaper and retest before buying a replacement board.
Protecting the sensor for long-term use
Corrosion is the primary reason these sensors fail within weeks rather than lasting through a full growing season. The two metal pads sit in moist, mineral-rich soil, which creates ideal conditions for oxidation every time you leave the sensor powered continuously. The single most effective habit you can develop is switching power through a digital pin, as shown in Step 2, so the sensor stays live for only 10 to 20 milliseconds per reading cycle.
Coating the non-pad section of the board with clear acrylic conformal spray adds a second layer of protection without covering the sensing area. Apply it to the top face of the PCB and let it cure fully before inserting the sensor into soil. Combined with pulsed power, this two-step approach extends a typical sensor's useful life from a few months to well over a year of continuous outdoor use.
Next steps for your plant monitor
You now have a working SparkFun soil moisture sensor connected to your Arduino, producing calibrated readings that map directly to the conditions in your soil. That foundation opens the door to a full automated plant monitor with very few additional parts. Add a relay module to switch a small pump on when the sensor reports a dry status, wire in an LCD display to show live readings without a laptop nearby, or log data to an SD card over several weeks to spot watering patterns specific to your plants and climate.
Building garden tech like this connects directly to how outdoor spaces perform over time. Consistent moisture data helps you design smarter irrigation systems and healthier planting schemes, whether you manage a single pot or a full landscape. If you want professional guidance on turning a functional garden into something remarkable, talk to our landscape design team and see what is possible.

