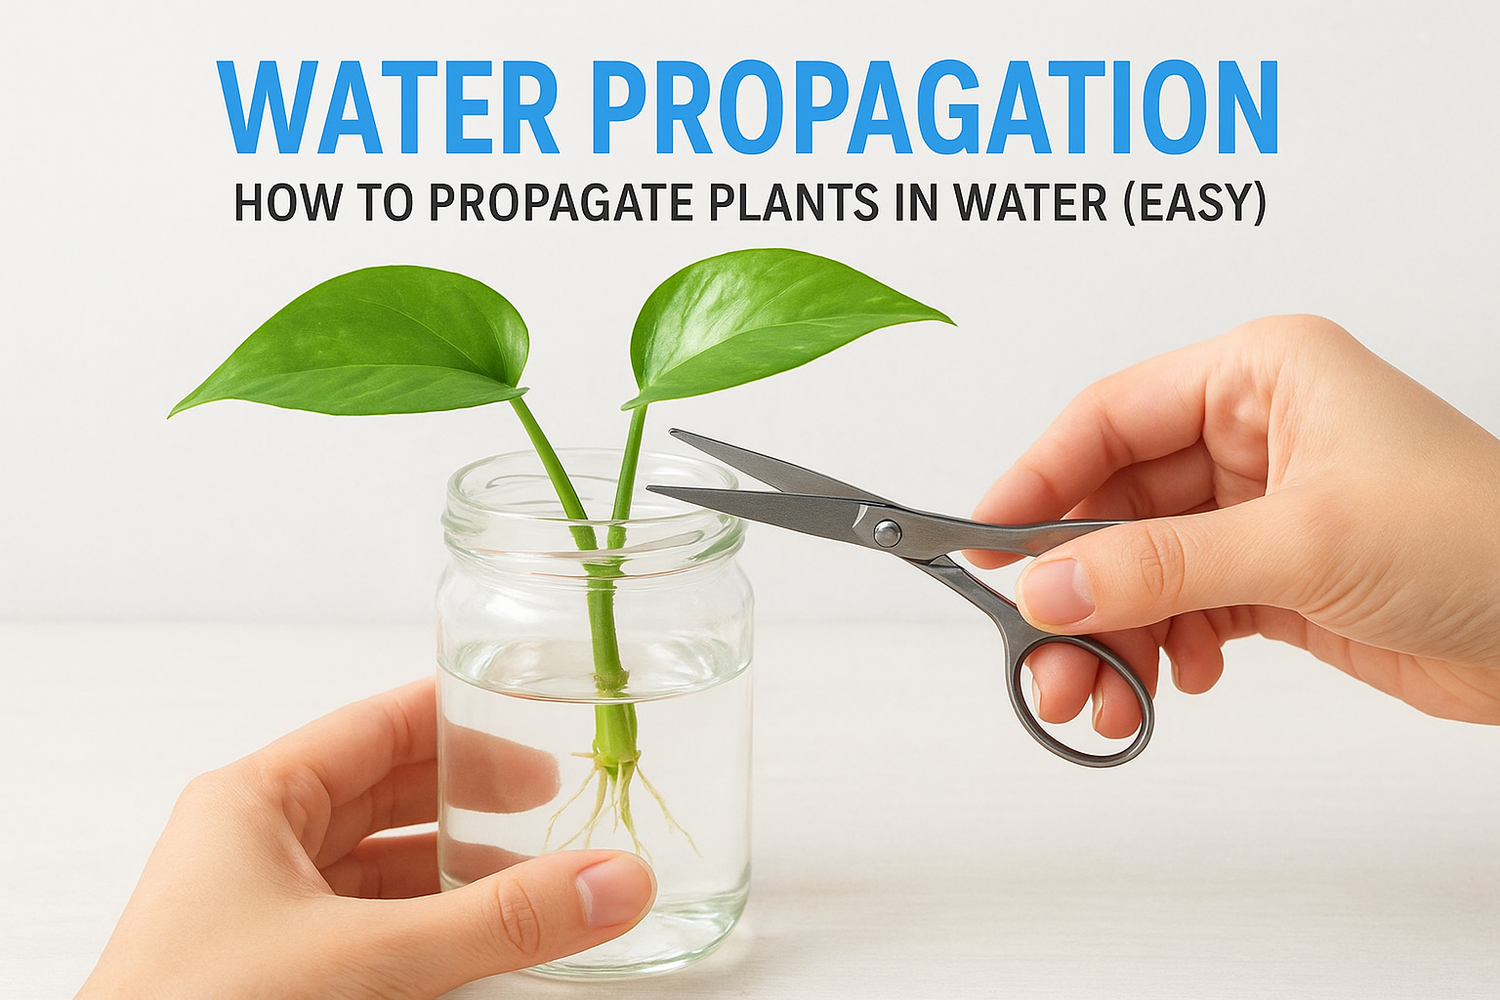
Growing your plant collection doesn't have to mean spending more money at the nursery. How to propagate plants in water is one of the simplest skills any plant owner can pick up, and it works surprisingly well for dozens of common houseplant species. All you really need is a healthy parent plant, a clean jar, and a bit of patience.
Water propagation lets you watch roots develop in real time, which makes it both practical and oddly satisfying. You snip a cutting, place it in water, and within weeks you've got a brand-new plant ready for soil. It's a low-cost, low-risk method that works whether you're a first-time plant parent or someone who's been gardening for years. At Konzept Garden, we work with plants and green spaces every day, from full-scale landscape design projects across Malaysia to helping clients choose the right greenery for their homes, so propagation is something our team knows well.
This guide walks you through the entire process step by step: which plants root best in water, how to take a proper cutting, how to encourage strong root growth, and when to transplant into soil. We'll also cover the common mistakes that cause cuttings to fail so you can avoid them from the start.
What water propagation is and when it works
Water propagation is the process of placing a plant cutting into water so it can grow roots before you transfer it to soil, or in some cases, keep it growing in water permanently. Unlike soil-based propagation methods that require perlite, moss, or rooting hormone, this approach gives you full visibility of root development from day one. You can see exactly when roots appear, how fast they're growing, and whether a cutting is healthy or struggling. It's one of the most accessible ways to learn how to propagate plants in water, and it requires almost no specialized equipment to get started.
How roots form in water
When you cut a stem just below a node, the plant responds to the wound by forming callus tissue at the cut end and eventually redirecting energy toward producing new root cells. Water keeps the base of the cutting hydrated while that process happens. The roots that emerge in water tend to look different from soil roots: they're typically longer, more translucent, and less branched because they adapt to a low-resistance, high-moisture environment where they don't need to push through soil particles to find water.
The node is the most critical factor. Without a node submerged in the water, most cuttings will not produce roots regardless of how long you wait.
Root development speed depends on several variables: the plant species, water temperature, and available light. Pothos and impatiens can show visible roots in as little as 10 to 14 days under good conditions. Woody-stemmed plants like rosemary take far longer and often don't root in water at all. Water temperature matters more than most people expect. Keeping your water between 65 and 75°F (18 to 24°C) encourages faster root growth than cold tap water pulled straight from the faucet.
When water propagation works and when it doesn't
Water propagation performs best with soft-stemmed, fast-growing plants that naturally produce roots at their nodes. Tropical houseplants are particularly well-suited because they evolved in humid environments where aerial roots and stem rooting are common. Plants like pothos, philodendron, tradescantia, coleus, and begonias all root reliably in water with minimal effort from you.
The method has clear limits though. Succulents, cacti, and most bulb plants do not propagate well in water and will typically rot before they produce roots. Heavily woody stems, like those on established rosemary or lavender, also tend to fail because the tissue doesn't respond the same way soft growth does. For those plants, soil or perlite propagation gives you better results.
Use this table to quickly check whether your plant is a good candidate:
| Plant type | Water propagation success |
|---|---|
| Pothos, philodendron, tradescantia | High |
| Coleus, impatiens, begonia | High |
| Basil, mint, soft herbs | High |
| Rosemary, lavender, thyme | Low |
| Succulents and cacti | Very low |
| Bulb plants (tulips, dahlias) | Not suitable |
Knowing which plants respond well saves you a lot of failed attempts. Once you've confirmed your plant is a good fit, the next step is pulling together the right tools and supplies before you make a single cut.
What to gather before you cut
Having everything ready before you make the first cut matters more than it sounds. Scrambling for a container or scissors after you've already taken a cutting gives the exposed stem time to dry out, which slows root development and increases the chance of rot. A few minutes of preparation creates the right conditions from the start and makes the whole process of how to propagate plants in water smoother and more predictable.
Preparation before the cut is just as important as the cut itself. A well-prepared setup gives your cutting the best possible start.
The tools you need
You don't need specialized equipment, but you do need sharp, clean cutting tools. A pair of pruning shears or sharp scissors works well for most houseplants. Dull blades crush stem tissue instead of slicing through it cleanly, and that damaged tissue is far more likely to rot in water than to produce roots.
Clean your blades with rubbing alcohol or a diluted bleach solution (one part bleach to nine parts water) before making any cuts. Wipe the blade dry with a clean cloth afterward. This one step prevents bacteria from transferring between plants and significantly reduces the risk of losing your cuttings to stem rot in the first week.
Containers and water
Clear glass jars, vases, or cups are the best choice for water propagation because they let you watch root growth and catch problems early without disturbing the cutting. A narrow-necked bottle or jar also holds the stem upright naturally, so the node stays submerged while the leaves remain above the water. Opaque containers work in a pinch, but you lose the ability to monitor root development at a glance.
For the water, use room-temperature filtered water or tap water that has sat out for at least a few hours before you add your cutting. Leaving tap water out allows chlorine to dissipate, which reduces irritation to new root tissue. Avoid cold water straight from the tap, particularly in air-conditioned spaces where the temperature contrast can stress a fresh cutting.
Here's a quick checklist of everything to have on hand before you begin:
- Sharp scissors or pruning shears
- Rubbing alcohol or diluted bleach for cleaning blades
- Clean cloth or paper towel to dry the blade
- Clear glass jar, vase, or cup
- Room-temperature water (filtered or left to sit overnight)
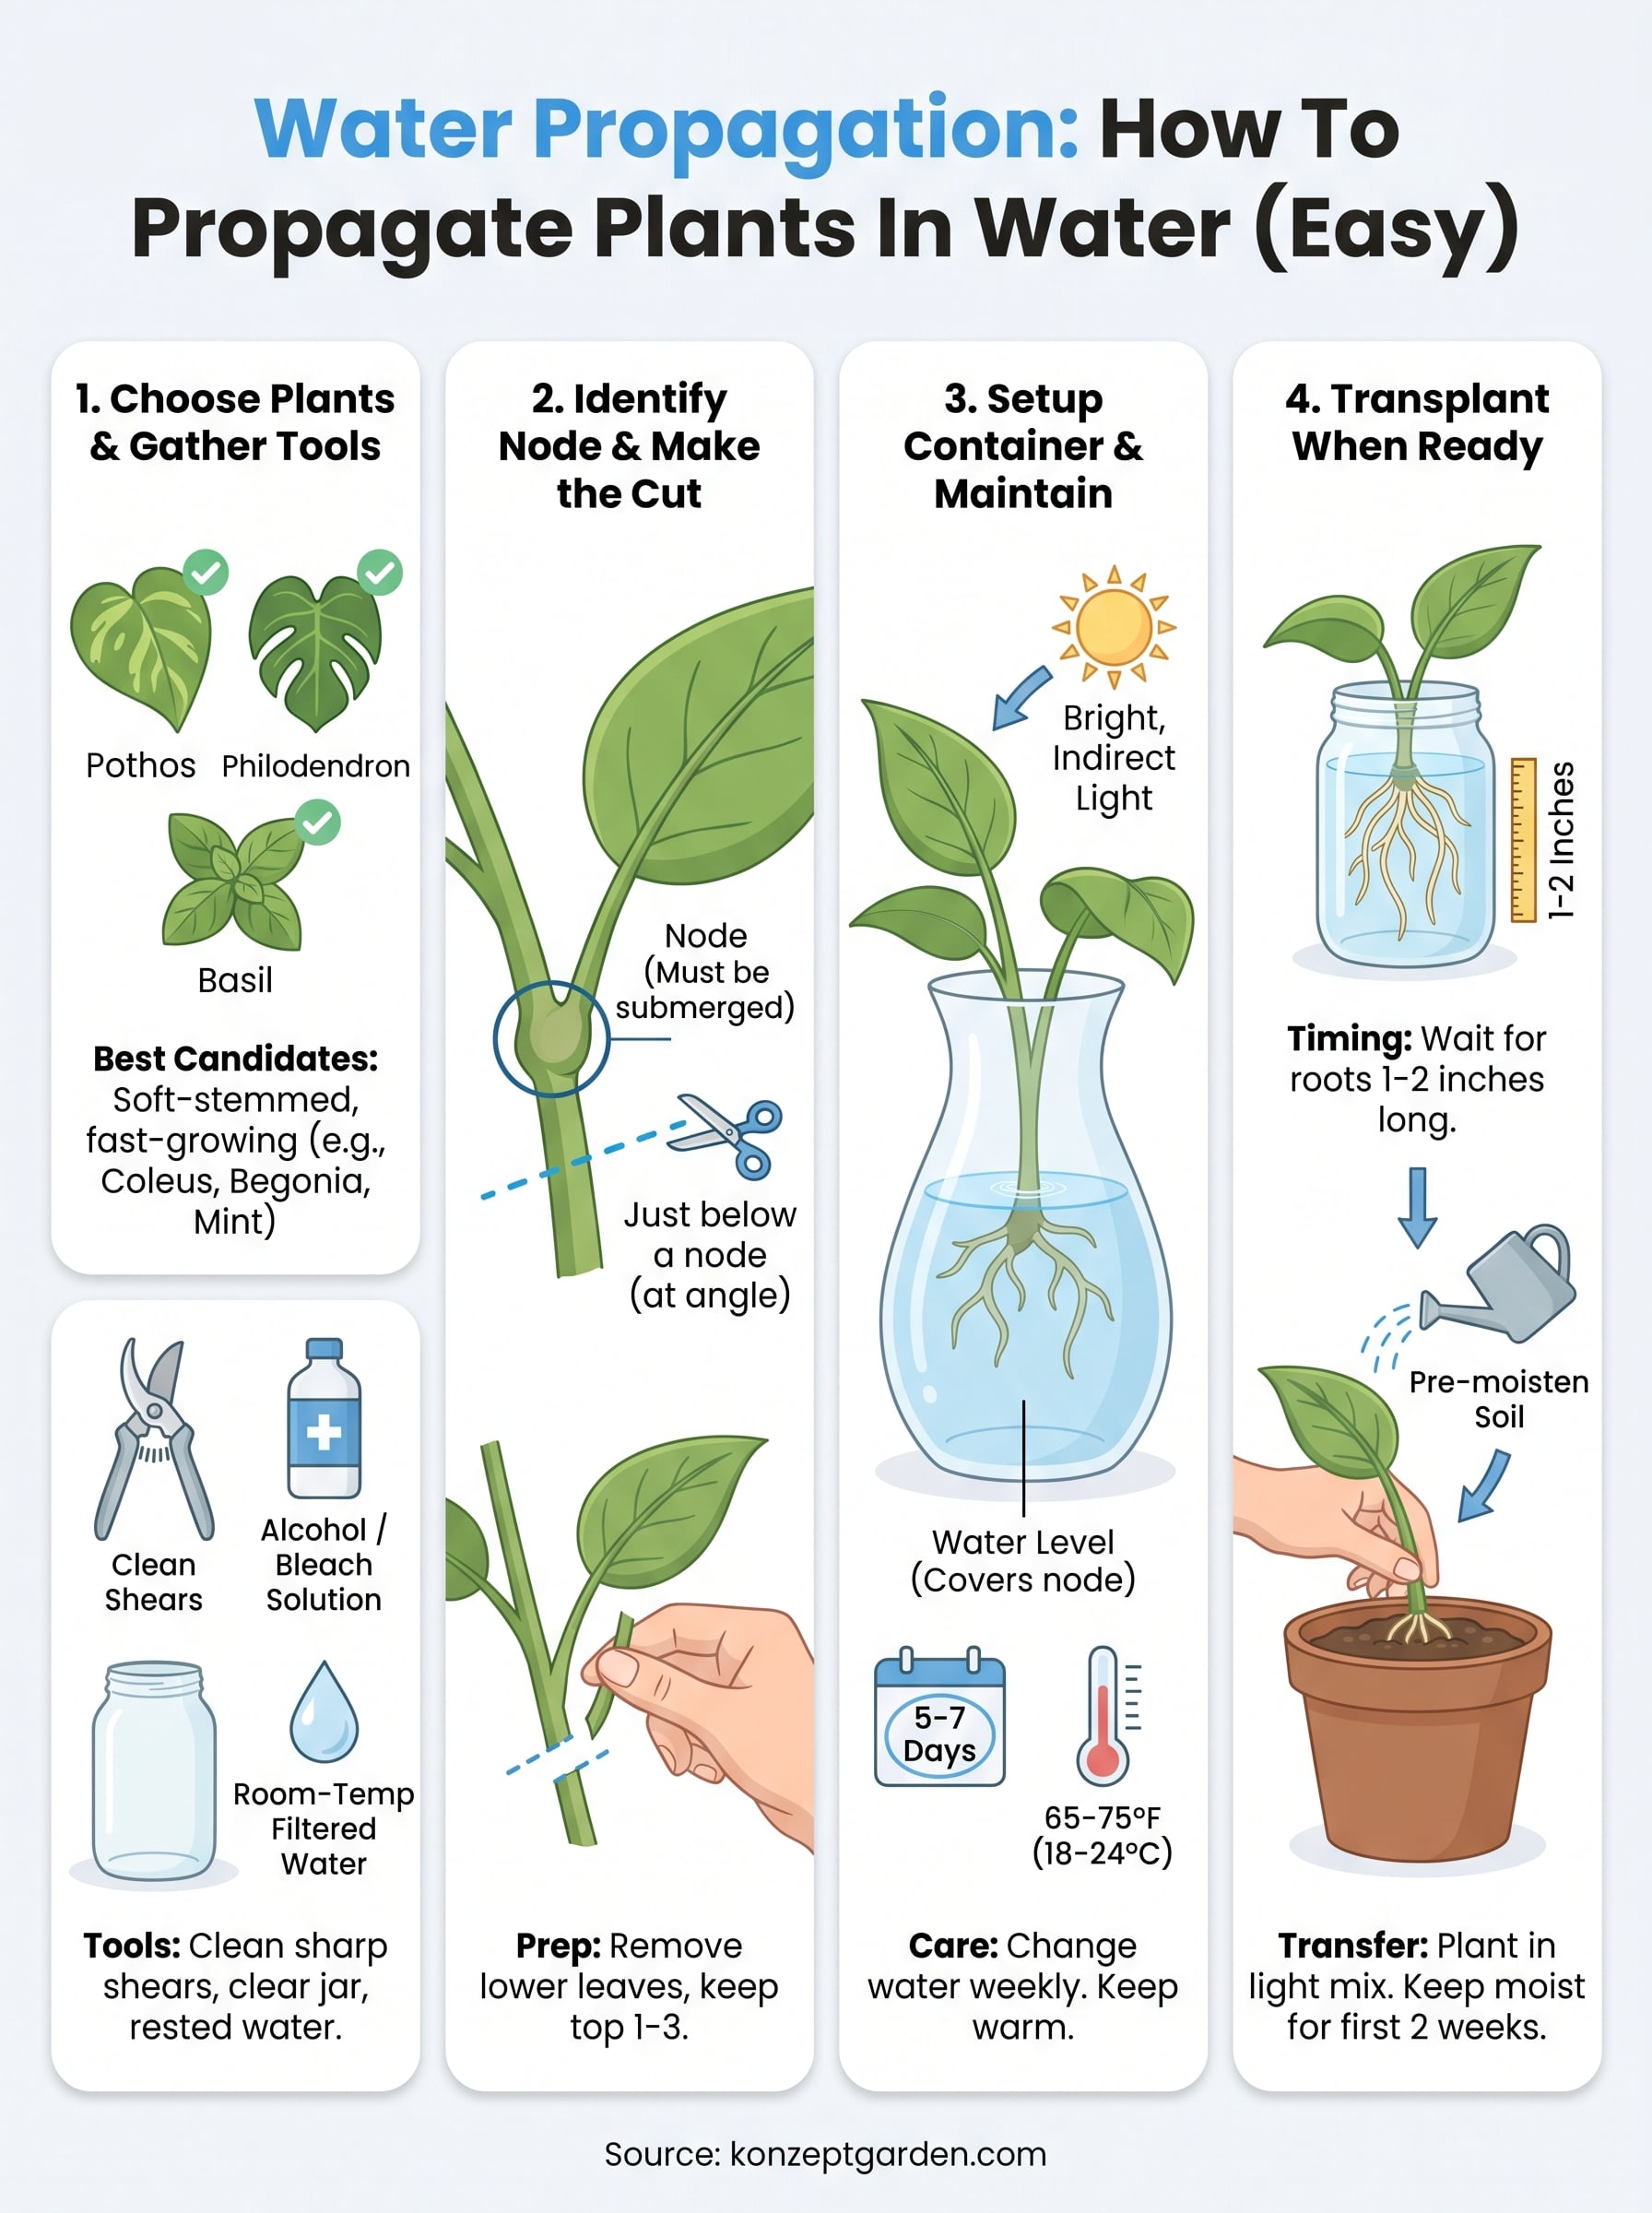
Step 1. Choose plants that root well in water
Starting with the right plant makes the difference between a cutting that roots in two weeks and one that sits in a jar rotting for a month. Not every plant responds to water propagation, and forcing the method on an unsuitable species wastes time and leaves you wondering what went wrong. Before you pick up your scissors, confirm that your plant is a strong candidate for this approach to how to propagate plants in water, then move forward with confidence.
Plants that root consistently in water
Some plants root in water so reliably that they're almost foolproof for beginners. Pothos (Epipremnum aureum) is the most commonly recommended starting point because it produces roots from nodes within one to two weeks under normal indoor light. Philodendrons, particularly heartleaf varieties, behave the same way and are widely available at nurseries and garden centers across Malaysia.
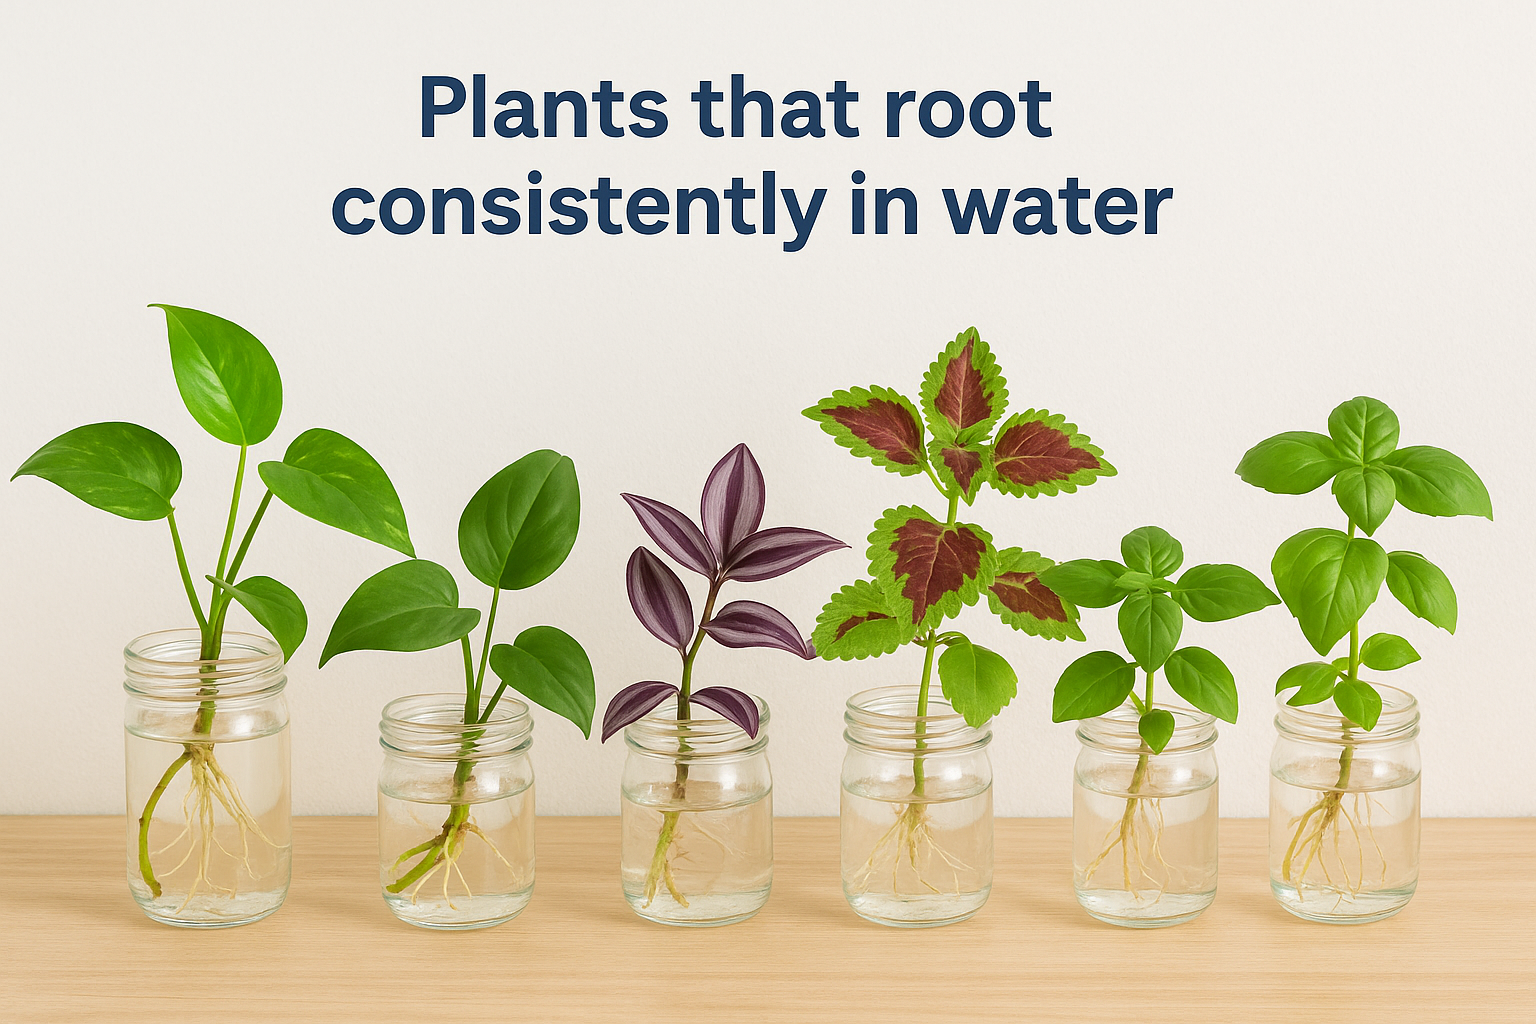
Tradescantia, coleus, and impatiens are soft-stemmed plants that root quickly and with very little effort on your part. Begonias are another dependable option, though they prefer indirect light during the rooting process rather than direct sun. For those interested in edible plants, basil and mint both root well in water and can go from cutting to soil-ready plant in under three weeks. You can take basil cuttings directly from a fresh grocery store bunch if you don't have a plant at home.
Here are the most reliable plants to start with:
- Pothos
- Heartleaf philodendron
- Tradescantia
- Coleus
- Impatiens
- Begonia
- Basil and mint
A soft, flexible stem with clearly visible nodes or leaf joints is the strongest indicator that a plant will root successfully in water.
What to look for in a parent plant
Picking the right parent plant matters as much as picking the right species. Look for a healthy, pest-free stem with no yellowing leaves, brown spots, or signs of rot. Cuttings from stressed or unhealthy plants tend to root slowly or fail entirely because the plant doesn't have enough energy to push toward new root growth.
Take cuttings from actively growing stems with fresh green tips rather than older, thickened sections near the base of the plant. Younger growth contains higher concentrations of the auxins that drive root development. In Malaysia's warm, humid climate, most tropical houseplants stay in active growth year-round, so you rarely need to wait for a particular season to get started.
Step 2. Find the node and plan your cuts
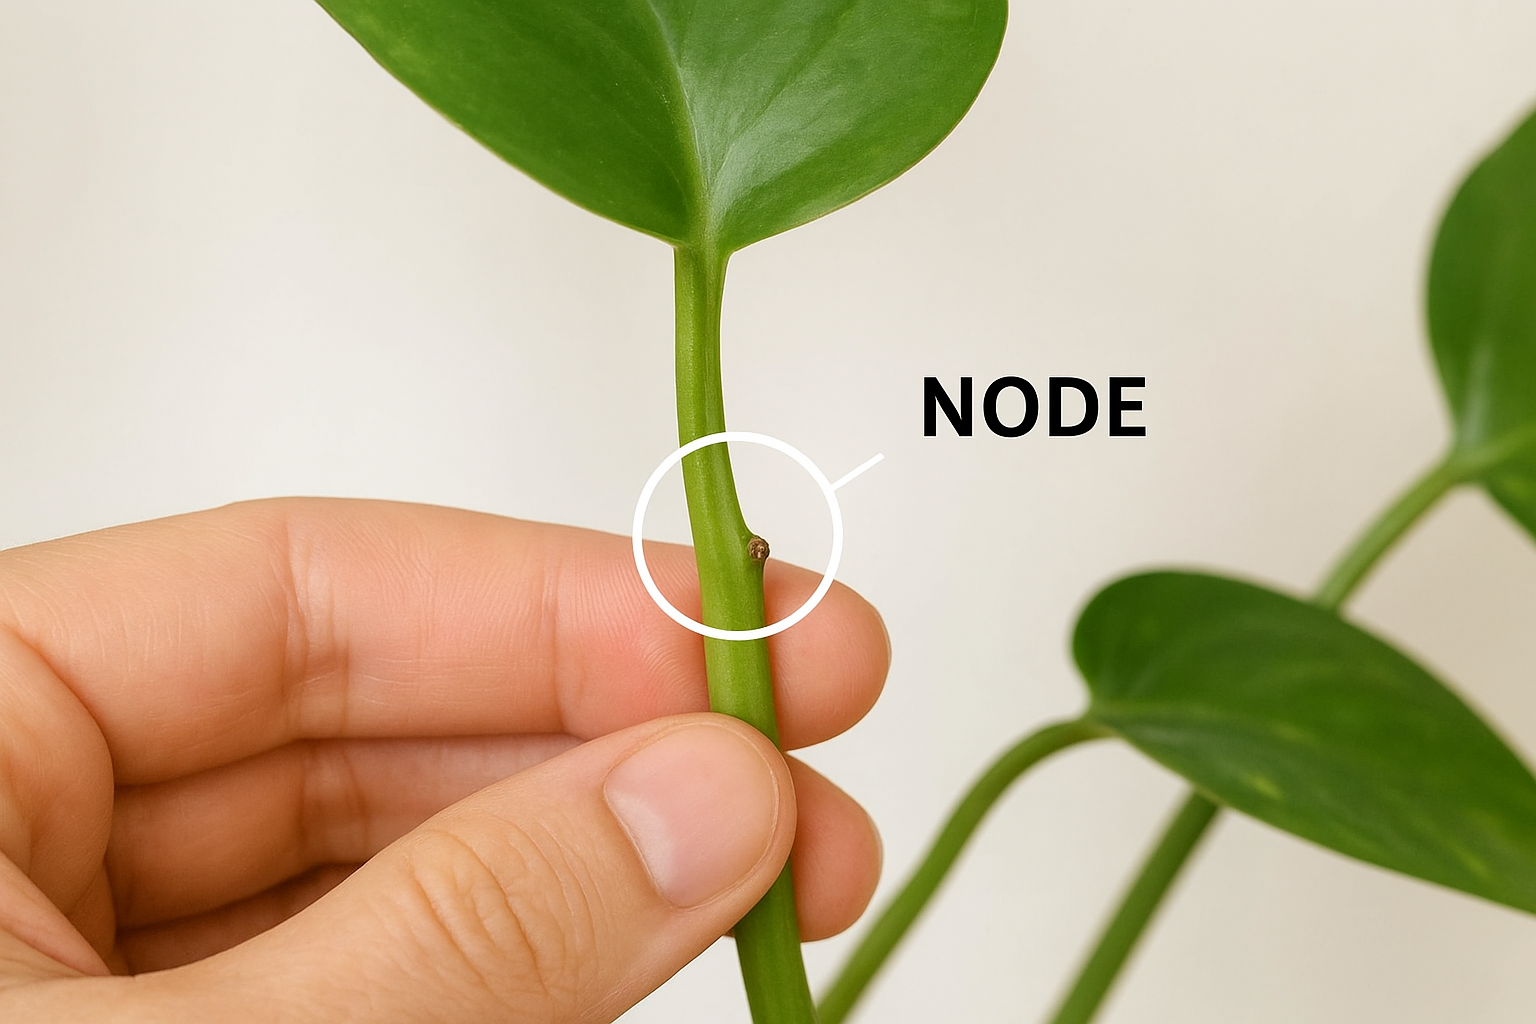
The node is the single most important part of the cutting when you learn how to propagate plants in water. Without a node submerged in your jar, the cutting will not produce roots, regardless of how long you leave it in. A node is the point on the stem where a leaf, bud, or aerial root attaches. All root development begins at or near this structure, so finding and including at least one node in your cutting is non-negotiable.
How to identify a node on common houseplants
On most houseplants, nodes are easy to spot once you know what to look for. They appear as slight bumps, joints, or rings on the stem, usually at the point where a leaf connects. On pothos and philodendron, you'll see a small brown nub or aerial root stub directly at the leaf attachment point, and that's your node. On tradescantia, the nodes are the visible swollen joints where leaves emerge along the stem.
Look at the stem between two leaves. That section is called the internode, and it cannot produce roots on its own. The node itself sits at the top and bottom of each internode, right where the leaf connects. If you're unsure on a new plant, gently bend the stem and watch where it naturally wants to flex. Those flex points are almost always nodes.
The node must be below the waterline in your container. If it sits above the water, roots will not form, even if the stem looks healthy.
How many nodes to include and where to cut
Plan your cut so the final cutting contains one to three nodes, with at least one node that will sit below the water surface. A cutting that's roughly 4 to 6 inches long usually achieves this for most common houseplants. Longer cuttings don't root faster and can actually exhaust the plant's stored energy before roots appear.
Make your cut just below a node, leaving about a quarter inch of stem beneath it. Cutting directly through a node damages the very tissue you need for root growth. Aim for the clean internode section directly below it, and you'll give that node the best possible environment to produce new roots once it's in water.
Step 3. Take the cutting and prep it for water
With your node identified and your tools clean, you're ready to make the cut. This is the most hands-on part of learning how to propagate plants in water, and doing it correctly takes less than a minute once you know what you're aiming for. A clean, confident cut beats a slow, hesitant one every time, so position your blade just below the node and slice through the stem in one smooth motion.
How to make the cut
Hold the stem steady with one hand and position your clean, sharp scissors or pruning shears about a quarter inch below the lowest node you plan to include in your cutting. Cut at a slight angle, around 45 degrees, rather than straight across. An angled cut increases the surface area exposed to water, which gives root tissue more room to emerge and also prevents the flat base from sitting flush against the bottom of the container and blocking water contact.
A single clean cut at a slight angle below the node gives you the best combination of exposed surface area and rooted tissue placement.
Check the cut end immediately. It should look fresh and moist, not brown or fibrous. Brown or stringy tissue at the cut end usually means the stem is older or stressed, and that section is less likely to root well. If that's what you see, move up the stem to a younger section and cut again.
Removing leaves and preparing the stem
After you take the cutting, remove all leaves from the lower half of the stem, keeping only the top one to three leaves on the cutting. Leaves submerged in water decompose quickly, which introduces bacteria into your jar and raises the risk of stem rot before roots even begin to form. Strip the lower leaves cleanly by pulling them downward toward the cut end rather than upward, which reduces tearing on the stem.
If your cutting has any aerial roots already visible at the nodes, leave them intact. They often transition into water roots faster than stem tissue and give the cutting a head start. Once the lower leaves are removed and the stem looks clean, your cutting is ready to go into the jar.
Step 4. Set up the container and add water correctly
Your container choice and water setup affect root development more than most guides acknowledge. The right jar size, water depth, and light exposure all work together to create the environment your cutting needs to push out strong roots. Getting this step right takes less than five minutes and significantly improves your results when learning how to propagate plants in water.
Choosing and positioning the container
Select a clear glass jar or bottle with a narrow neck that holds the stem upright without extra support. The narrow neck keeps the cutting stable so the node stays submerged rather than drifting sideways or floating up. A repurposed wine bottle, a glass vase, or a standard mason jar all work well depending on the length of your cutting.
A narrow neck that naturally supports the stem prevents the node from drifting above the waterline, which is one of the most common reasons cuttings fail to root.
Position the container in bright, indirect light rather than direct sun. Direct sunlight warms the water too quickly, encourages algae growth, and can stress a fresh cutting before it has any roots to sustain it. A spot near a north or east-facing window works well indoors. If you're in Malaysia where natural light tends to be strong, step the container back from the glass by at least a foot to filter the intensity.
How much water to add and what to avoid
Fill the jar so the lowest node on your cutting sits below the waterline by about half an inch to one inch. You don't need to submerge the entire lower stem. Covering only the node area reduces the amount of organic matter in contact with water, which lowers the chance of bacterial buildup and rot.
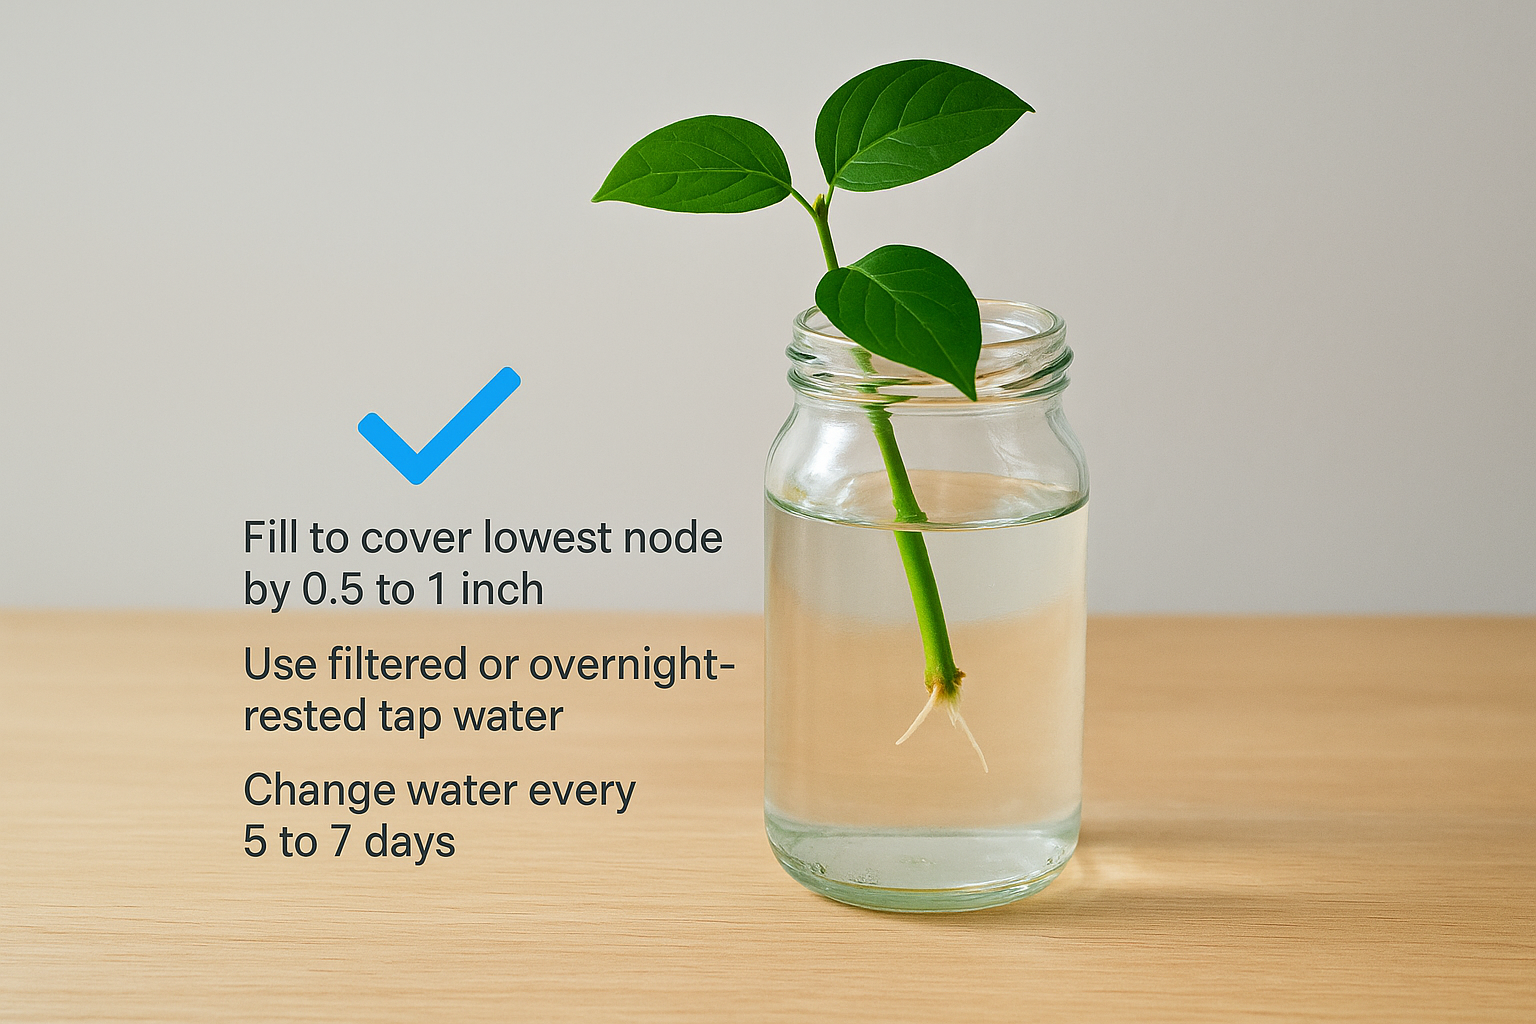
Use room-temperature filtered water or tap water that has rested overnight to allow chlorine to dissipate before your cutting goes in. Avoid distilled water as the complete absence of minerals can slow root development in some species. Keep the water level consistent over time, topping it up as it evaporates rather than doing large full changes. When you do change the water, do it every five to seven days to keep bacteria levels low and oxygen available at the root zone.
- Fill to cover the lowest node by 0.5 to 1 inch
- Use filtered or overnight-rested tap water
- Change water every 5 to 7 days
- Keep the container in bright, indirect light
- Avoid direct sun and cold tap water straight from the faucet
Step 5. Care for the cutting while roots develop
Once your cutting is in the jar, your main job shifts to monitoring and maintaining conditions rather than doing much at all. Most of what happens now is biological, and the cutting does the work. That said, a few consistent habits during this waiting period make the difference between a cutting that roots strongly in two to three weeks and one that slowly declines without producing anything useful.
What to check during the first week
Inspect your cutting every two to three days without moving it. Look at the water clarity and the stem base near the node. Clear or slightly cloudy water is normal. Dark, murky water with a bad smell signals bacterial buildup, and that requires an immediate water change. When you change the water, rinse the jar with hot water and a drop of dish soap, rinse it again thoroughly, then refill with room-temperature rested water before placing the cutting back.
Changing the water the moment it turns dark or cloudy protects the node tissue and gives root development the clean environment it needs to continue.
Also check the submerged leaves or any stripped stem nodes for signs of sliminess or soft tissue. Healthy stem tissue stays firm. If you notice soft, dark spots forming on the submerged section, trim back to clean tissue immediately with a clean blade, then return the cutting to fresh water.
How to support consistent root growth
Keep your cutting in the same location throughout the rooting period rather than moving it between windows or rooms. Consistent light and temperature matter more than finding the perfect spot and then changing it. In Malaysia's warm indoor climate, most cuttings do well at room temperature between 72 and 82°F (22 to 28°C), which aligns naturally with typical air-conditioned and non-air-conditioned living spaces.
Learning how to propagate plants in water also means knowing what not to do during this phase. Avoid adding fertilizer to the water at this stage. Nutrients encourage leaf growth rather than root growth, and roots need to develop first before the cutting can handle any nutrient load. Once you see roots reaching 1 to 2 inches in length, you're close to the transfer window, and at that point you can consider a very diluted liquid fertilizer if you plan to keep the cutting growing in water long-term.
Step 6. Transfer to soil or keep it growing in water
Once your cutting has roots 1 to 2 inches long with multiple visible root strands, you're at the decision point in learning how to propagate plants in water. You can either move the cutting into soil, where it will develop a stronger root system over time, or leave it in water permanently if the species tolerates it. Both paths work, but each requires a slightly different approach to avoid shocking the plant.
How to transplant rooted cuttings into soil
Transplanting from water to soil is the step that trips up the most beginners because the two environments ask very different things of roots. Water roots are adapted to low resistance and constant moisture, so going directly into dense, dry potting mix can stress them badly. Use a light, well-draining potting mix and water it thoroughly before you put the cutting in, so the roots move into soil that already feels closer to the water environment they developed in.
Planting into pre-moistened soil reduces transplant shock more reliably than watering heavily after the cutting is already in the pot.
Follow these steps to give your cutting the smoothest transition:
- Fill a small pot (3 to 4 inches) with a light potting mix, perlite added at a 1:1 ratio helps drainage
- Water the mix fully and let it drain before planting
- Make a small hole in the center with a pencil or finger
- Lower the cutting in carefully, keeping roots spread outward rather than bunched downward
- Gently firm the soil around the base without compressing it tightly
- Place the pot in bright, indirect light and keep the soil consistently moist for the first two weeks
Avoid fertilizing for the first three to four weeks after transplanting. The cutting needs time to adjust and anchor new root growth before it can process nutrients effectively.
Keeping your cutting in water long-term
Some plants, including pothos and lucky bamboo, grow well in water indefinitely with minimal care. If you choose this route, switch to a very diluted liquid fertilizer (around one quarter of the recommended dose) every three to four weeks once roots reach 2 to 3 inches, since tap water alone provides no nutrients over time.
Change the water every seven to ten days and keep the container clean to prevent algae buildup. Wipe the inside of the jar with a bottle brush when you do a full water change, and make sure the container stays out of direct sun to slow algae growth between changes.
Your next propagation
You now have everything you need to start propagating plants in water with real confidence. A sharp blade, a clean jar, and a node below the waterline are the three things that drive success in this method, and none of them require a large investment or a lot of space. Take one cutting this week from a healthy pothos or begonia, follow the steps in this guide, and watch what happens over the next 10 to 14 days.
Knowing how to propagate plants in water is just one part of building a green space you actually enjoy spending time in. If you want to take your outdoor or indoor garden further, the team at Konzept Garden can help you think through the bigger picture. From planting plans to full landscape design, we work with clients across Malaysia to create spaces that suit how they live. Talk to our team today and get started.
