
Malaysia's tropical climate gives you a year-round growing season, but heavy rain, compacted clay soil, and poor drainage can make ground-level planting a frustrating experience. That's exactly why learning how to build a raised garden bed is one of the smartest moves you can make. A raised bed puts you in control of soil quality, drainage, and root depth, so your herbs, vegetables, or ornamentals actually thrive instead of drowning in waterlogged earth.
Whether you're working with a compact terrace house garden or a larger bungalow compound, raised beds adapt to almost any space. They're also surprisingly straightforward to build yourself, even if you've never picked up a drill. The key is choosing the right materials for our climate and following a clear construction sequence so your bed lasts for years, not months. Budget-friendly options exist too, so you don't need to spend a fortune to get started.
At Konzept Garden, we've designed and built gardens across Malaysia, from full landscape overhauls to focused planting solutions like raised beds and planters. This guide draws on that hands-on project experience to walk you through every step: planning your bed's size and placement, selecting materials, building the structure, and filling it with the right soil mix. By the end, you'll have a clear, practical blueprint to build a raised garden bed that suits Malaysian conditions and your own backyard.
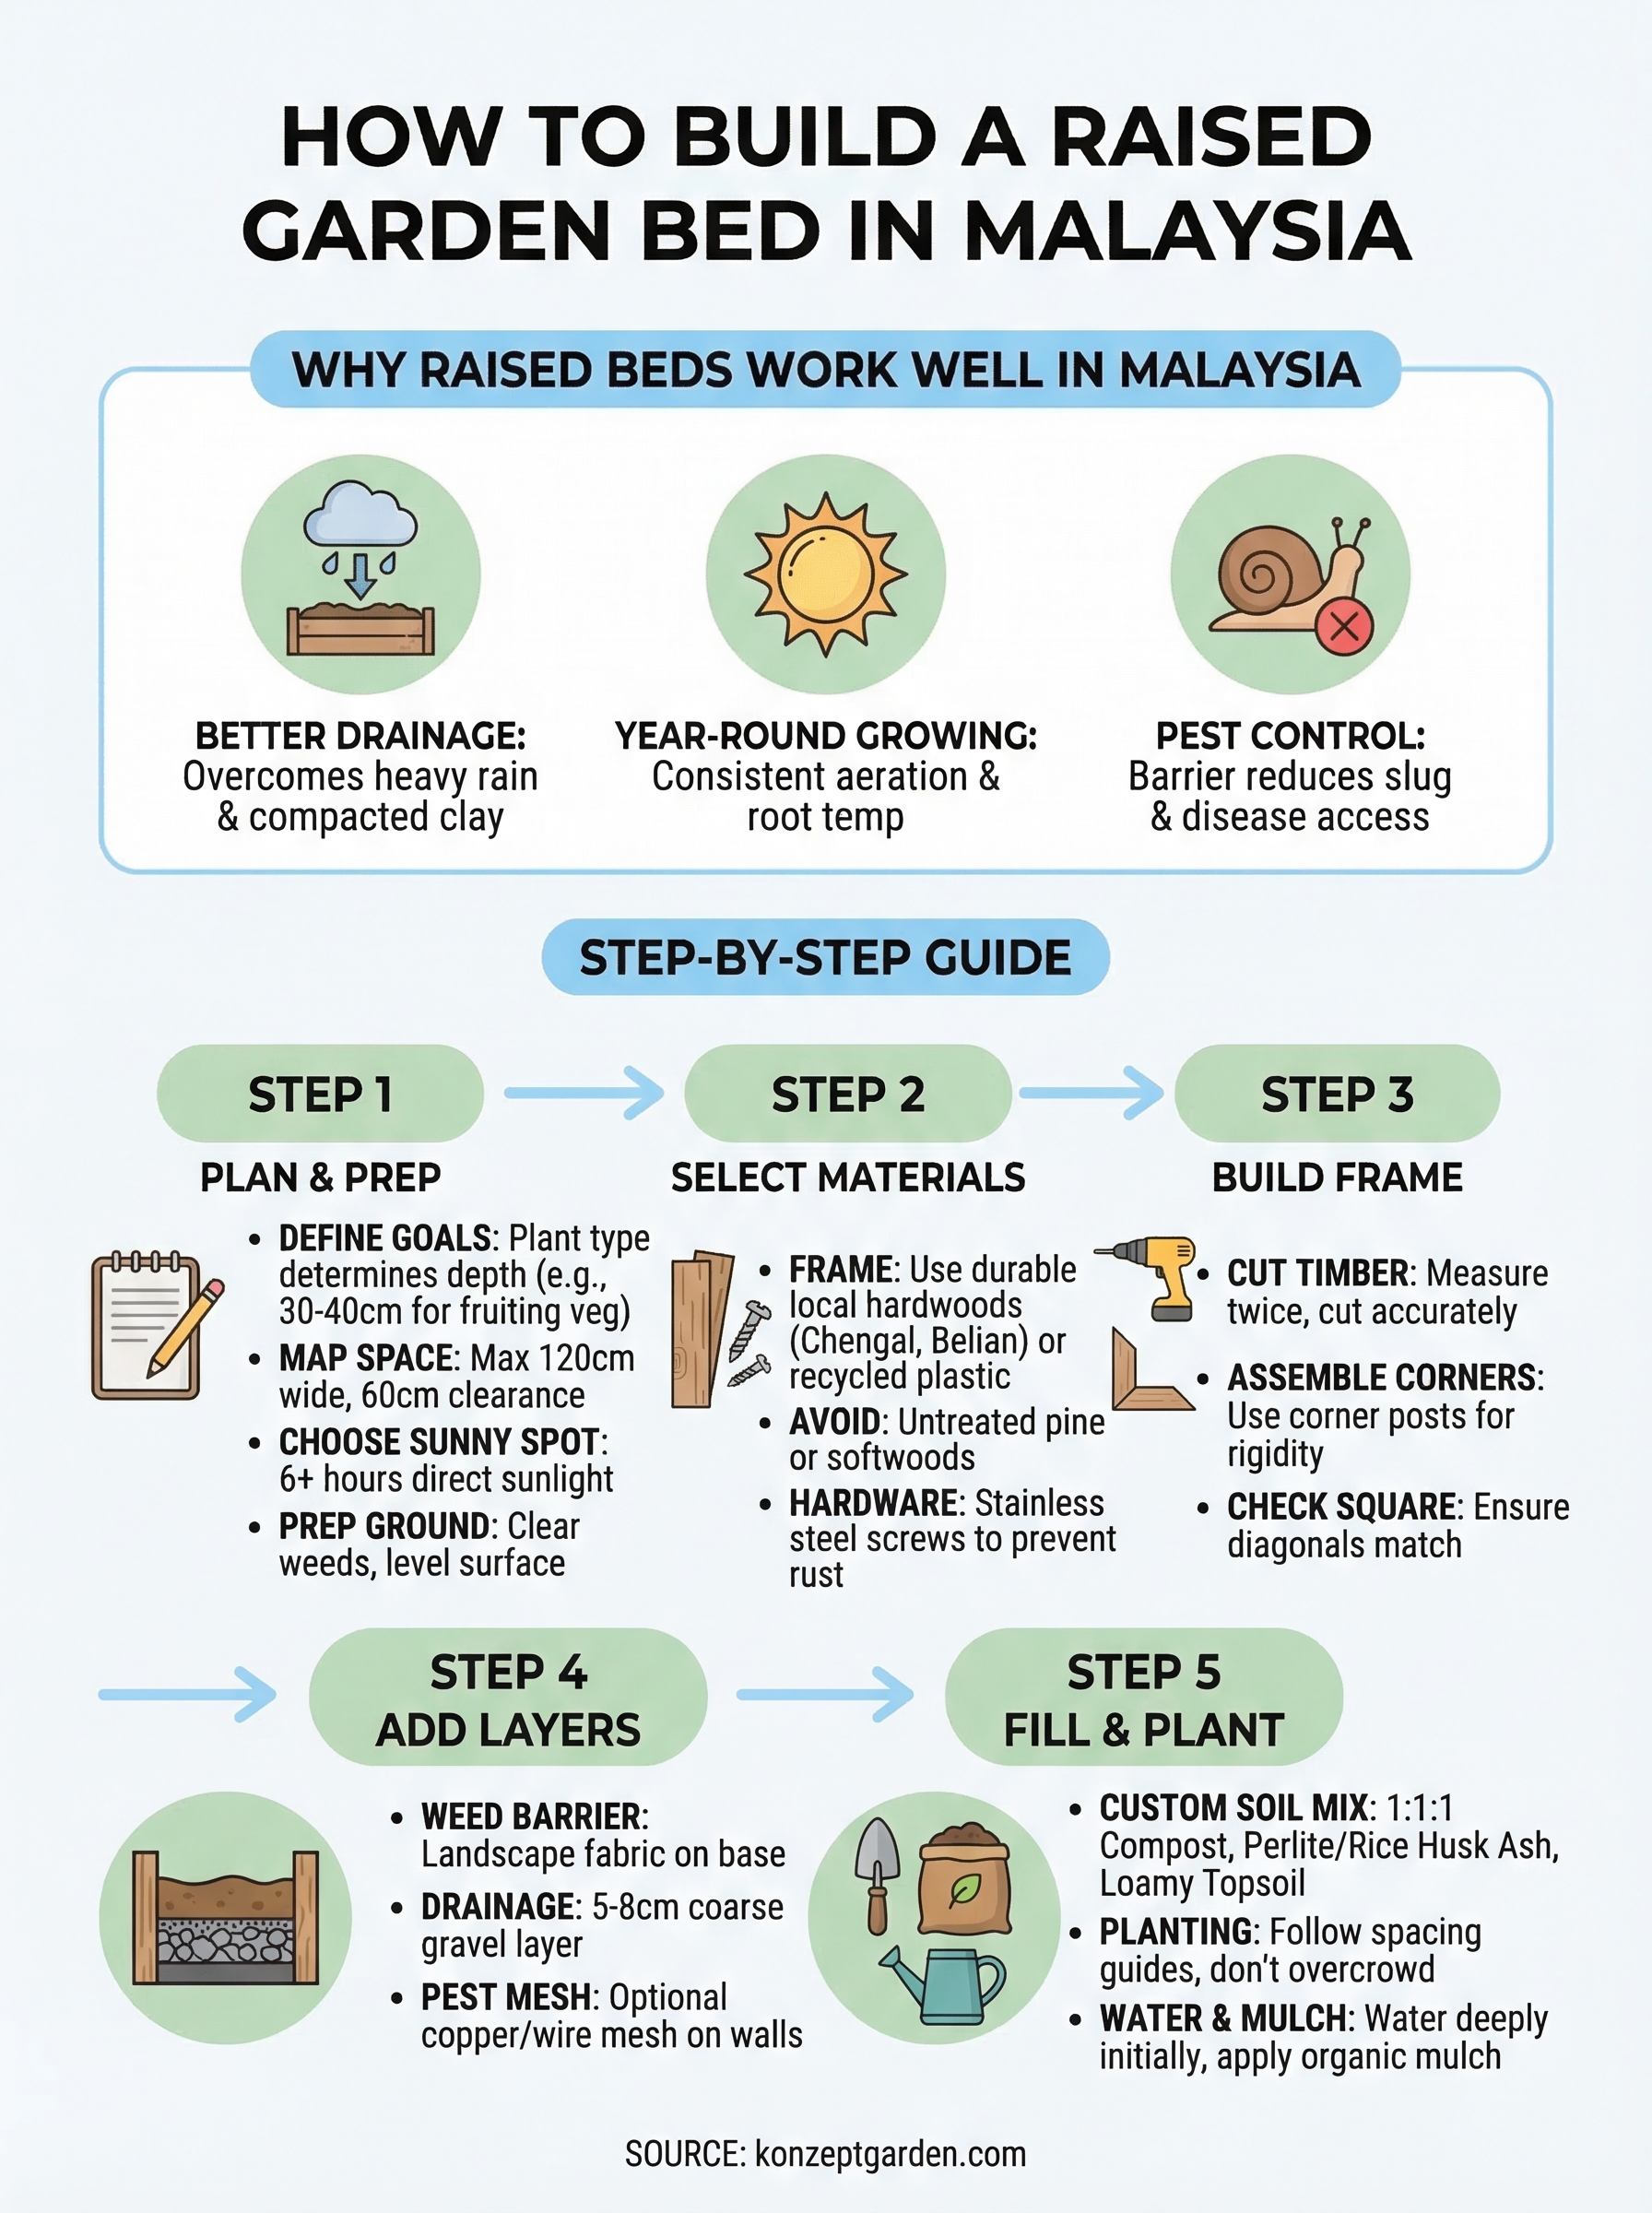
Why raised beds work well in Malaysia
Malaysia receives between 2,000 and 4,000 mm of rain per year, much of it in sudden, heavy downpours. When you plant at ground level and your soil is compacted or clay-heavy, which is the default in many residential plots across Klang Valley, Penang, and Johor, water has nowhere to go. Raised beds lift your root zone above that problem entirely, giving excess water a clear drainage path downward and out. That's the core reason raised beds consistently outperform ground-level planting across Malaysian gardens.
Poor drainage and clay soil
Most residential land in Malaysia was cleared and developed rapidly, leaving soil stripped of organic matter and compacted by construction traffic. Clay-heavy soil drains poorly and hardens when dry, forming a crust that roots struggle to penetrate. When you build a raised bed, you bypass that native soil completely and fill the frame with a custom, well-aerated mix that supports healthy root growth regardless of what lies underneath.
This matters more than most beginners expect. Roots need oxygen as much as water, and waterlogged clay suffocates root systems within days. That's exactly why many first-time Malaysian gardeners watch healthy seedlings collapse for no obvious reason. A raised bed removes that variable entirely and gives you a controlled environment from day one.
The year-round growing advantage
Malaysia has no cold season, so your raised bed can support crops or ornamentals continuously throughout the year. The elevated soil also warms faster than ground soil on cooler wet-season mornings, keeping root activity consistently high. Popular herbs and vegetables in Malaysian gardens, including kangkung, curry leaf, chili, and pandan, all respond well to the stable aeration and root temperature a raised bed delivers.
A raised bed in Malaysia isn't just a design preference, it's a practical system that works with the climate rather than against it.
You also get direct control over nutrient levels. Ground soil in many urban plots is low in organic matter and may carry residue from previous construction or land use. When you fill your own raised bed, you decide exactly what your plants grow in from the very start, which makes troubleshooting and soil improvement far simpler.
Pest and weed control
Slugs, snails, and soil-borne fungal diseases stay active year-round in Malaysia's humidity. Ground-level planting gives these pests direct access through soil contact, which is the main pathway for slug damage and soil-splash fungal infection on lower leaves. A raised frame creates a physical barrier that slows pest movement and significantly reduces splash contact with foliage.
Weeds are a real maintenance burden when you're growing non-stop throughout the year. A raised bed lets you install a weed-suppressing barrier directly below your soil mix, blocking germination from seeds that sit in the native ground underneath. Combined with surface mulching, which this guide covers in a later step, you can cut your weekly weeding time significantly. For anyone working out how to build a raised garden bed suited to Malaysia's specific conditions, understanding these advantages upfront helps you make smarter decisions about height, materials, and placement before you spend a single ringgit.
What to plan before you buy anything
Skipping the planning phase is the most common reason raised beds end up poorly placed, too small, or built from materials that warp within a monsoon season. Before you spend anything on timber, screws, or soil, you need clear answers to three questions: what you're growing, where the bed will sit, and how much space and budget you're actually working with. Getting these right upfront saves you from expensive rework later.
Define your growing goals first
Your plant choices directly determine the height and depth your bed needs. Shallow-rooted crops like lettuce, kangkung, and most herbs grow fine in a bed that's 20 to 25 cm deep. Tomatoes, chilies, and root vegetables like carrot and sweet potato need at least 30 to 40 cm of root depth to develop properly. Write down the five or six plants you actually want to grow, then design your bed depth around the most demanding one on that list.
| Plant Type | Minimum Bed Depth |
|---|---|
| Herbs (basil, mint, pandan) | 20 cm |
| Leafy greens (kangkung, lettuce) | 20-25 cm |
| Fruiting vegetables (chili, tomato) | 30-35 cm |
| Root vegetables (carrot, sweet potato) | 40 cm |
Getting the depth right before you build prevents the most frustrating problem in raised bed gardening: healthy-looking plants that stall because their roots hit frame bottom and can't go further.
Map out your space and access
Measure the area you have available before you commit to any size. A bed wider than 120 cm makes it difficult to reach the center from either side without stepping into the soil, which compresses the aerated mix you've worked to build. Keep your bed width at 90 to 120 cm maximum so every plant stays within arm's reach for planting, watering, and harvesting.
Access paths matter just as much as bed dimensions. You need at least 60 cm of clearance around each bed for comfortable movement, wheelbarrow access, and good airflow between structures. Knowing how to build a raised garden bed that fits your actual space means accounting for these clearances before you cut a single plank. Sketch a simple top-down layout of your garden, mark where each bed will sit, and confirm the path widths actually work before you buy a single piece of timber.
Tools and materials that hold up in heat and rain
Malaysia's heat and constant humidity destroy cheap materials fast. Untreated pine rots within a single wet season, and standard construction timber swells and warps under repeated soaking. Choosing the right materials before you build is what separates a bed that lasts one year from one that holds up for five or more. Knowing what to select also keeps your total spend in check, since the wrong first purchase often leads to a second one.
Best materials for the frame
Your frame material is the single most important decision in how to build a raised garden bed that survives Malaysian conditions. Chengal and belian are the two local hardwoods that perform best in outdoor exposure. Both are naturally dense and resistant to rot, insects, and moisture, and you can source them from most timber yards across the Klang Valley and Johor. Avoid rubberwood for structural use since it absorbs water and softens quickly under sustained rain.
If you can't find local hardwoods at a reasonable price, food-grade recycled plastic lumber is a reliable alternative that won't rot, warp, or leach chemicals into your soil.
| Material | Durability in Malaysia | Notes |
|---|---|---|
| Chengal / Belian | Excellent (10+ years) | Best choice; source from local timber yards |
| Galvanized steel | Excellent | Lightweight, modern look; check for food-safe coating |
| Recycled plastic lumber | Very good (8-10 years) | No rot, no splinters, heavier to handle |
| Treated pine | Moderate (3-5 years) | Affordable but degrades faster in high humidity |
| Untreated softwood | Poor (under 1 year) | Avoid entirely |
Tools you need before you start
You don't need a full workshop setup to build a solid raised bed. A basic toolkit covers everything required for a standard rectangular frame, and most of these items are available at any hardware store across Malaysia.
- Circular saw or handsaw for cutting timber to length
- Cordless drill with screwdriver bits for assembly
- Tape measure and carpenter's square to keep cuts accurate and corners true
- Level to confirm your frame sits flat on the ground
- Safety gloves and eye protection for cutting
Pick up stainless steel or hot-dipped galvanized screws rather than standard zinc-coated ones. Regular screws rust within months under Malaysia's rainfall, which weakens frame joints and forces early repairs that could have been avoided from the start.
Step 1. Choose the right size, height, and shape
Before you cut a single board or mix any soil, you need fixed dimensions on paper. Locking in your size, height, and shape first means your material list stays accurate, your cuts go to plan, and you don't end up with a frame that's awkward to use once it's sitting in your garden. This is where knowing how to build a raised garden bed properly starts separating a frustrating weekend project from a smooth one.
Standard sizes that work for most gardens
Width is the most critical dimension to get right. Keep it between 90 cm and 120 cm so you can reach the center from either side without stretching or stepping onto the soil. For length, 180 cm to 240 cm fits comfortably in most Malaysian terrace house gardens and gives you enough planting area for a productive mix of herbs and vegetables without wasting material.
| Bed Size | Best For | Approximate Timber Needed |
|---|---|---|
| 90 cm x 120 cm | Small balcony or patio | 6-8 planks |
| 90 cm x 180 cm | Compact terrace garden | 8-10 planks |
| 120 cm x 240 cm | Larger yard, mixed planting | 12-14 planks |
How high should your bed be?
Height controls how deeply roots can grow and determines how physically comfortable the bed is to work with. A 30 cm frame is the minimum you should build for most vegetables in Malaysia. It gives fruiting plants like chili and tomato enough root depth and lifts the soil far enough above ground-level waterlogging risks.
If you have back or knee problems, build to 60 cm or higher so you can tend the bed comfortably while standing.
Taller beds from 45 to 60 cm also reduce pest access, since slugs and snails have more surface to climb. The tradeoff is that you need more soil volume to fill them, which adds to your overall budget. Factor that into your planning before you commit to a height.
Shape options and when they matter
Rectangular beds are the simplest to build and the most efficient use of timber. L-shaped or tiered designs add visual interest and can work well around existing garden features, but they require more complex cuts and additional joinery. Stick with a rectangle for your first build, then move to more complex shapes once you've completed one successful project.
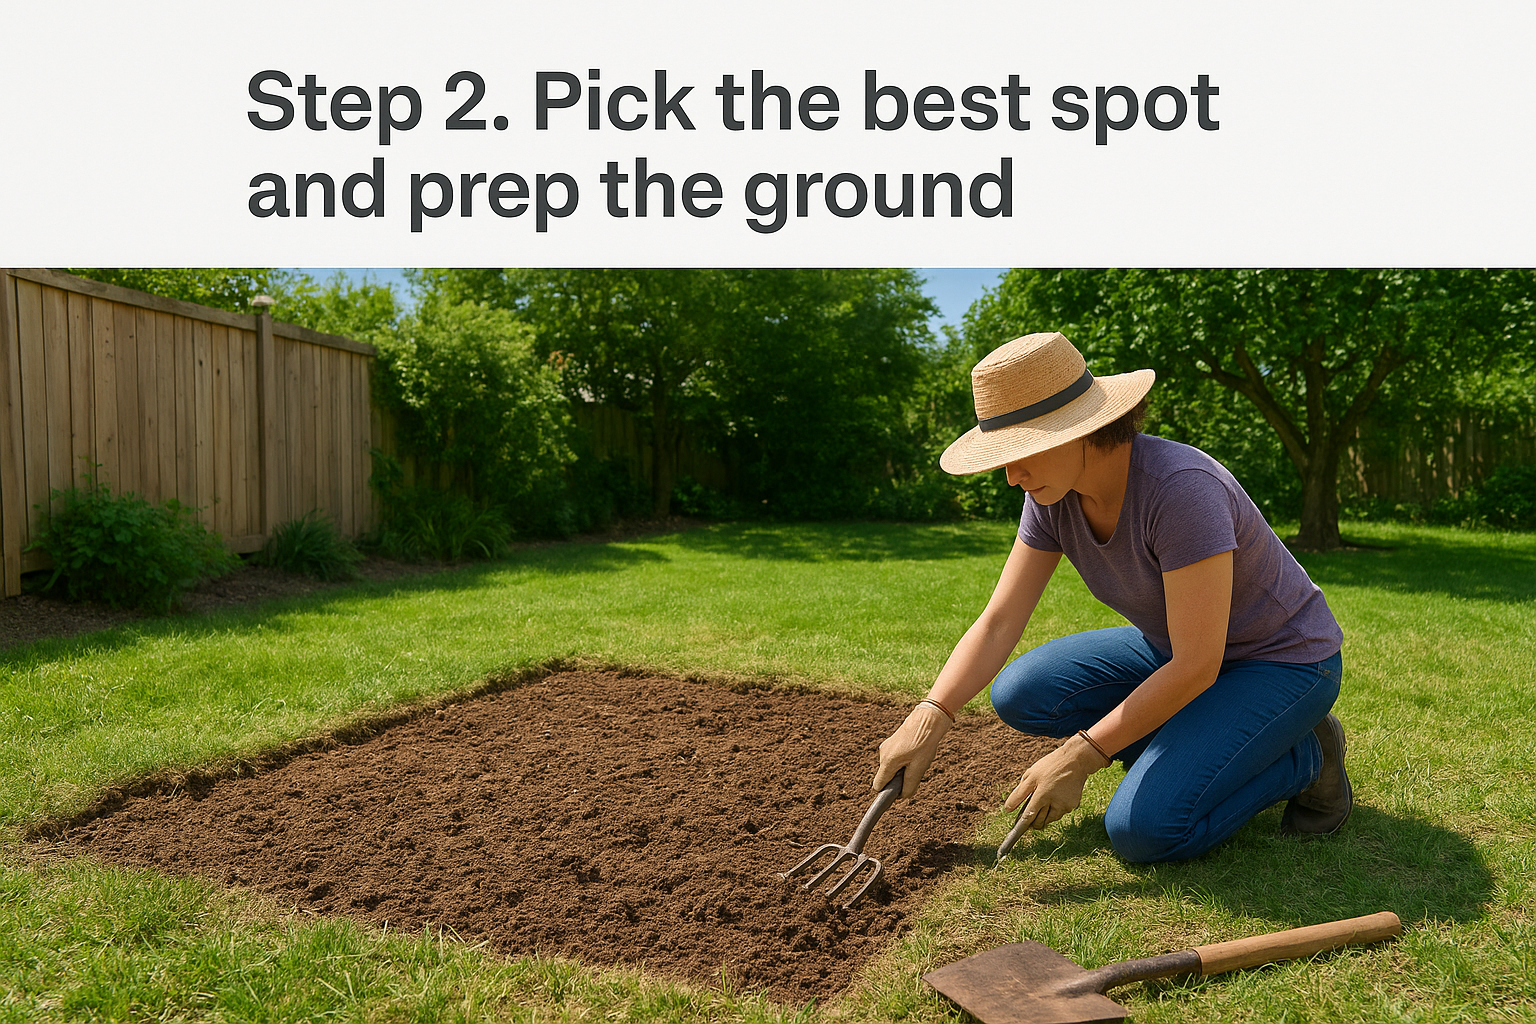
Step 2. Pick the best spot and prep the ground
Where you place your raised bed determines more about long-term success than almost any other decision in this guide. Sun exposure, surface stability, and proximity to your water source all directly affect how often your plants produce and how much maintenance your setup demands. Getting this right before you nail a single plank together saves you from the frustrating option of disassembling and relocating the whole structure later.
Find a spot with enough direct sun
Most food plants and flowering ornamentals need at least six hours of direct sunlight per day to grow productively. In Malaysia, the sun tracks a relatively direct overhead path year-round, which means tall walls, overhanging roofs, and large trees create consistent shade patches that won't shift much with the season. Walk through your garden at different times of day and mark where sunlight actually lands for the longest stretches before committing to a location.
If your only available spot gets four to five hours of direct sun, focus on shade-tolerant crops like kangkung, pandan, and mint rather than chilies or tomatoes, which will underperform without full exposure.
Avoid placing the bed directly against a solid wall on the south side of your property. Walls trap heat and reduce airflow, which accelerates fungal disease in Malaysia's already-humid conditions. Open-air positioning with good circulation around all four sides keeps your plants healthier with far less intervention.
Prepare the ground before you set the frame down
Once you've confirmed your location, take time to level and prepare the surface properly. Clear all grass, weeds, and loose debris from the footprint of your bed before placing the frame. Leftover grass roots will push upward into your soil mix and create persistent weed pressure that undermines the entire point of a contained growing environment.
Use a flat spade to skim the top 5 cm of vegetation and lightly break up any hard crust with a garden fork. Then confirm the surface is level in both directions using a spirit level. An unlevel base causes your frame to rack and distort as soil weight shifts unevenly across the structure. For anyone working out how to build a raised garden bed that holds its shape over multiple seasons, a flat, cleared base is the non-negotiable starting point.
Step 3. Build a strong frame that stays square
Assembly is where most DIY raised beds go wrong. Frames that rack out of square during construction create gaps at the corners, uneven stress on screws, and a structure that loosens progressively as soil pressure pushes outward. Working methodically through each step of how to build a raised garden bed frame gives you a rigid, long-lasting result without needing advanced carpentry skills.

Cut your timber to length
Accurate cuts are the foundation of a square frame. Measure each board twice before cutting, and use a carpenter's square to mark a clean 90-degree line across the face of each plank before you run your saw. For a standard 120 cm x 240 cm bed using two-board-high walls, you'll need two boards cut to 240 cm for the long sides and four boards cut to 117 cm for the short sides, accounting for the thickness of your corner posts.
Cutting all your boards before you start assembling lets you check every measurement is consistent and catch any errors before screws go in.
Stack your cut boards and label each one with a pencil marking its position, such as "long side top" or "short side bottom." This small step prevents confusion during assembly and keeps the process moving without stopping to re-measure.
Assemble corner by corner
Building one corner at a time keeps the frame controllable and accurate. Use 100 mm corner posts cut from the same timber stock at each internal corner for rigidity. Clamp the first short-side board to the corner post, confirm the angle with your carpenter's square, then drive two screws through the board face into the post.
Work around the frame in sequence rather than jumping to opposite corners. Follow these steps in order to keep everything aligned:
- Attach both short-side boards to one corner post and set the assembly flat on the ground.
- Connect the long-side boards to each end of that assembly, one side at a time.
- Check diagonal measurements across the frame before driving the final screws. Both diagonals must match exactly for the frame to be square.
- Drive a third screw into each joint once you've confirmed the diagonals are equal.
Stainless steel screws prevent rust from weakening your joints over Malaysia's wet seasons, so don't substitute them for standard hardware store alternatives at this stage.
Step 4. Add weed control, drainage, and pest protection
With your frame assembled, the next step is layering in protection before any soil goes in. Skipping this phase is the most common reason raised beds develop persistent weeds and soggy root zones within the first season. Spending an extra hour here on weed barriers, drainage, and pest deterrents adds years of productive life to your setup.
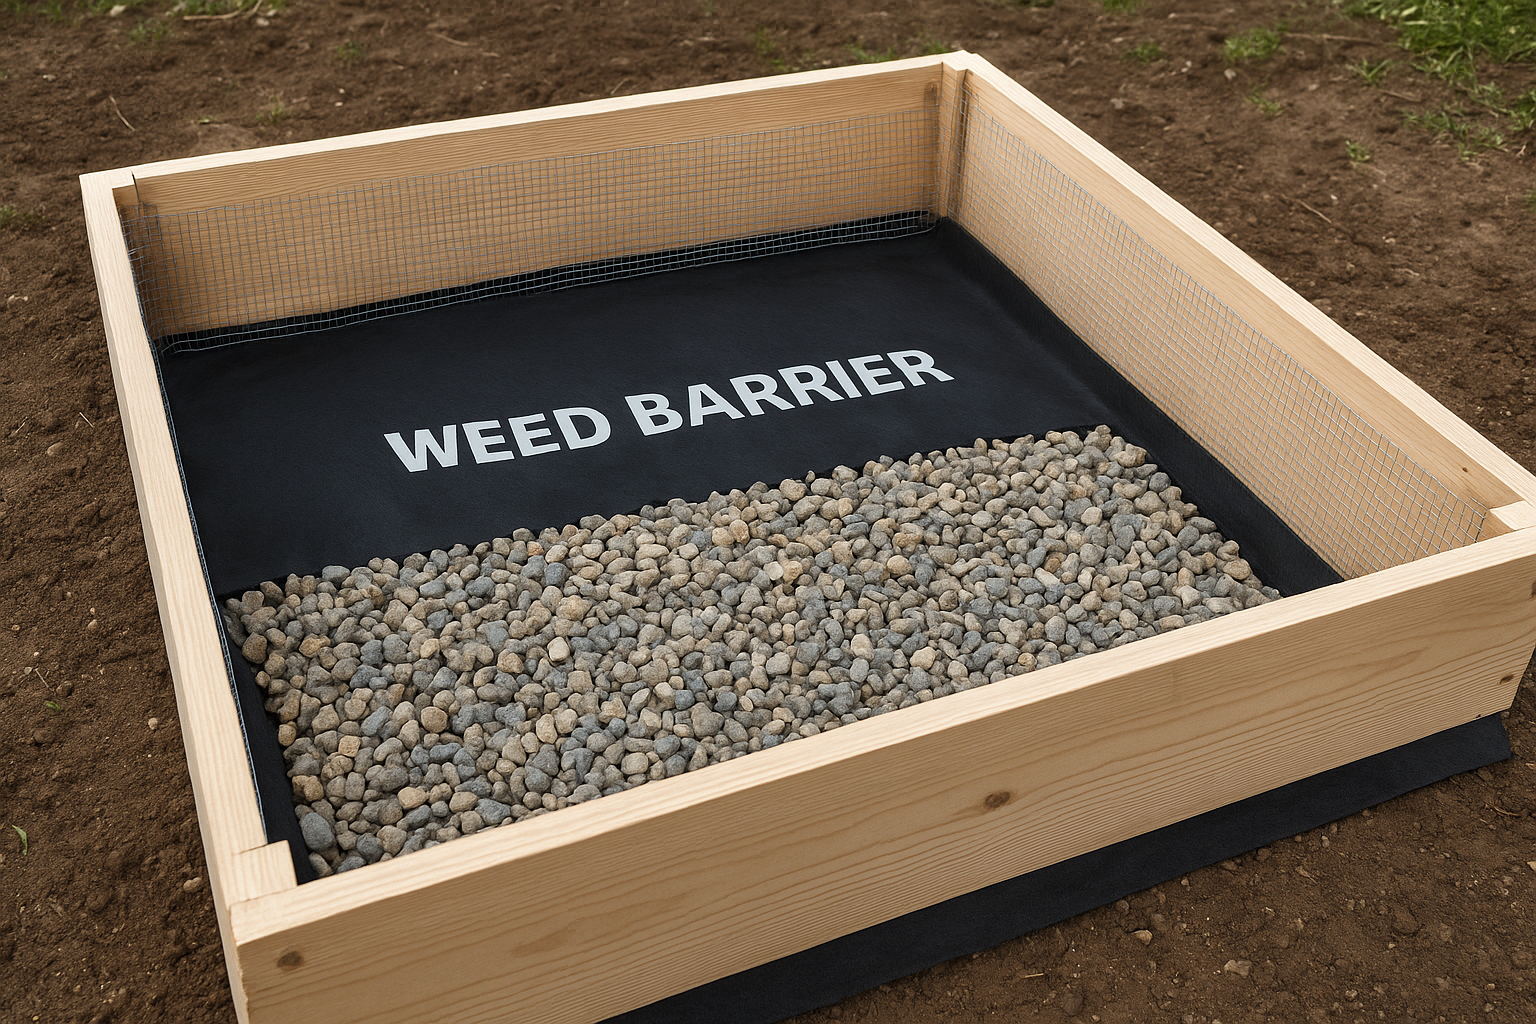
Install a weed barrier on the base
Lay a single layer of heavy-duty landscape fabric directly on the ground inside your frame before adding any soil. This fabric lets water drain through while blocking weed seeds in the native soil from germinating upward into your growing mix. Avoid using standard plastic sheeting, which traps water underneath and suffocates the beneficial soil organisms your plants depend on.
Landscape fabric labeled "geotextile" or "weed control fabric" at Malaysian hardware stores typically costs between RM 2 to RM 5 per square meter.
Cut the fabric to match your bed's interior dimensions and overlap the edges by at least 5 cm on all sides to prevent gaps at corners where weeds push through most readily.
Build in drainage with a gravel layer
Place a 5 to 8 cm layer of coarse gravel or construction aggregate directly on top of the weed fabric. This drainage layer prevents water from pooling at root level during Malaysia's heavy downpours, which is the leading cause of root rot in tropical raised beds. Mix in washed river sand at a 1:1 ratio if you want even faster drainage across the full base area.
Adding this layer also creates a buffer zone between your soil mix and the weed fabric, which keeps fine soil particles from gradually clogging the fabric over multiple wet seasons.
Add physical pest deterrents
Line the interior walls of your frame with copper mesh or fine galvanized wire mesh to block slugs, snails, and burrowing pests that are common in Malaysian residential areas. Knowing how to build a raised garden bed that stays protected long-term means addressing these threats at the construction stage rather than reacting to damage after your plants are already in the ground. Staple the mesh firmly to the inner face of each board, pulling it taut so there are no loose sections that pests can squeeze through.
Scatter crushed eggshells or coarse sand around the outer perimeter of the bed as a secondary deterrent that's both low-cost and easy to replenish throughout the growing season.
Step 5. Fill with a soil mix that stays airy in the tropics
The soil mix you put inside your frame does more work than any other part of knowing how to build a raised garden bed that actually produces. Bagged potting soil alone is not sufficient for Malaysian conditions, since most commercial mixes compact quickly under heavy tropical rainfall and lose aeration within a few weeks. You need a custom blend that retains moisture, drains freely, and holds enough organic matter to support continuous cropping across the year.
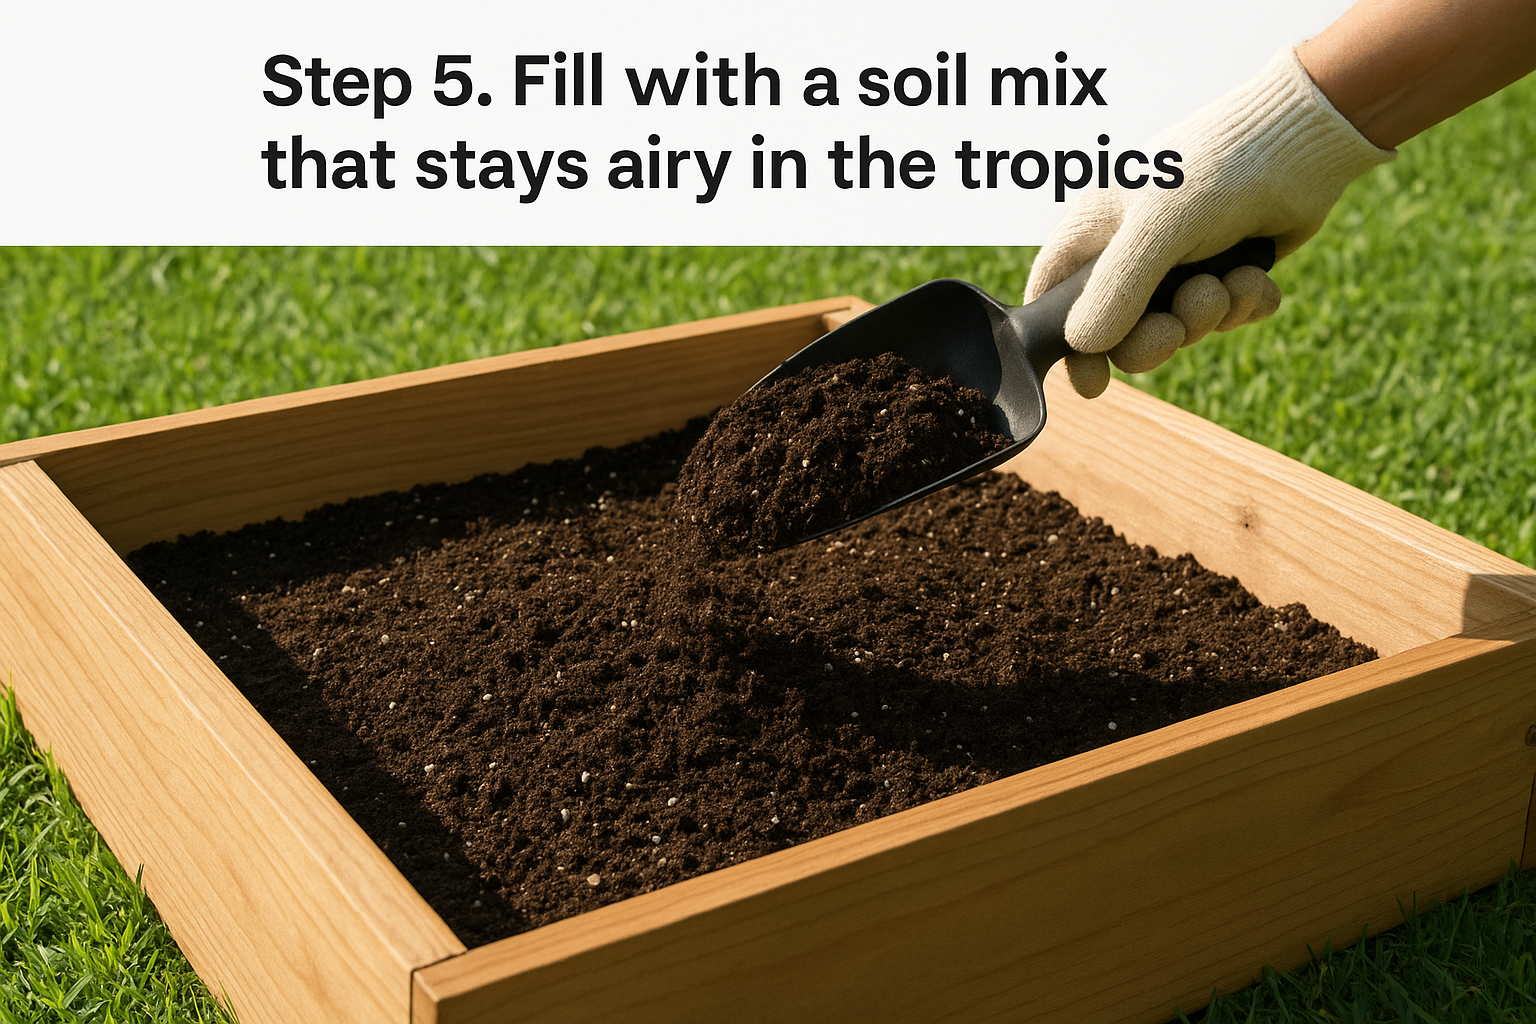
The right ratio for tropical conditions
Start with a three-part base mix and adjust from there based on what you're growing. The standard formula that works across most Malaysian gardens combines equal volumes of quality compost, coarse perlite or rice husk ash, and good loamy topsoil. This ratio keeps the mix airy enough for roots to penetrate freely while holding sufficient nutrients to reduce how often you need to fertilize.
A soil mix that drains well and stays loose after heavy rain will outperform expensive commercial potting media every time in a Malaysian raised bed.
| Component | Volume Ratio | Purpose |
|---|---|---|
| Compost (matured organic) | 1 part | Nutrients and microbial activity |
| Coarse perlite or rice husk ash | 1 part | Aeration and drainage |
| Loamy topsoil | 1 part | Structure and water retention |
| Slow-release organic fertilizer | Small handful per 50L | Baseline nutrition for 3-4 months |
Mix these components thoroughly before loading them into the frame. Fill your bed in two stages, adding half the mix first and tamping it lightly, then adding the remainder to within 5 cm of the top edge. Leaving that gap prevents soil from washing out during downpours.
What to avoid putting in your bed
Never fill your raised bed with straight garden soil dug from the surrounding ground. Most urban Malaysian soil is compacted, low in organic matter, and may carry fungal pathogens from previous plant debris. It also forms a dense, airless block once it's enclosed in a frame, which suffocates roots far faster than open-ground planting.
Skip pure sand as a primary filler too. Coarse sand alone drains too quickly and holds almost no nutrients, leaving your plants consistently underfed regardless of how often you water or fertilize.
Step 6. Plant, water, and mulch for fast establishment
With your frame built and soil mix loaded, you're now at the most rewarding part of knowing how to build a raised garden bed: actually putting plants in the ground. How you plant, water, and mulch in the first two weeks determines how quickly your bed transitions from a construction project to a productive growing system. Rushing through this stage or skipping mulch entirely is what causes new beds to dry out, crust over, or produce weak, slow-growing seedlings.
Plant at the right spacing and depth
Overcrowding is the most common planting mistake in raised beds, especially when the fresh, rich soil makes everything look like it has unlimited room to spread. Follow the spacing recommendations on your seedling labels or seed packets without reducing them, even if the bed looks empty at first. Tight spacing blocks airflow between plants and creates the humid canopy conditions that fungal diseases thrive in across Malaysian gardens.
Use this spacing guide as a starting reference for common Malaysian garden plants:
| Plant | Recommended Spacing | Notes |
|---|---|---|
| Chili / tomato | 40-50 cm apart | Stake at planting, not after |
| Kangkung / leafy greens | 15-20 cm apart | Direct sow or transplant seedlings |
| Herbs (basil, mint) | 20-25 cm apart | Pinch tops early to encourage bushing |
| Pandan | 30-40 cm apart | Grows wide; allow full spacing |
Water consistently in the first two weeks
The first 14 days after planting are when root systems make their most critical connections with the surrounding soil mix. Water deeply every morning during this period, aiming the flow at soil level rather than over the foliage. Surface-level watering reduces fungal splash and keeps moisture where roots can actually access it.
Consistent early watering builds root depth. Plants watered shallowly and frequently develop shallow roots that are vulnerable to both drought and flooding.
Apply mulch right after planting
Spread a 3 to 5 cm layer of organic mulch across the entire soil surface immediately after planting. Dried grass clippings, coco peat, or wood chip mulch all work well and are widely available at Malaysian nurseries. Mulch slows soil moisture loss between watering sessions, keeps soil temperature stable during midday heat, and suppresses the surface weed germination that starts within days of exposing fresh soil to sunlight.
Fix common issues and upgrade your bed over time
Even a well-built raised bed runs into problems after a season or two. Recognizing the signs early and knowing exactly what to adjust keeps your bed productive without starting over from scratch. Most issues that appear after the first monsoon season trace back to soil compaction, drainage failure, or nutrient depletion, and all three are fixable with targeted action rather than a full rebuild.
Diagnose and fix waterlogging and compaction
If you notice water pooling on the soil surface for more than 30 minutes after rain, your drainage layer has either compacted or your soil mix has broken down. Lift a section of soil from the top 10 cm and check whether it holds together in a dense clump. If it does, your perlite or rice husk ash has degraded and lost its structure.
The fix is straightforward: top-dress the bed with a 5 cm layer of fresh compost mixed with new perlite, then work it into the top layer with a hand fork to restore aeration.
Compaction near the edges typically happens when you rest your hands on the soil wall while reaching across the bed. Keep your weight on the frame itself and avoid pressing down on the growing area. If compaction is severe across the whole surface, loosen the top 15 cm fully with a hand fork before adding your top-dress layer.
Upgrade with trellises, drip irrigation, and extra boards
Once your bed is established and you understand how to build a raised garden bed that works in Malaysian conditions, simple upgrades extend its usefulness significantly. Add a trellis by driving 1.5-meter bamboo poles into the corners and stringing horizontal twine between them at 20 cm intervals. This supports climbing plants like bitter gourd, long beans, and passion fruit without adding weight to the frame.
For watering, a basic drip irrigation line connected to a timer reduces manual effort and delivers water directly to the root zone. This cuts fungal pressure on foliage that comes from overhead watering.
If your current frame height isn't deep enough for root vegetables, stack a second tier of boards on top of your existing frame using the same corner post method from Step 3. Bolt both layers together through the corner posts with 120 mm stainless bolts to lock the structure firmly.
Conclusion
Now you have a complete, step-by-step system for how to build a raised garden bed that holds up through Malaysia's heat, heavy rain, and year-round growing demands. From choosing the right hardwood frame and drainage layers to filling with a custom tropical soil mix, every decision in this guide connects back to what actually works in Malaysian conditions rather than generic advice written for temperate climates.
Start with one bed, get comfortable with the process, and expand from there. The skills you build on your first project transfer directly to every bed you add afterward. Focus on getting your size, materials, and soil mix right before you plant anything, and the rest follows naturally.
If you want professional input on turning your outdoor space into something more complete, the team at Konzept Garden is ready to help. Get in touch with our landscape designers to start planning your garden today.

