Artificial grass has become a popular choice for homeowners seeking a low-maintenance, long-lasting alternative to natural grass. Whether you're installing artificial grass in your backyard, on a rooftop, or in a small garden space, learning how to properly cut and fit the grass is crucial for achieving a professional, flawless finish. In this tutorial, we'll walk you through a step-by-step process for cutting artificial grass, ensuring your DIY project looks as seamless and polished as possible. With the right tools and techniques, you can easily complete this task and enjoy a beautiful, green space all year round.
Tools & Materials Needed
Before starting your artificial grass installation, gathering the right tools and materials is essential for a smooth process. Here’s what you’ll need:
- Utility Knife: A sharp utility knife is your main tool for cutting the artificial grass. Make sure to have extra blades handy for clean and precise cuts.
- Measuring Tape: Accurate measurements are key to avoiding mistakes when cutting the grass to fit your space perfectly.
- Straight Edge: This will help guide your knife when making long, straight cuts to ensure neat edges.
- Adhesive/Glue: You’ll need strong adhesive for securing seams and edges, especially if you’re installing on a hard surface like concrete.
- Joining Tape: For larger areas where multiple rolls of artificial grass are used, joining tape is required to create seamless transitions between sections.
- Nails or Stakes: If you're installing artificial grass on soil or sand, nails or stakes will help secure the perimeter and keep the grass in place.
- Sand Infill (Optional): Adding sand infill can improve the durability and appearance of the grass, keeping the blades upright and natural-looking over time.
- Knee Pads (Optional): To protect your knees during the installation process, especially when working on hard surfaces.
By preparing these tools and materials in advance, you’ll set yourself up for a successful and efficient DIY artificial grass installation.
Preparing the Area
Proper preparation of the installation area is crucial for ensuring that your artificial grass lasts long and looks great. Follow these steps to get your space ready:
- Clear the Surface: Start by removing any debris, rocks, plants, or existing grass from the area. Use a shovel or a garden rake to ensure the surface is completely free from obstacles that could affect the grass installation. If you're installing over concrete, simply sweep away any loose dirt or dust.
- Level the Ground: It's important to ensure the surface is even. If you're working with soil or sand, level the area using a landscaping rake. Fill in any dips or holes with sand or gravel to create a flat, stable foundation. For larger spaces, using a compactor to flatten the ground is recommended. A smooth, level base is crucial for proper drainage and a uniform appearance.
- Install the Base Layer: For installations on soil, lay down a base of crushed stone or aggregate (about 2-3 inches thick). This layer provides a stable foundation and ensures good drainage. Compact this base layer thoroughly using a roller or plate compactor to prevent shifting over time.
- Installing the Weed Barrier: Lay a weed membrane over the prepared surface to prevent weeds from growing through the artificial grass. Secure the membrane in place with landscape staples, ensuring it covers the entire area without gaps.
- Check for Drainage: Good drainage is essential for artificial grass installations. Make sure that the base has a slight slope to allow water to drain away naturally. This prevents water pooling and ensures the longevity of your installation.
By carefully preparing the area, you create a strong foundation for your artificial grass, which helps it look better and last longer. Proper ground preparation is key to a successful installation!

Measuring and Laying the Artificial Grass
Once the area is prepped, it's time to measure and lay down your artificial grass. Getting this step right is key to ensuring a smooth, seamless installation. Here’s how to do it:
- Measure the Area: Start by accurately measuring the dimensions of the installation space. Use a measuring tape to record the length and width. Be sure to allow a little extra grass for trimming along the edges or corners. Proper measurements will help reduce waste and ensure that the grass fits perfectly in your desired area.
- Unroll the Grass: Once you have the measurements, unroll the artificial grass and let it sit for a few hours. This helps the grass settle and relax, making it easier to work with. Allowing the grass to flatten will prevent wrinkles or creases from appearing during installation.
- Position the Grass: Carefully lay the artificial grass over the prepared base. Make sure the blades of grass are all facing in the same direction for a consistent look across the surface. Adjust the positioning until the entire area is covered. If using multiple rolls of grass, overlap the edges slightly before trimming to ensure seamless joins.
- Align for Best Results: Take your time aligning the grass to avoid any gaps or awkward seams. If necessary, adjust the rolls to ensure the pattern and grain of the grass are even. Ensuring proper alignment is essential for achieving a natural and professional finish.
- Plan for Excess Grass: Leave some extra grass around the edges, as this will give you more flexibility when cutting and trimming to fit. It's always better to have more grass to work with than too little, as you can always trim it later.
How to Cut Artificial Grass

Cutting the artificial grass accurately is one of the most critical steps in the installation process. Follow these steps to ensure clean and precise cuts:
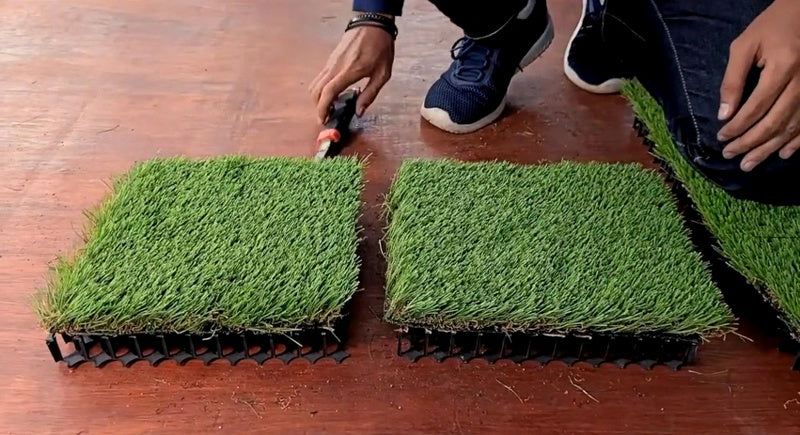
- Step 1: Cut the Top Layer: Begin by using a sharp utility knife to make an initial cut through the top layer of the artificial grass. This top layer usually contains the grass blades and a backing material. Be sure to follow your measurements and markings to cut exactly where needed. Cutting through only the top layer at first gives you more control and avoids cutting too deep.
- Step 2: Bend the Draincell: After cutting the top layer, gently bend or lift the draincell, which is the layer underneath that allows for proper drainage. Bending the draincell makes it easier to manage while you prepare for the final cut. This step is especially useful for curved areas or tight spaces where precision is necessary.
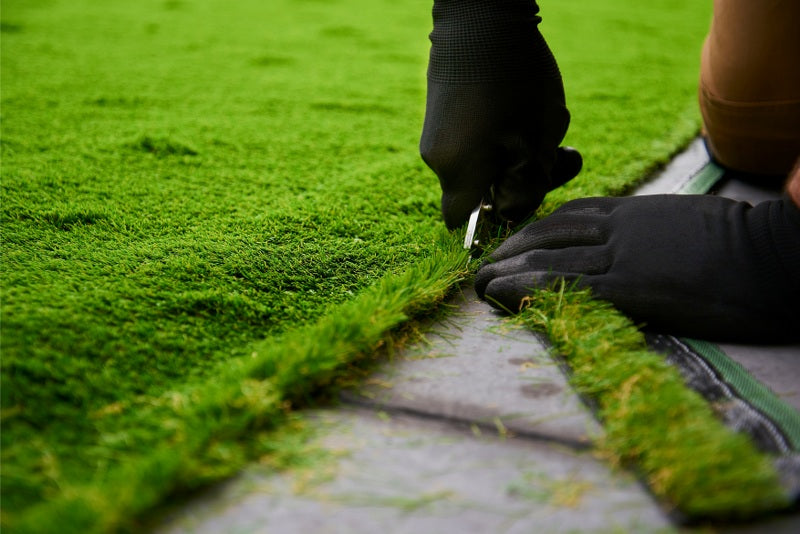
- Step 3: Cut the Artificial Grass: Now, proceed to cut through the remaining layers of the artificial grass, including the backing. You can cut the grass to different sizes depending on your installation needs, such as around garden beds, edges, or obstacles like stepping stones. Make sure to follow the same cutting techniques as earlier to maintain consistency across the entire project. Always cut from the underside of the grass for a cleaner edge and more accuracy.
By following these three steps, you can easily cut artificial grass to fit any space, whether you need straight lines or custom shapes. Consistency in technique ensures that your installation looks seamless and professional.
Joining Sections of Artificial Grass
For larger areas where multiple rolls of artificial grass are needed, joining the sections properly is key to achieving a seamless look. Follow these steps to ensure the joins are barely noticeable:
- Using Joining Tape and Adhesive: Start by positioning the artificial grass sections so that they overlap slightly at the edges. Place the joining tape along the seam between the two pieces, adhesive side facing up. Next, apply strong outdoor adhesive along the length of the tape. Make sure the adhesive is spread evenly to ensure a firm bond between the grass sections.
- Aligning the Seams: Once the adhesive is applied, carefully align the edges of the two sections of grass. Be sure to push the edges together gently but firmly, ensuring the grass blades point in the same direction on both sections. This step is crucial for a seamless appearance, as misaligned seams can create visible gaps.
- Pressing the Seams Together: Use your hands or a roller to press the seams down firmly into the adhesive. Ensure the entire seam is securely attached to the joining tape. Avoid stepping directly on the seam until the adhesive has had time to set. This will prevent shifting and ensure a strong bond.
- Finishing the Join: Once the seams are pressed down, brush the grass with a stiff broom to lift the blades and blend the join into the surrounding area. This will help to disguise the seam and give the grass a uniform appearance.
By carefully joining sections of artificial grass using tape and adhesive, you can create a smooth, continuous surface that looks as though it’s made from a single piece.
Securing the Grass
After cutting and joining the sections of artificial grass, the next step is to secure it in place to ensure it stays flat and doesn’t move over time. Follow these steps for proper securing:
- Nailing or Gluing the Perimeter: If you’re installing the artificial grass on a soil or sand base, use landscaping nails or staples to secure the edges. Space the nails about 6-12 inches apart around the entire perimeter. For installations on hard surfaces like concrete, use outdoor adhesive to glue the edges down firmly. Make sure the adhesive is evenly applied for a strong bond.
- Stretching the Grass: As you secure the edges, pull the grass tightly to remove any wrinkles or bubbles. This will help the grass lay flat and ensure a smooth, even surface. Stretching the grass is especially important for larger areas to prevent sagging over time.
- Adding Sand Infill: Adding sand infill helps to weigh down the grass, keeping it in place, while also improving the appearance and durability. Spread the sand evenly over the surface and brush it into the grass using a stiff broom. The sand helps support the grass fibers, keeping them upright and providing extra stability.
- Securing Around Obstacles: For areas around trees, flower beds, or other obstacles, cut the grass precisely to fit and secure the edges with nails or adhesive. Ensure the grass is tightly secured to prevent lifting or shifting.
Final Touches
The finishing touches are just as important as the installation itself, ensuring your artificial grass looks natural and well-maintained. Here’s how to perfect the final appearance:
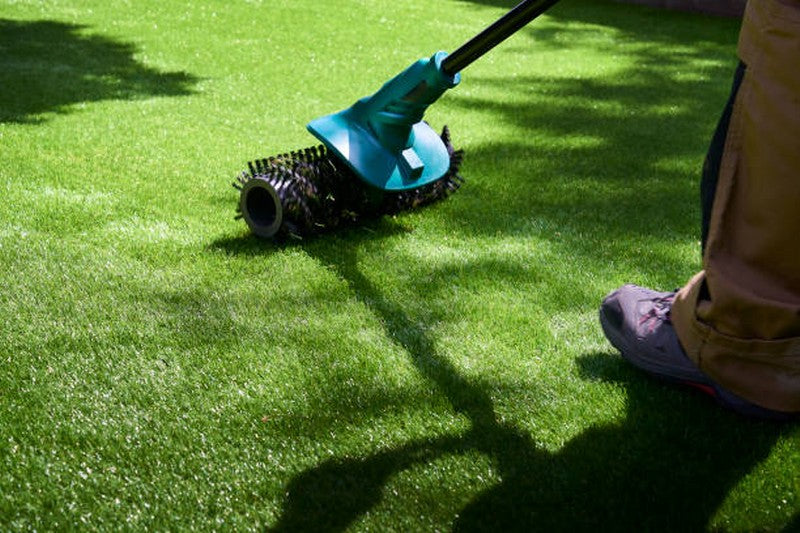
- Brushing the Grass: Once the grass is secured, use a stiff broom to brush the grass fibers in an upward direction. This helps lift the blades and gives them a more natural appearance. Regular brushing also helps to redistribute the sand infill and maintain the upright position of the blades over time.
- Check for Gaps and Wrinkles: Walk around the installation area and inspect for any gaps, wrinkles, or loose spots. If you find any, fix them by either trimming the edges, adding more nails, or reapplying adhesive. Ensuring there are no imperfections will help the grass look seamless and professional.
- Maintenance Tips: Although artificial grass is low-maintenance, it’s important to perform light upkeep to keep it looking its best. Regularly brush the grass to lift the fibers, remove debris, and rinse it with water occasionally to keep it clean. Avoid heavy objects on the grass to prevent dents or compression over time.

Konzept Garden's Noble Artificial Grass with Drain Cell: The Perfect DIY Solution
For homeowners seeking a durable and efficient solution for their outdoor spaces, Konzept Garden’s Noble Artificial Synthetic Grass (DIY Valu-30) provides several key advantages:
- Integrated Drain Cell System: Promotes superior drainage, ensuring water flows away quickly and prevents puddles, keeping surfaces clean and dry—perfect for rainy or humid climates.
- High UV Resistance: Ideal for outdoor spaces exposed to prolonged sunlight, this grass resists fading and maintains its vibrant green color all year round.
- Eco-Friendly and Lead-Free: Made from environmentally friendly materials, this grass is safe for children and pets, aligning with sustainability practices.
- Easy DIY Installation: Designed with a user-friendly installation process, allowing homeowners to easily create beautiful green spaces without professional help.
- Built-in Drain Cell Layer: Enhances water management, making it suitable for a variety of applications, including rooftops, patios, and lawns.
- Soft Yet Durable Fibers: Provides a comfortable walking surface while standing up to heavy foot traffic, ideal for both residential and commercial use.
By choosing Konzept Garden’s Noble Artificial Grass, you’re investing in a long-lasting, low-maintenance solution that combines beauty and functionality for years to come.
Conclusion
Installing artificial grass can transform your outdoor space into a low-maintenance, lush area. By following this guide, you’ll be able to cut, join, and secure artificial grass for a seamless, professional finish. For an even better result, consider Konzept Garden’s Noble Artificial Grass with Drain Cell, which offers superior drainage, UV resistance, and easy DIY installation.
With the right tools and a little effort, your artificial grass will provide a durable, vibrant, and hassle-free landscape for years to come.