You want a peaceful water feature in your backyard but the idea of how to build a garden pond feels overwhelming. Between choosing the right spot and figuring out what materials you need, the whole process seems complicated. Most homeowners in Malaysia skip this project because they think it requires professional skills or expensive equipment.
The truth is simpler. You can build a beautiful pond over a weekend using basic tools and readily available materials. The key lies in following a proven step by step method that breaks down each task into manageable actions. No special training needed.
This guide walks you through the entire pond building process from start to finish. You'll learn how to pick the perfect location for Malaysian weather, excavate the soil properly, install liners that last, and set up a filtration system that keeps water clear. By the end, you'll have a functional garden pond that attracts wildlife and transforms your outdoor space into something special.
Planning the location and gathering materials
Your pond's success depends heavily on the decisions you make before digging the first shovelful of soil. Proper planning saves you from costly mistakes like repositioning your pond halfway through or dealing with constant algae problems. Take time to assess your yard carefully and gather everything you need in one go so you can work efficiently when construction begins.
Choose a location that suits Malaysian climate
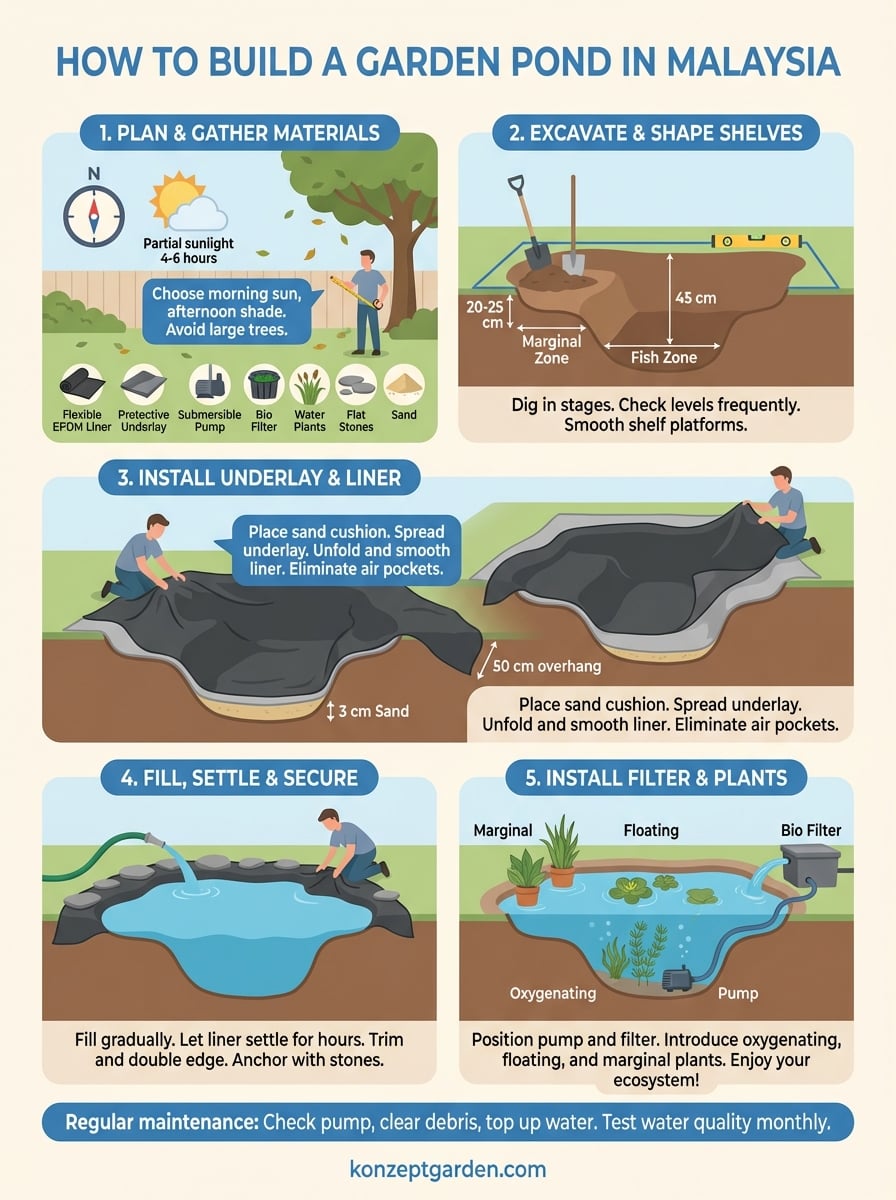
Pick a spot that receives partial sunlight for 4 to 6 hours daily. Full sun exposure in Malaysia's tropical heat will warm your water excessively and trigger rapid algae growth. Areas with morning sun and afternoon shade work best because they maintain balanced water temperatures throughout the day.
Keep your pond at least 3 meters away from large trees to minimize falling leaves and root intrusion. Roots can puncture liners over time, while decomposing leaves reduce oxygen levels and create murky water. Avoid placing your pond directly under power lines or near underground utilities like water pipes, electrical cables, or septic systems. Check with your local utility providers if you're uncertain about what lies beneath your chosen spot.
Select a location visible from your main living areas so you can enjoy the pond's calming presence daily.
Calculate the right pond size
Start with dimensions that match your available space and maintenance capacity. A beginner friendly pond measures 2 meters by 1.5 meters with a depth of 60 centimeters. This size provides enough volume to support fish and plants while remaining manageable for one person to maintain.
Depth matters more than surface area when you build a garden pond. Your pond needs at least 45 centimeters of depth to protect fish from temperature fluctuations and predators like herons. Consider adding shallow shelf areas around the edges at 20 to 30 centimeters deep where marginal plants can thrive and wildlife can access water safely.
Gather essential materials and tools
You'll need specific supplies to complete your pond properly. Purchase a flexible EPDM rubber liner because it conforms to irregular shapes and resists Malaysia's UV exposure better than PVC alternatives. Calculate liner size by adding twice the maximum depth to both length and width measurements, then add an extra meter for edge overlap.
Stock up on these materials before starting:
- Pond liner (EPDM rubber, calculated to your pond dimensions)
- Protective underlay (geotextile fabric or old carpet)
- Submersible pond pump (rated for your water volume)
- Biological filter (sized appropriately for pond capacity)
- Water plants (mix of oxygenating, floating, and marginal species)
- Flat stones or edging materials (to hide liner edges)
- Sand (one 25kg bag for cushioning)
Gather these basic tools that you probably already own:
- Spade and shovel
- Spirit level
- Garden hose
- Wheelbarrow
- Utility knife
- Measuring tape
Most materials are available at garden centers throughout Malaysia or through major online retailers. Budget between RM800 to RM1,500 for a basic 2 by 1.5 meter pond including all materials and a simple filtration system. Quality liners cost more upfront but last 20 years or longer, making them worthwhile investments compared to cheaper alternatives that crack within 3 to 5 years.
Step 1. Excavate the soil and shape the shelves
You begin the actual construction by removing soil in a controlled manner that creates the foundation for your pond. Mark your pond's outline using a garden hose or rope because these flexible materials let you adjust the shape until it looks right. Walk around the marked area from different angles to ensure the proportions work with your landscape before committing to the design.
Mark your pond outline clearly
Spray marking paint along the hose line once you finalize the shape. This permanent outline stays visible throughout excavation even as you move soil and create different depth levels. Remove the hose and start digging just inside the painted line to give yourself room for adjustments.
Dig in stages from shallow to deep
Start excavating from the outer edges inward, creating the marginal shelf first. Dig down 20 to 25 centimeters across the entire marked area to establish your shallowest level where plants will sit. Use a spirit level frequently to check that the pond rim sits level on all sides, otherwise water will overflow from the low point and expose liner on the high side.
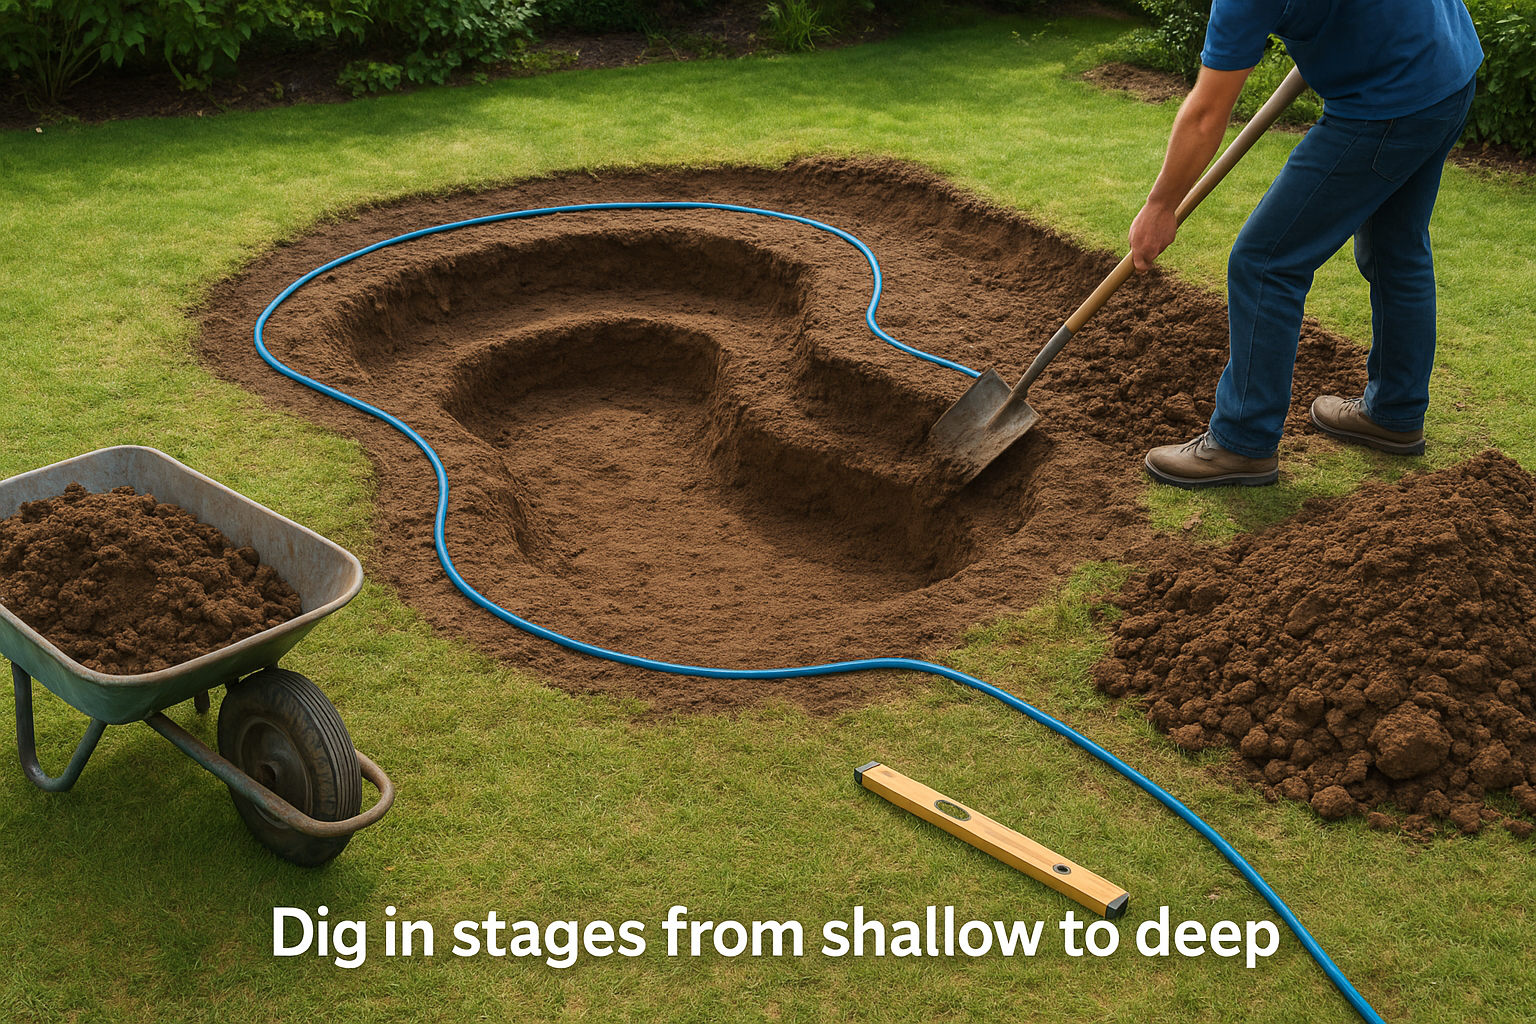
Move inward about 30 centimeters from the edge and mark your next depth zone. Excavate this central area to 45 centimeters deep for fish to swim comfortably. Keep the transition slope between shelf and deep zone at a gentle 20 degree angle so soil doesn't collapse and liner installs smoothly later.
Pile excavated soil in a wheelbarrow and move it away from the pond area immediately to prevent it from sliding back into your hole.
Check your depth measurements from the pond rim down, not from ground level, because this ensures accuracy when you build a garden pond. Malaysian clay soil compacts well and holds vertical walls, but sandy soil requires gentler slopes of 30 degrees to prevent cave-ins. Adjust your angles based on what you're digging through.
Create stable shelf levels
Your shelves need flat surfaces for planting baskets to sit without tipping. Smooth out each shelf platform using the back of your spade and remove any protruding rocks or roots that could puncture the liner. Each shelf should measure at least 25 centimeters wide to accommodate standard pond plant baskets.
Test the shelf levels by placing a board across them and checking with your spirit level. Uneven shelves cause plants to lean and make the finished pond look unprofessional. Compact loose soil gently with your foot and add or remove material until all surfaces sit perfectly horizontal.
Step 2. Install the underlay and pond liner
Your excavation is complete and now you protect the hole from punctures before adding the liner. The underlay acts as a cushion between sharp objects in the soil and your expensive pond liner, preventing tiny stones or roots from causing leaks over time. This protective layer represents the difference between a pond that lasts decades and one that fails within months.
Spread protective underlay across all surfaces
Pour a 3 centimeter layer of sand across the entire pond bottom and smooth it with your hands to create an even cushion. Press the sand firmly into corners and along shelf edges where pressure points typically develop. The sand fills small irregularities and creates a uniform base for the underlay fabric.
Drape your geotextile underlay or old carpet pieces across the sand layer. Overlap multiple pieces by at least 15 centimeters if your pond is larger than a single sheet. Press the material firmly against all surfaces including vertical walls and shelf edges so it doesn't shift when you build a garden pond liner installation on top.
The underlay investment of RM50 to RM100 protects your RM500 to RM800 liner from damage that would require complete reconstruction.
Position and unfold the liner properly
Center your folded EPDM liner over the pond hole before unfolding it. Recruit a helper to hold opposite corners because the liner becomes heavy and unwieldy once partially unfolded. Let the liner drape naturally into the excavation rather than forcing it into position.
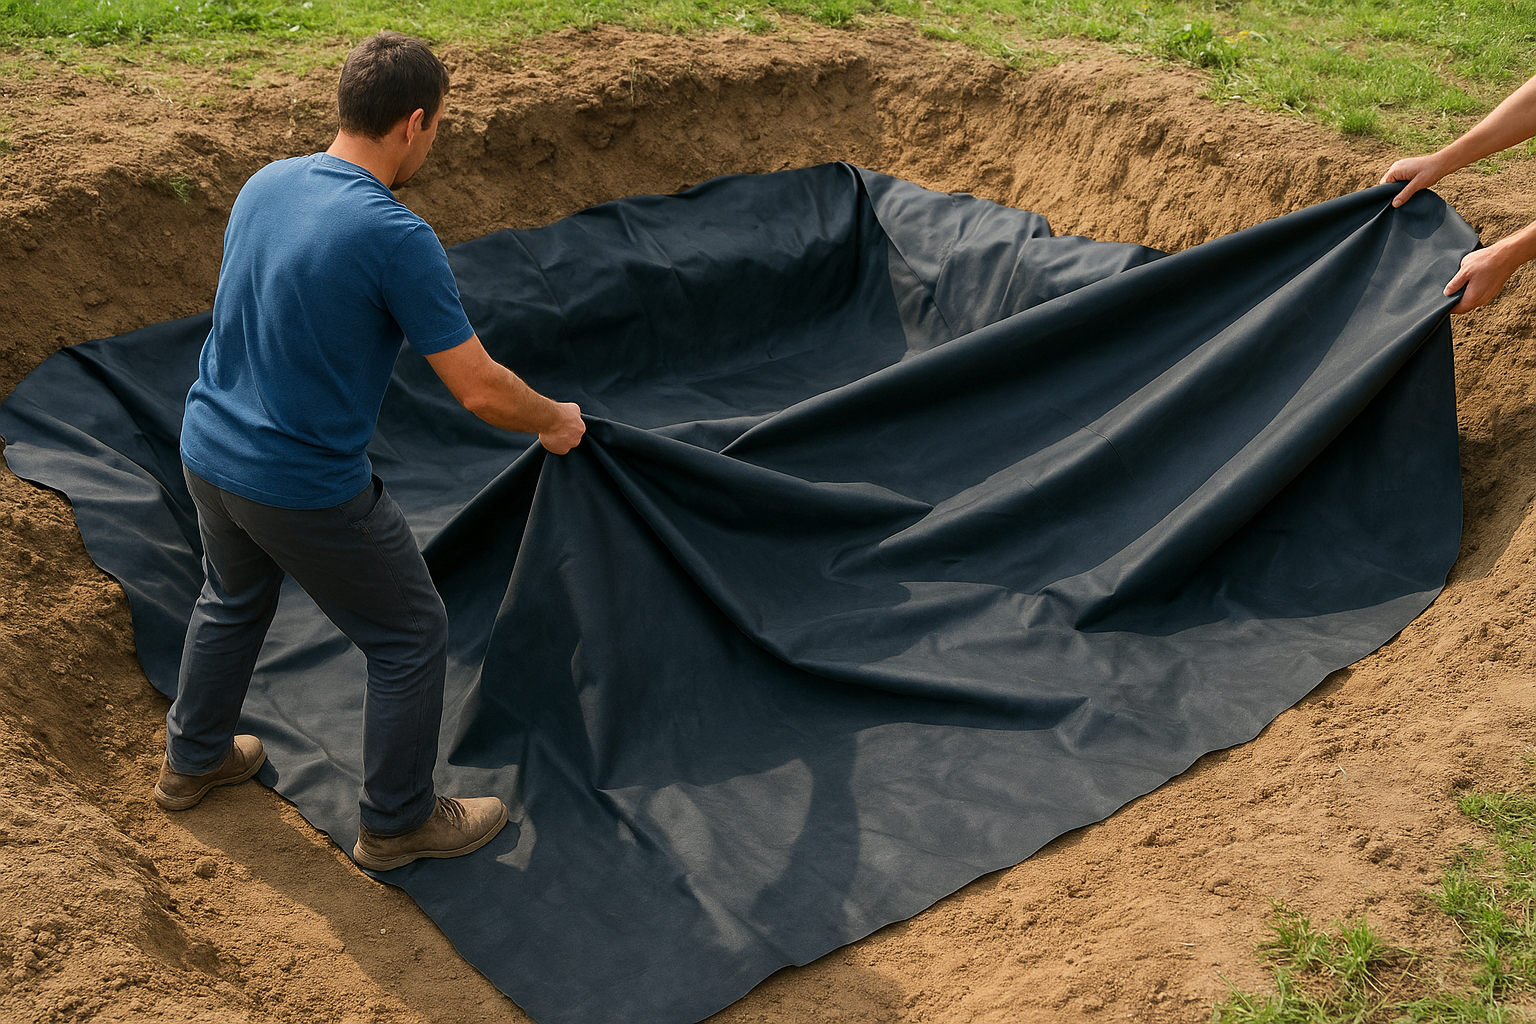
Allow equal overhang on all sides of the pond rim, measuring with your tape to ensure you have at least 50 centimeters extending beyond the edge in every direction. Adjust the liner position now before adding water weight makes repositioning impossible. The Malaysian sun softens EPDM rubber within 30 minutes, making it more pliable and easier to work with during installation.
Smooth out wrinkles and folds
Walk barefoot into the pond and press the liner against the bottom and sides, working from the center outward to eliminate air pockets. Create neat accordion style folds at corners rather than bunching the material randomly. Systematic folds look cleaner and reduce stress points where leaks could develop.
Place smooth river stones or bricks temporarily on the liner edges to hold everything in position while you work. Tuck excess material into natural contours and press it firmly against shelf surfaces. The liner should conform closely to your excavated shape without pulling tight across any area.
Step 3. Fill with water and secure the edges
Water transforms your excavation into an actual pond while revealing any adjustments needed before you finalize the installation. The filling process settles the liner into its final position and shows you exactly where the waterline will sit against your landscape. This step requires patience because rushing creates problems that become difficult to fix once the pond is full.
Fill gradually to settle the liner
Start filling from the deepest section using a garden hose positioned directly at the pond center to avoid disturbing the liner arrangement. Watch how the water weight pulls the material tight against all surfaces and eliminates remaining air pockets. Stop filling when water reaches the first shelf level, approximately 20 centimeters deep.
Walk around the pond perimeter and adjust any visible wrinkles or folds while the water pressure remains manageable. Pull gently on the liner edges to redistribute material and create smoother surfaces. Resume filling to the next depth level and repeat this adjustment process until water reaches 5 centimeters below your desired final level.
Allow the liner to settle for 2 to 4 hours before making final adjustments because the rubber continues stretching under water pressure.
The settling period lets you spot any areas where the liner pulls unevenly or where the waterline appears crooked. Add or remove water to achieve a level surface that sits at least 8 centimeters below the pond rim when you build a garden pond. This gap prevents overflow during Malaysia's heavy rainfall periods and provides space for edging materials.
Trim and secure the liner edges
Cut away excess liner material once the water settles, leaving exactly 30 centimeters extending beyond the waterline on all sides. Use a sharp utility knife and cut in smooth motions rather than sawing back and forth. The trimmed edge should follow your pond's natural contours while maintaining consistent overhang width.
Fold the 30 centimeter overhang back over itself to create a doubled edge that resists UV damage and provides extra durability where the liner transitions from wet to dry zones. This fold also raises the liner edge slightly above ground level, preventing soil and debris from washing into your pond.
Place heavy flat stones or concrete pavers directly on the folded liner edge to anchor everything permanently. Arrange stones so they overhang the water by 3 to 5 centimeters, hiding the liner completely while creating a clean finished appearance. Backfill behind the stones with soil to lock them in position and blend the pond naturally into your garden landscape.
Step 4. Install the filter and add plants
Your pond holds water but needs two critical components to maintain clarity and support life. The filtration system removes waste particles and harmful chemicals while plants absorb excess nutrients that would otherwise fuel algae growth. Together they create a balanced ecosystem that stays clean with minimal intervention when you build a garden pond properly.
Set up your filtration system
Place your submersible pump at the pond's deepest point where debris naturally settles so it pulls sediment into the filtration system effectively. Position the pump on a flat stone or brick to lift it 5 centimeters off the bottom, preventing it from sucking against the liner and reducing flow.
Connect the pump outlet hose to your biological filter positioned outside the pond at a slightly higher elevation than the water surface. Run the hose along the pond edge and hide it under your edging stones for a clean appearance. The filter should sit on stable ground where you can access it easily for monthly cleaning without disturbing surrounding plants.
Place the filter return outlet at the opposite end from the pump intake to create circulation that moves water across the entire pond surface.
Power the system and check that water flows smoothly through all connections. Adjust the pump flow rate to cycle your total pond volume once every two hours for optimal filtration in Malaysia's warm climate. A 1,500 liter pond needs a pump rated at 750 liters per hour minimum.
Select plants for different zones
Choose submerged oxygenating plants like hornwort or water sprite because they release oxygen directly into the water and absorb fish waste naturally. Bundle five stems together with a plant weight and drop them into the deep zone where they'll spread across the pond bottom.
Floating plants such as water lettuce or water hyacinth provide shade that cools the water and blocks sunlight that feeds algae. Place three to five plants on the surface to cover approximately 30 percent of the water area without overcrowding. These plants multiply rapidly in Malaysian conditions, so remove excess growth monthly to maintain balance.
Position marginal plants on shelves
Fill plastic pond baskets with aquatic soil and plant water lilies, lotus, or papyrus according to their specific depth requirements listed on plant labels. Water lilies need 30 to 45 centimeters of water above their pots while papyrus thrives in just 10 centimeters.
Lower each basket onto your prepared shelves and adjust positions until plants sit at their recommended depths. Space containers 40 centimeters apart to allow room for growth and ensure each plant receives adequate light exposure throughout the day.
Enjoying your new backyard oasis
Your pond is complete and ready to transform your outdoor living experience. Watch as birds discover the water source within days and dragonflies begin patrolling the surface by week two. The gentle sound of moving water creates a peaceful atmosphere that makes your garden feel larger and more private than before. Your plants will establish roots over the next month while fish adjust to their new environment.
Maintenance requires just 15 minutes weekly to remove fallen debris, check the pump filter, and top up water lost to evaporation in Malaysia's heat. Test water quality monthly during the first three months while your ecosystem establishes balance. As plants mature and beneficial bacteria colonize your filter media, the pond becomes increasingly self-sustaining with minimal intervention required.
Ready to upgrade or add a second feature to complement what you learned about how to build a garden pond? Our professional design team creates custom installations like the Zen Bio Koi Pond with advanced filtration systems and specialized materials suited for Malaysia's tropical climate.
